


Using your TV
18
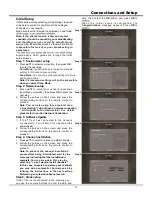
Manual, you should set date and time at Date
and Time item. Highlight Date or Time, press
OK to enter and then use 0-9 buttons and OK
buttons to change the date or time.
Note:
Time option will not be memorized when
turning on the TV next time, and the TV 's
time will start from the default.
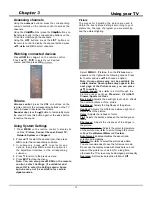
• Power on timer: Use
Ÿ
/
ź
to select Once,
Daily or Off. If you select Once or Daily, you
should set a time period after which the TV
automatically switches to on at Time below
this item. Highlight Time, press
OK
to enter
and then use 0-9 buttons and OK buttons to
change the time.
•
Power off timer: Use
Ÿź
to select Once,
Daily or Off. If you select Once or Daily, you
should set a time period after which the TV
automatically switches to off at Time below
this item. Highlight Time, press OKto enter
and then use 0-9 buttons and OK buttons to
change the time.
•
Sleep timer:
Sets a period of time after which
the TV set goes into standby mode. Use
Ÿź
to set the period (120 minutes maximum). To
disable this function, select
Off
.
•
Auto standby:
Sets a period of time after which
the TV set goes into standby mode. Use
Ÿź
to set the period. To disable this function, select
Off
.
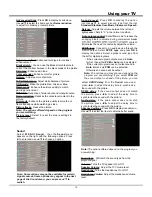
Lock:
This menu can control the special function for
TV channels.
Note:
You must enter your personal code before
entering the
Lock
menu.
Select
System > Lock
and press
OK
The factory
Then press remote number keys to enter password
to enter lock menu.
default code is
1234.
And the super password is
0423
.
If you forget your code, enter it to override any existing
codes.
The
Lock
options are as below:
•
Channel lock
: This option allows you to lock a
certain Channel. Use
Ÿź
to select a certain TV
channel you want to lock, then press OK to lock.
To unlock, use the same operation.
•
Input lock
: This option allows you to lock a
certain external source you want to lock. Press
OK to display Input lock menu, then press
Ÿź
to select a certain external source you want to
lock, and press OK to lock. To unlock, use the
same operation.
Note: when the current input is locked, you can
press OK and enter the password to enter.
•
Front panel lock
: Press
Ÿź
to select On to
lock the set's buttons.
•
Installation lock
: Press
Ÿź
to select On
to prevent access to the Installation menu to
prevent any channels from being set up without
your consent.
•
Change password
: This option allows you to
change the password. Press OK to enter, then
press OK to display the virtual keyboard, and
enter the new password twice.
•
Max volume
: Press OK to display the adjustment
bar and use
ŻŹ
to set the max volume when
watching program.
•
Clean all
: Press OK to enter, use
ŻŹ
to set
OK, clear all settings.
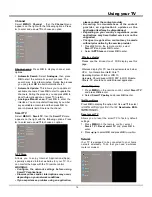
Input Settings:
Select
System > Input Settings
,
press
OK
to enter. User can select the device name of
the input source here, easy to identify the source.
Location:
Use
Ÿź
to select
Home
,
Shop
press
OK
to enter.
Auto source:
Press
OK
to enter, press
Ÿ
/
ź
to turn
On
or
Off
the auto source, and press
OK
Sports mode:
Enhance the picture quality of moving
picture.
LED Indicator
Allows you to select the LED indicator on the TV front
1. Press MENU
on the remote control, select
System >
LED Indicator
and press
OK
to enter.
2. Press
Ÿź
to select
Flashing
or
Normal
or
Off
and press
OK
Instant power on:
Press
OK
to enter, press
Ÿź
to turn
On
or
Off
the instant power, and press
OK
to
Reset
Allows you to reset the TV to factory default settings.
1. Press
MENU
on the remote control, select
System > Reset
and press
OK
to enter.
2. Use the numeric buttons to enter the password.
3. Press / to select
OK
and press
OK
4. The
Initial setup
menu appears. Follow the
instructions in the section
Initial setup
.


