background image

Sapido Technology Inc.                                                                                                                                       

www.sapido.com.tw


CS105x


User Manual


V2.2.X Android System


Smart Home Kit   

Security Alarm + Wireless Switch 


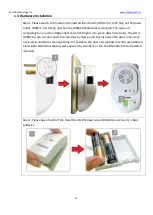
Product Introduction:


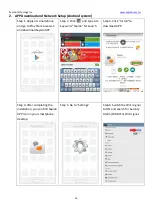
CS105x is easy to install to your home network. Download Sapido APP, you can enjoy the remote control 

the security system, receive the instant push notification from your handheld devices if it detects any 

abnormal movement and view the 30 seconds video gram recording. With IP Cam's built-in microphone & 

speaker and Sapido APP, you can take real-time action to set up alarm or broadcast your voice to intruders. 

Keep your home safe and secured.


With Smart Switch, you can do the power ON/OFF via Sapido APP Schedule Management Function. It provides 

electricity usage consumption and history record function to calculate electricity usage as the reference. Even 

you are in a frenzy of work, you can turn the electric appliances On/Off via your smartphone for saving energy 

and money, giving the experience of smart life with more convenience.


Summary of Contents for CS105x

Page 1: ...econds video gram recording With IP Cam s built in microphone speaker and Sapido APP you can take real time action to set up alarm or broadcast your voice to intruders Keep your home safe and secured With Smart Switch you can do the power ON OFF via Sapido APP Schedule Management Function It provides electricity usage consumption and history record function to calculate electricity usage as the re...

Page 2: ...nshot and Browse 63 6 3 Music Play 65 6 3 1 Add the music to USB drive of IP Camera 65 6 3 2 Play music in USB drive 67 6 3 3 Schedule Setup of Music Play 69 6 4 Setup for Alarm Siren 72 6 4 1 Add the siren alarm to IP Camera s USB 72 6 4 2 Schedule Setup for Alarm Siren 74 7 Smart Switch Application Instruction 77 7 1 Cloud Switch APP On Off and Schedule Set up 78 7 1 1 Set up Schedule of Power O...

Page 3: ... 115 11 1 5 Distributed Denial of Service DDoS 118 11 1 6 Login History 118 11 2 Download List How to manage the files of mobile device Smartphone Tablet 119 11 2 1 Document Browse 120 11 2 2 Rename 123 11 2 3 File Edit 124 11 2 4 Offline Browse 127 11 3 IOT Network To review IP Camera and USB device status 128 11 4 IOT Settings How to manage security device in system 132 11 4 1 How to auto update...

Page 4: ...e Power on is being applied on the device After 30 seconds the LED light will be green Green Wireless network is connected properly ZigBee LED Green Steady Security system working properly Flashing Alarm Door Window sensors and motion detector are mapping the connection Wireless Status Green Wi Fi signal normal WPS Status Orange Wi Fi signal extending Green Wi Fi signal extended successfully ...

Page 5: ... Cloud Motion Sensor MDKA0z Product Guide light Light Color Statue Instruction DDLA0z ZigBee Red Connecting with WDG71n Green Connected with WDG71n successfully Orange Low Battery MDKA0z ZigBee Red Connecting with WDG71n Green Connected with WDG71n successfully Orange Low Battery ...

Page 6: ...IPJC2n Guide light Light Color Statue Instruction Power Green IR Recording properly WAN Green Wireless network is connected properly LAN Green Wireless network is connected properly Wireless Status Green Wi Fi signal normal WPS Status Orange Wi Fi signal extending Green Wi Fi signal extended successfully ...

Page 7: ...ue Instruction WAN LAN Orange Power on is being applied on the device After 30 seconds the LED light will be green Green Wireless network is connected properly Manual Button Green Power ON No Light Power OFF Wireless Status Green Wi Fi signal normal WPS Status Orange Wi Fi signal extending Green Wi Fi signal extended successfully ...

Page 8: ...turn on off alarm manually Network Mode Switch Please switch to the R mode while the RJ45 cable is connecting to the xDSL modem and WDG71n Please switch to A mode while RJ45 cable is connecting to Sapido router and WDG71n Please switch to the W mode while connecting to Wi Fi network by Sapido router Please switch to the R mode while connecting to the network by other brand routers Reset Button Pre...

Page 9: ...otion Sensor MDKA0z and Cloud Door Window Sensor DDLA0z Product Button Statue Instruction DDLA0z Power Button ON Power On OFF Power Off ZigBee LED ZigBee signal connecting MDKA0z Power Button ON Power On OFF Power Off ZigBee LED ZigBee signal connecting ...

Page 10: ...e apply Switch Hub for extension USB Connectable Micro USD Power Port Please connect with Sapido adapter Volume Adjust the volume of speaker R A W Mode Switch to R mode connects between xDSL modem and IPJC2n Switch to A mode Connects between Sapido router and IPJC2n Switch to W mode Build WiFi bridge connection to Sapido router Connecting with other brand router via Ethernet cord please switch to ...

Page 11: ...work Mode Switch Please switch to the R mode while the RJ45 cable is connecting to the xDSL modem and WSG70n Please switch to A mode while RJ45 cable is connecting to Sapido router and WSG70n Please switch to the W mode while connecting to Wi Fi network by Sapido router Please switch to the R mode while connecting to the network by other brand routers RESET REBOOT Press over 10 seconds to factory ...

Page 12: ...turn on when ZigBee light and all LED lights turn green after 30 seconds The alarm WDG71n can not only deter the intruders by alert sound but also warn the owner about any unusual circumstances are happening For example the door and window to which are attached Cloud Door Window Sensors were opened by intruders or the Cloud Motion Sensor detected intruders Step 2 Please open the lid of the Cloud D...

Page 13: ...The interval of both parts is no longer than 1 cm You can also fasten the DDLA0z by the attached fasteners Step 4 Please turn on the power When the ZigBee light is blinking which means the DDLA0z is mapping with alarm WDG71n Once the Window is opened the alarm will start to have the alert sound Step 5 Please open the lid of the Cloud Motion Sensor MDKA0z and insert 2 x AAA batteries Before close t...

Page 14: ...tening the MKDA0z on the hallway or gate it will trigger the alarm WDG71n if someone approaches the MDKA0z Step 8 Put your IP Cam IPJC2n at your entrance or window to monitor anytime Power on turns red and blink to boot Step 9 Wait for 30 sec when and turns green the boot is succeed IP Cam will make alarm while both Window Door Sensor and Motion Sensor been detected ...

Page 15: ...There are two ways to make WiFi connection with Smart Switch WSG70n based on distance 1 Get started to make the WPS wireless Wi Fi connection of Security Alarm WDG71n and Smart Switch WSG70n Please press the WPS button on both Security Alarm Router WDG71n and WSG70n separately When both of the lights stop blinking it means the connection is completed 2 Get started to make the WPS wireless Wi Fi co...

Page 16: ...Store to search and download Sapido APP Step 2 Click and type into key word Sapido for search Step 3 Click Install to download APP Step 4 After completing the installation you can find Sapido APP icon in your smartphone desktop Step 5 Go to Settings Step 6 Switch the Wi Fi signal to ON and search for Security Alarm WDG71n WiFi signal ...

Page 17: ...our network domain security please click Change Password and enter the new password Then click New IOT to finish the process Now you have to enter your new password to access the domain security IOT name You can give your IOT Name in the blank Device Name The Device name will show up automatically doesn t need to change User name of Domain The account will show up automatically doesn t need to cha...

Page 18: ...do com tw 18 Step 11 Connecting Step 12 Click IOT Settings Step 13 Entered the IOT Settings you can see the security system is built up as below Security Alarm Door Window Sensor Motion Sensor IP Cam and Smart Switch Battery Status ...

Page 19: ... the new name click Apply to confirm Step 16 IP Camera has been shown with new device name Step 17 You can rename the name of device in IOT Setting Please select the Security Alarm router WDG71n first then click Rename Step 18 After entering the new name please click Apply then it will show the new name Step 19 The alarm WDG71n had been changed to the new name ...

Page 20: ...lease click Apply then it will show the new name Step 22 The Cloud Door Window Sensor DDLA0z_xxx had been changed to the new name Step 23 To rename the Cloud Motion Sensor Choose the Cloud Motion Sensor MDKA0z_xxx in IOT Setting first then click Rename Step 24 After entering the new name please click Apply then it will show the new name Step 25 The Cloud Motion Sensor MDKA0z_xxx had been changed t...

Page 21: ...IOT Settings Please click the Switch WSG70n first then click Rename Step 27 After entering the new name please click Apply then it will show the new name Step 28 The Switch WSG70n had been changed to the new name Step 29 After renaming click to control the remote PC and click to access GUI ...

Page 22: ...re sleeping or go out please set the shield as green which represents the security system is working Alarm Triggered When the security system was triggered the shield will turn red Click the shield from red to green to turn off the alert sound and stay security mode Security System Disarm To click the shield to turn gray represents turn off the security system ...

Page 23: ...rtphone and handheld devices using first this step will let you receive emergency messages successfully while you go out Follow the security system set up steps as below Step 1 Connect the Ethernet cable to WDG71n s WAN LAN port and switch to R mode while Ethernet cable is connecting to the xDSL modem and WDG71n modem mode ...

Page 24: ... setup operation Do not turn off or return Step 5 After the update the screen will subsequently goes back to Log In page you might directly connect to the network if you have 3G in your smartphone to make sure it is available for remote use as well Step 6 If your smart phone didn t have 3G network services please turn on Wi Fi of your smartphone and choose the network from WDG71n Enter the passwor...

Page 25: ...k is disconnected Red Event alert 2 The light symbols of the Cloud Security Green Security System Arm Gray Security System Disarm Red Alarm is triggered Empty No Installed or Security System offline 3 Change the password Key To change the password of domain 4 Trash Can Symbol To delete the domain Congratulations The Internet Setting of Cloud Security Alarm WDG71n is completed Please enter the Secu...

Page 26: ...n to enter the APP main page you will see the shield is red and the event alert will show up in front of the network name Meanwhile you can enter the Message to obtain the detail of event Ex 2nd Floor Window is opened and turn off the alert Moreover with 30 seconds real time recording and monitor the environment via Cloud Camera function Press Arm and Voice Sender to deter the intruder When everyt...

Page 27: ...Once it detects abnormal situation the alarm system will be activated Default of Door Window Sensor Step 1 Click Security Step 2 Click Door Window Sensor Step 3 Select your specific Door Window Sensor Step 4 You can see the message alert Speaker and Recording are selected already means that WDG71n will send you an alert message and make alert at the same time ...

Page 28: ... the Switch shown in red frame Step 6 Select Switch Mode Step 7 To face your needed you can choose ON OFF or Repeat mode of your Switch Step 8 After click Switch you will receive push notification and alarm will be triggered when window is opened Also 30 seconds recording and Switch will turn on at the same time ...

Page 29: ... mute the alarm The 2nd method to turn off the alarm Step 1 You will receive the push notification as the photo below Please click the push notification and enter to the security system in APP Step 2 You will see the event alert and the shield will turn red To mute the alarm just click the shield to return to green Step 3 Click Message to understand the situation immediately It will show the event...

Page 30: ...apido com tw 30 Step 4 Click Camera to view the situation of event right away Step 5 Click Arm once you find the intruder in the smartphone screen Volume adjustor Step 6 Also you can click Voice Sender once you find the intruder ...

Page 31: ...p 2 The event list is sorted by date and time You can turn off the alert when you reenter the event again to view the page with more detail Step 3 Click the silence sign to mute the alarm and click Record Video to view the 30 seconds recording Then back to the main list and enter Camera to view the real time monitor Step 4 Click Camera to view the situation of event right away Step 5 Click Arm onc...

Page 32: ...2 Step 6 Also you can click Voice Sender once you find the intruder Step 7 After disarming the shield will turn back to green Also the event alert will turn to the green dote which means that the alert is turn off but the security keep working ...

Page 33: ...Once it detects abnormal situation the alarm system will be activated Default of Cloud Motion Sensor MDKA0z Step 1 Click Security Step 2 Click Motion Sensor Step 3 Select your specific Cloud Motion Sensor Step 4 You can see the message alert Speaker and Recording are selected already means that WDG71n will send you an alarm notification and make alert at the same time ...

Page 34: ...t the Switch shown in red frame Step 6 Select Switch Mode Step 7 To face your needed you can choose ON OFF or Repeat mode of your Switch Step 8 After click Switch you will receive push notification and alarm will triggered when window is opened Also 30 seconds recording and Switch will turn on at the same time ...

Page 35: ...te the alarm The 2nd method to turn off the alarm Step 1 You will receive the push notification as the photo below Please click the push notification and enter to the security system in APP Step 2 You will see the event alert and the shield will turn red To mute the alarm just click the shield to return to green Step 3 Click Message to understand the situation immediately It will show the event li...

Page 36: ...apido com tw 36 Step 4 Click Camera to view the situation of event right away Step 5 Click Arm once you find the intruder in the smartphone screen Volume adjustor Step 6 Also you can click Voice Sender once you find the intruder ...

Page 37: ...p 2 The event list is sorted by date and time You can turn off the alert when you reenter the event again to view the page with more detail Step 3 Click the silence sign to mute the alarm and click Record Video to view the 30 seconds recording Then back to the main list and enter Camera to view the real time monitor Step 4 Click Camera to view the situation of event right away Step 5 Click Arm onc...

Page 38: ...8 Step 6 Also you can click Voice Sender once you find the intruder Step 7 After disarming the shield will turn back to green Also the event alert will turn to the green dote which means that the alert is turn off but the security keep working ...

Page 39: ...f sound temperature and light at home At the same time the Security Alarm Router WDG71n will send you an alert message to tell you the emergency immediately In addition you can control the situation by self via Sapido APP Click the push notification to enter the APP main page you will see the shield is red and the event alert will show up in front of the network name Meanwhile you can enter the Cl...

Page 40: ...d volume dB level will show on the right of the Sound Sensor page Step 4 Please click Warning Device Step 5 When it detects the abnormal sound in the space you will receive an alert message on your phone Meanwhile the alarm system will activate Please choose Notification Message and Sensor Alarm Step 6 For setting up the condition of the alarm trigger please click Sensor Alarm Device shown below i...

Page 41: ... a time Step 8 The preinstall alarm setting is continuity alarm means that the alarm will touch off when the intensity reaches the level of indoor maximum limit Sirens will continue beeping until you turn off the alarm manually If you want to change the setting to Define Alarm Sounds then you can adjust alarm sounding time under any abnormal movement such as 1 second 2 seconds 5 minutes etc ...

Page 42: ...ease press Done at the top right of the page to return to the sensing feature page Step 10 If you want your lights on while window is opened just select the Switch shown in red frame Step 11 Face your needed to setup dB for example higher than 60dB to make the Switch triggered Step 12 To face your needed you can choose ON OFF or Repeat mode of your Switch ...

Page 43: ...om tw 43 There are two ways to mute the alarm when the alarm WDG71n triggers alarm The 1st method to turn off the alarm If the alarm is triggered and you are at home you can press the ZigBee button of the alarm WDG71n to mute the alarm ...

Page 44: ...etails while the shield is red Please select the event again to view the page with more detail Step 3 Click the silence sign to mute the alarm and click Record Video to view the 30 seconds recording Then back to the main list and enter Camera to view the real time monitor Step 4 Click Camera to view the situation of event right away Step 5 Also you can click Voice Sender to talk to your child once...

Page 45: ...current in room temperature The preinstall measurement setting is Celsius Step 4 Click the Sensor Device Step5 Select the Notification Message and Sensor Alarm options you will receive a push notification on your phone and the alarm will make beeping sound when the temperature is in an abnormal situation Step 6 For setting up the condition of the alarm trigger by the limit of trigger temperature p...

Page 46: ... a time Step 8 The preinstall setting of Sensor Alarm is continuity alarm means that the alarm will touch off when the intensity reaches the level of indoor maximum limit Sirens will continue beeping until you turn off the alarm manually If you want to change the setting to Define Alarm Sounds then you can adjust alarm sounding time under any abnormal movement such as 1 second 2 seconds 5 minutes ...

Page 47: ...se press Done at the top right of the page to return to the sensing feature page Step 10 If you want your lights on while window is opened just select the Switch shown in red frame Step 11 Face your needed to setup Celsius for example higher than 60C to make the Switch triggered Step 12 To face your needed you can choose ON OFF or Repeat mode of your Switch ...

Page 48: ... There are two ways to mute the alarm when the Security Alarm Router WDG71n triggers alarm The 1st method to turn off the alarm If the alarm is triggered and you are at home you can press the ZigBee button of the alarm WDG71n to mute the alarm ...

Page 49: ...lert when you reenter the Event again to view the page with more detail Step 3 Click the silence sign to mute the alarm and click Record Video to view the 30 seconds recording Then back to the main list and enter Camera to view the real time monitor Step 4 Click Camera to view the situation of event right away Step 5 Also you can click Voice Sender to talk to your family members once you find out ...

Page 50: ... in room brightness Step4 Click the Siren Device Step5 Select the Notification Message and Sensor Alarm options you will receive a push notification on your phone and the alarm will make beeping sound when the temperature is in an abnormal situation Step 6 For setting up the condition of the alarm trigger please click Sirens Device shown below in red frame ...

Page 51: ...p 8 The preinstall setting of Sensor Alarm is continuity sounds means that the alarm will touch off when the intensity reaches the level of indoor maximum limit Sirens will continue beeping until you turn off the alarm manually If you want to change the setting to Define Alarm Sounds then you can adjust alarm sounding time under any abnormal movement such as 1 second 2 seconds 5 minutes etc ...

Page 52: ...press Done at the top right of the page to return to the sensing feature page Step 10 If you want your lights on while window is opened just select the Switch shown in red frame Step 11 Face your needed to setup brightness for example higher than 400 Lm to make the Switch triggered Step 12 To face your needed you can choose ON OFF or Repeat mode of your Switch ...

Page 53: ... There are two ways to mute the alarm when the Security Alarm Router WDG71n triggers alarm The 1st method to turn off the alarm If the alarm is triggered and you are at home you can press the ZigBee button of the alarm WDG71n to mute the alarm ...

Page 54: ...t to view the details while the shield is red Please select the event again to view the page with more detail Step 3 Click the silence sign to mute the alarm and click Record Video to view the 30 seconds recording Then back to the main list and enter Camera to view the real time monitor Step 4 Click Camera to view the situation of event right away Step 5 Click Arm once you find the intruder in the...

Page 55: ...Sapido Technology Inc www sapido com tw 55 Step 6 Also you can click Voice Sender to yield to intruder Volume adjustor ...

Page 56: ...a Step 2 Click the functional key Record Step 3 Setting please wait Step 4 When the recording starts you can find the red pot on the top left corner Step 5 Video will be automatically stored in the USB drive of IP camera please go View Videos for video browse Step 6 Videos will be sorted by date and time please directly choose the video you want to view ...

Page 57: ... goes back to the last page Rotating the device to enlarge for browse Step 9 Click Download if you want to back up the files to your smartphone or other devices Step 10 Video Downloading Step 11 Once download successfully and then you can play it Step 12 Downloaded files will be directly stored in Camera of Download List ...

Page 58: ...Sapido Technology Inc www sapido com tw 58 Step 13 Please Click Stop to stop recording Step 14 Click Apply and await Step 15 Once the red pot is disappeared the recording has been stopped ...

Page 59: ...ring day time or bedtime the operating method are as below Step1 Select Camera Step 2 Click Schedule in below Step 3 Click New to add new schedule Step 4 Cross day recording schedule of every 10pm to 6am of the next day Set up 1st recording schedule please first select Record Schedule and set up the start time at 22 00 and end time at 23 59 choose Everyday for Day and finally click Done for confir...

Page 60: ...not shut down the APP Step 7 After completing the schedule added the screen will automatically go back to home page Please click the network to log in Step 8 Click Camera Step 9 Click Schedule in below Step 10 You can find the schedule you just added Please again click New if you want to add new schedule ...

Page 61: ...ose Record Schedule and select start time at 00 00 end time at 06 00 and Everyday for Day and finally click Done for completion Step 12 Choose USB storage device Step 13 Please await do not shut down the APP Step 14 The APP screen will automatically go back to log in page after completing schedule added please click the network to log in ...

Page 62: ...o Technology Inc www sapido com tw 62 Step 15 Click Camera Step 16 Click Schedule in below Step 17 You can find the 2nd schedule added To modify the schedule please click To delete the schedule please click ...

Page 63: ...ep 3 Click View Picture to review the screenshot image Step 4 The images will be sorted by date please direct select the date you want to view Step 5 Image checklist will be listed in order by time sequence See left side to directly preview the image and click the image for full screen review Step 6 Click below Play icon to review all images in turn when browsing full screen image ...

Page 64: ...Sapido Technology Inc www sapido com tw 64 Step 7 Rotating the device to full screen review and click Exit to leave ...

Page 65: ...ble to store your favorite music in USB drive of IP Camera via Upload and bring you more options Step 1 Click Upload Step 2 Select My Files Step 3 Select the music you want to upload and click Change to choose path Step 4 Click your IP Camera device name nickname Step 5 Click New Folder Step 6 Rename the folder such as Music Folder and click Apply ...

Page 66: ...ido Technology Inc www sapido com tw 66 Step 7 Select the new added folder Step 8 Click Upload Step 9 Uploading Step 10 Upload succeeded Click Upload more files to upload more music or click Home to leave ...

Page 67: ...r your needed In order Play in order Repeat Repeat all selected music and play Timer Play in scheduled hours minutes and stop Step 5 If you want to play music for 2 hours and then stop please first select Schedule Mode and set up the time click Done to complete Step 6 First select the music you want to play or whole folder and click Play on the top right corner ...

Page 68: ...Sapido Technology Inc www sapido com tw 68 Step 7 In music play mode you can adjust the volume via Step 8 Click Stop to stop Step 9 Music play is stopped ...

Page 69: ...ic Play Step 1 Select Camera Step 2 Click Schedule Step 3 Click New Step 4 For example set up automatic music play at every 12 00 pm to 13 00 pm please first select Music Schedule mode and set the start time at 12 00 pm and end time at 13 00 pm and choose Everyday for Day ...

Page 70: ...ect the music or whole folder and then Done Step 7 Click Done in top right corner for completion Step 8 Please await for setting Do not turn off or return Step 9 Once the setup is done the screen will automatically go back to log in page Please again log in Step 10 Click Camera ...

Page 71: ...Sapido Technology Inc www sapido com tw 71 Step 11 Click Schedule in below Step 12 You can see the music schedule you just added in the checklist To modify please click To delete please click ...

Page 72: ...sirens to Siren folder of IP camera USB drive via Upload for more options 6 4 1 Add the siren alarm to IP Camera s USB Step 1 Click Upload Step 2 Select My Files Step 3 Select the music you want to upload and click Change to choose path Step 4 Click your IP Camera device name nickname Step 5 Click Alarm Siren Step 6 Click Upload ...

Page 73: ...Sapido Technology Inc www sapido com tw 73 Step 7 Uploading Step 8 Upload succeeded Click Upload more files to upload more music or click Home to leave ...

Page 74: ...er to 6 4 1 and enter into schedule setup to select the siren Step 1 Click Camera Step 2 Click Schedule in below Step 3 Click New Step 4 For example to set up the morning alarm at every 6 00 am please first select the mode as Siren Schedule and set the start time at 6 00 am end time at 6 05 am and select Everyday for Day ...

Page 75: ...pido com tw 75 Step 5 Select Alarm Step 6 Click Done Step 7 Settings please await do not turn off or return Step 8 After adding the schedule APP will automatically return to home page and click to log in again Step 9 Click Camera ...

Page 76: ...Sapido Technology Inc www sapido com tw 76 Step 10 Select Schedule in below Step 11 New added Alarm Schedules are showed in the checklist To modify please click To delete please click ...

Page 77: ...ons power consumption measurement power switch set up schedule making and start up timing with the specific electric appliance for historical electric information reference Also it provides the function of over heating protection Giving you a lifestyle with smart protection power saving and energy conservation You can turn on off the power directly click the power button on the Smart Switch WSG70n...

Page 78: ...power switch mode In addition you can operate the appliances in your house along with the set schedules of Smart Insight Switch through cycling time setting and schedule function to surely accompany with daily routine and fully saving the energy and cost 7 1 1 Set up Schedule of Power On Off Step 1 Click Switch Step 2 Click one specific electric appliance s power button at the right next to device...

Page 79: ...me of startup Step 6 If you want to change the Switch Mode to Repeat click Switch Mode Step 7 Click Repeat Step 8 Get Started to set up Repeat Condition for example let it power on for 3 minutes and turn off for 1 minute in 10 minutes as a period Click Done to finish setting Step 9 Back to the front page automatically and your electric appliance will follow the schedule you have set up ...

Page 80: ...at sign at the right next to the device name that means your setup was successful Now turn the repeat sign to red represents turn on the repeat mode Step 11 After ten minutes in a period the sign will turn to grey Step 12 If you want to stop the repeat mode click the sign and it will turn to grey ...

Page 81: ...pliances at home Smart Cloud Switch will give you an energy saving life style 7 1 2 1 Set Up Schedule of Power On Off Step 1 Click Switch Step 2 Select the specific electric appliance Step 3 Select Schedule Step 4 Click New on the top right corner to add your new schedule Step 5 There are three modes for power On Off OFF power off ON power on Repeat power on off circulation Step 6 If you want to s...

Page 82: ... up your schedule Step 8 Select Start End for example from 19 00 to 21 00 Click Done for saving and your Switch will follow the schedule for powering on off Step 9 Please wait for the set up operation Do not turn off or return Step 10 After setting up it will pop up on the main page of domain Step 11 Click Switch Step 12 Select the specific electric appliance ...

Page 83: ...To add a new schedule click New on the top right corner Step 16 Select the OFF time then select the days to turn off your electric appliance Step 17 Select Start End for example from 19 00 to 21 00 Click Done for saving and your switch will follow the schedule for power off Step 18 You can see your schedule is under the page To delete or edit the schedule click delete or edit button to do so ...

Page 84: ...rking in such the rule Turn on for 1 5 hours and turn off for 30 minutes within a 5 hours circle schedule on every Friday Please follow the steps below Step 1 Click Switch Step 2 Select the specific electric appliance Step 3 Select Schedule Step 4 To add a new schedule click New on the top right corner Step 5 Select the Repeat of Switch Mode Step 6 Set up the schedule like this ON 1 Hour and 10 mi...

Page 85: ...ting up it will pop up on the main page of domain Step 9 Click Switch Step 10 You will see the repeat sign at the right next to the device name and enter the specific electric appliance Step 11 Select Schedule Step 12 You can see your schedule is under the page To delete or edit the schedule click delete or edit button to do so ...

Page 86: ...tics Step 4 You can view the data of your specific electric appliance s total Day Week Month and Year power consumption like the picture below Step 5 To delete all the data before click Reset on the top right corner After deleting the device will show up the time of reset If you turn on the power button again the data measurement will restart from the reset time Step 6 You will see the reset data ...

Page 87: ...ep 2 Select the specific electric appliance Step 3 Click History Step 4 History record of your electric appliances power on off Cloud Switch Schedule Use schedule set up to turn on off power Mobile APP Switch Use mobile APP to turn on off power Button Press Button on the Smart Switch to turn on off power Step 5 To delete all the data click Reset Step 6 All history record were deleted ...

Page 88: ...ame place as CS105x Step 1 Go to Settings Step 2 Switch on Wi Fi of new device for searching Step 3 Select WiFi signal of Security Alarm WDG71n or IP Cam IPJC2n or Smart Switch WSG70n to connect Step 4 Type in the Security Password set by network creator and click Connect Step 5 Click Play Store and search Sapido APP or Sapido Step 6 Click Install ...

Page 89: ...istrator in column and click New IOT to log in Step 10 Connecting please await Step 11 Once log in is success handheld device could access the security system see below picture The device can control the security system and receive push notification anytime and everywhere once it is connected to internet Step 12 Click Back and return to home page and then you can see the network nickname set by th...

Page 90: ...Open the Sapido APP Step 2 Click New IOT Step 3 Device Name The Device name will show up automatically doesn t need to change User name of Domain The account will show up automatically doesn t need to change Password of Domain Need to enter the default password admin Step 4 The network is under connecting please wait Step 5 Log in successfully you can see the security system is built up Step 6 Bac...

Page 91: ...elow are the steps of how to cancel those functions 9 1 1 ZigBee Cloud Motion Sensor MDKA0z Step 1 Click Security Step 2 Click Motion Sensor Step 3 Enter the alarm system to the setting page Step 4 Cancel the Notification Message Once detected someone s movement you will not receive the push notification but alarm keeps working Step 5 Cancel the Sensor Alarm Once detected someone s movement alarm ...

Page 92: ...ation Message Once detected the door is opened you will not receive the push notification but alarm keeps working Step 5 Cancel the Sensor Alarm Once detected the door is opened alarm will not make the beeping sound but you will receive the push notification Step 6 Cancel all the function Once detected the door is opened you will not receive any message notification and the alarm will not make the...

Page 93: ...ensor MDKA0z Step 1 Click Security Step 2 Click Motion Sensor Step 3 Enter the alarm system to the setting page Step 4 Select the Sensor Alarm to the setting page shown below in red frame Step 5 Enter Alarm Setting to adjust the system Step 6 Choose one of the options as you like to set up the alarm type and time ...

Page 94: ... settle down alarm sounds and siren please press Done at the top right of the page to return to the sensing feature page Step 8 Select the Speaker to the setting page shown below in red frame Step 9 Enter Alarm Setting to adjust the system Step 10 Choose one of the options as you like to set up the alarm type and time ...

Page 95: ...hen settle down alarm sounds and siren please press Done at the top right of the page to return to the sensing feature page Step 12 Select the Video Record to the setting page shown below in red frame Step 13 Set up Video Save to Auto mode or other device for saving the 30 seconds video recording while alarm trigger ...

Page 96: ...k Security Step 2 Click Door Window Sensor Step 3 Enter the alarm system to the setting page Step 4 Select the Sensor Alarm to the setting page shown below in red frame Step 5 Enter the Sensor Alarm to adjust the system Step 6 Choose one the options as you like to set up the alarm type and time ...

Page 97: ... settle down alarm sounds and siren please press Done at the top right of the page to return to the sensing feature page Step 8 Select the Speaker to the setting page shown below in red frame Step 9 Enter Alarm Setting to adjust the system Step 10 Choose one of the options as you like to set up the alarm type and time ...

Page 98: ...hen settle down alarm sounds and siren please press Done at the top right of the page to return to the sensing feature page Step 12 Select the Video Record to the setting page shown below in red frame Step 13 Set up Video Save to Auto mode or other device for saving the 30 seconds video recording while alarm trigger ...

Page 99: ... center you can upload photos videos and files etc in your mobile device to USB drive for expanding your storage spaces and share to you family members at the same time Step 1 Click Upload Step 2 Click My Files Step 3 Tick the files you want to upload ex photos and click Change to select the path Step 4 Select your device name nickname Step 5 Click New Folder Step 6 Rename the folder such as Photo...

Page 100: ...ep 8 Click Upload Step 9 Uploading the files Step 10 Please click Upload more files after upload succeeded Step 11 Click Back to select other files ex video Step 12 APP will memorize the path of last upload click Upload without changing path or click Change to choose other path ...

Page 101: ...orize your recent 5 upload paths as the shortcut Step 14 If you want to upload to other path please select the device name nickname Step 15 Click Upload Step 16 Uploading Step 17 All file upload succeeded click Upload more files to upload other files or click Home to leave ...

Page 102: ...era Step 1 Click Download Step 2 Select your IP Camera device name nickname Step 3 Select the files you want to download ex video and click Download Step 4 Downloading Step 5 File download succeeded Step 6 You can select the files and click Play on the top right corner to browse the file ...

Page 103: ...nlarge the screen Step 8 Return to download succeeded page and click Download more files Step 9 Click right next to folder to set as My Favorite Step 10 Click Back to return to the device selected page and you will see My Favorite has been shown in download shortcut Click the folder to directly access the folder ...

Page 104: ... at top right corner Step 12 Downloading Step 13 File download succeeded You can see contracted photos select the files and click Play at top right corner to browse Step 14 During file play rotate the smartphone and tablet to enlarge the photo Click Exit to end the browse and return to download succeeded page ...

Page 105: ...l power point and pdf please first install related APP Step 1 Click Online Streaming Step 2 Click IP Camera device name nickname Step 3 Select the files you want to play mp4 and AVI are supported Step 4 During video play rotate the smartphone or tablet to enlarge the screen Click Exit at the top left corner to end and return to previous page Videos and music are in the same folder will be automati...

Page 106: ...o browse PPT file are taken as the example in below Step 6 Before opening the document the smartphone will ask you to apply APP for browse please select the APP choose Just once If you want to always browse the files via indicated APP please choose Always Step 7 Document browsing ...

Page 107: ...remote log in to check and see internet attack status 11 1 1 Client List Step 1 Click Network Security Step 2 Click Client List Step 3 is to set up the internet block time and make it block during a period Step 4 Select the start and end time of block in 24 hour time system and then select weekday and click Save to save Step 5 Setting please await Step 6 After setting APP will automatically log ou...

Page 108: ...rk Security Step 8 Click Client List Step 9 right next to block device is shown as light gray with ON block setting is succeeded Step 10 If you want to cancel the setup just directly push the device switch to OFF Step 11 Click Sure to confirm Step 12 Please await ...

Page 109: ...Step 14 Click Network Security Step 15 Click Client List Step 16 The clock symbol of block device has become dark gray with ON block setting is succeeded Step 17 If you want to unlock the block to a specific device please directly push the device switch to OFF Step 18 Click Apply to unlock and the device can be on line again ...

Page 110: ...wait Step 20 APP will automatically log out after finishing setting please again log in Step 21 Click Network Security Step 22 Click Client List Step 23 When the block switch of device shows as gray and clock symbol shows as light gray the device can be on line ...

Page 111: ...le Step 2 Enter into checklist and click New on top right corner Step 3 Select online start and end time in 24 hour time system Select Weekday and click Save to save Step 4 Setting please await Step 5 After the setting APP will automatically log out please again log in Step 6 Click Network Security ...

Page 112: ...Sapido Technology Inc www sapido com tw 112 Step 7 Click Wireless Schedule Step 8 You can review the list of wireless schedule and click edit or delete ...

Page 113: ...d Step 2 Enter the keyword you want to block such as yahoo and click New to confirm Step 3 Please await Step 4 APP will automatically log out after setting please again log in Step 5 Click Network Security Keyword Blocked Step 6 You can review the block list and new added keyword has been added ...

Page 114: ...words you want to unlock and click Unlock on top right corner Step 8 Please await Step 9 APP will automatically log out after setting please again log in Step 10 Click Network Security Step 11 Click Keyword Blocked Step 12 To review the block list and you can find the unlock keyword has been removed from list ...

Page 115: ...ecklist and select the device you want to review Step 3 To review all visit website checklist of device and you can select any of website and click Preview Step 4 You can first preview the visited website and decide if blocking the website or not Click Back to end Step 5 Again return to website checklist and select the website you want to block click Block in below to confirm Step 6 Setting please...

Page 116: ...lease again log in Step 8 Click Network Security Step 9 Click Website History Step 10 You will find added block website is appeared in below block list Step 11 To unlock the website please first select the website you want to unlock and click Unlock on top right corner Step 12 Setting please await ...

Page 117: ...Step 13 APP will automatically log out after setting please again log in Step 14 Click Network Security Step 15 Click Website History Step 16 You will see the website which is just unlocked has been removed from the block list Unlock is succeeded ...

Page 118: ...fter log in Step 2 Click DDoS Step 3 When your network is attacked you can review the attack type situation and time If there s no event the list will be blank 11 1 6 Login History Step 1 Log in IOT and click Network Security Step 2 Click Login History Step 3 You can review all device IP and log in date and time here ...

Page 119: ...rowse under network disconnect status Step 1 Click Download List to show all files Step 2 The files downloaded via Sapido APP will be automatically sorted by file format JPG MP3 AVI EXE and stored in first 5 folder ex JPG will be automatically stored in Picture folder If you never download any file via Sapido APP and no file would be showed those 5 folders Step 3 Photos and videos in Camera Roll a...

Page 120: ...upported Step 1 Click Camera Roll Step 2 Select the photos you want to browse Step 3 During photo browse click Exit to stop and return to the previous page Step 4 Rotating the smartphone or tablet to enlarge the screen click Exit to stop and return to previous page If the functional key are hidden after rotating just slightly touch the screen to show Step 5 Return to Download List and click My Fil...

Page 121: ... watch Step 8 During video play click Exit to stop and return to the previous page Step 9 Rotate the smartphone or tablet to enlarge the screen click Back to stop and return to the previous page If functional key is hidden after rotating it will be again appeared after rotate it back Step 10 Return to Download List page and click Music ...

Page 122: ...w functional bar Click Exit to stop and return to the previous page Step 12 Please again select the file your want to browse Step 13 Before document open your smartphone will ask which APP you want to apply for browse Please select APP and click Only Once If you want to always browse via this APP please click Always Step 14 Document browsing ...

Page 123: ...click Edit on top right corner Step 2 You will find the rename key and edit functional key appeared on the right and bottom side of page Step 3 Click the function key in the right hand side to rename the file Step 4 Enter new name and click Apply to confirm Step 5 Rename succeeded new name has been shown in checklist ...

Page 124: ...p 2 Function keys of Rename and Edit will appear in the right hand side and in the bottom cut copy paste folder and delete Step 3 You can do the file and data edit here please select the files you want to sort and click Cut Step 1 Step 4 Click Folder Step 5 Enter the name of new folder and click Apply to confirm Step 6 Select the new added folder ...

Page 125: ...lick Done to end the edit or click Back to continue other file edit Step 9 Return to the previous page and continue other edit Please select the file you want to copy and click below Copy Step 10 Copy the selected file to any folder of Download List or click Folder to add new folder Step 11 Enter the new folder and click Paste to paste your photos you have selected Step 12 Click Back to the front ...

Page 126: ...e other file edit Select the files you want to delete and click Delete in below function key Step 14 Again confirm whether to delete the file or not click Apply to confirm the delete Step 15 File delete succeeded To end the edit click Done on the top right corner Step 16 End up your editing ...

Page 127: ...cted the light indicator will become gray Please select the network Step 2 Connecting please await Step 3 Please click Offline Browse Step 4 After access the download list you can browse the video and music etc or click Edit on the top right corner to edit files Step 5 Edit function key cut copy paste folder and delete will appear in bottom side of page Refer to 11 2 3 File Edit for detail operati...

Page 128: ...nd review the connection status of IP camera USB drive and speaker Step 1 Click IOT Network Step 2 Internet connection type and USB device connection status will be showed in this page Click PPPoE Step 3 To review the IP information of IP Camera click Back to the previous page Step 4 Click Step 5 Click LAN Information Step 6 You can see IP address MAC address SSID and Encryption mode here ...

Page 129: ...etwork Security page Step 8 Please refer to 11 1 Network Security for detail function Click Back and return to IOT Network Step 9 Click IP Cam IPJC2n Step 10 You can see IP address MAC address SSID and Encryption mode here Step 11 Click to rename the IP Cam IPJC2n and click Apply to confirm Click Back and return to the Network Security page ...

Page 130: ...rst select the music you want to play and click Change to select the speaker device Step 14 Select IP Camera nickname Step 15 During music play click Exit to stop and return to network maps Step 16 Click USB driver to upload or download files Step 17 Click to upload see 10 1 Upload Click to download see 10 2 Download ...

Page 131: ...Sapido Technology Inc www sapido com tw 131 Step 16 Click Camera to go Camera Step 17 For the application of Camera please refer to 7 Application of IP Camera for details ...

Page 132: ... new name for your security system Please operate in the IOT Settings page The IOT Settings page offers several functions like rename and the symbols of Graphic User Interface GUI security sensor update and PC management You can view the detail of all the wireless devices and ZigBee s CS105x number name and battery ...

Page 133: ...e sensors click it and complete the updating Step 2 Click Sure before double check Step 3 Under connecting Do not turn off or log out Step 4 You will see Sensor Alarm Router WDG71n lights on green after updating Enter Sapido APP then log in your security network Sapido APP then log in your security network The latest firmware version is successfully upgraded ...

Page 134: ...f viewing firmware version today s date time time of power on and network status Also it can setup VPN SSID and so on Step 1 Select one of the sensors then click GUI on the top right corner Step 2 Enter the page of GUI You will see the page as same as when you viewing from computer Step 3 You can arrange the screen for easier watching ...

Page 135: ...r place more secure Below are the steps of make connection of all of your sensors at home Step 1 Please open the lid of the Door Window Sensor DDLA0z and insert 2 x AAA batteries Before close the lid switch the power to ON Step 2 Get started to connect WDG71n and ZigBee Press the ZigBee button on both Security Alarm Router WDG71n and Door Window Sensor DDLA0z separately once about 1 sec When the l...

Page 136: ...hen click IOT Settings Step 4 You will see the new DDLA0z under the page of IOT Settings Step 5 Please select the new DDLA0z then click Rename Step 6 Enter the new name and click Apply for easier manage events in the future Step 7 Under connecting Please wait Step 8 Complete DDLA0z setting with new name ...

Page 137: ...efore you will have a new camera and updating security system Step 1 Please switch to the W mode that located at the back side of IPJC2n while connecting to Wi Fi network by Sapido router Wait for about 30 seconds for starting up Step 2 Get started to make the WPS wireless Wi Fi connection of Security Alarm Router WDG71n Please press the WPS button on both Security Alarm Router WDG71n and IPJC2n s...

Page 138: ... the WPS button on both IP Cams IPJC2n separately When both of the lights stop blinking it means the connection and encryption are completed To connect more than 3pcs IPJC2n follow the step 2 as the same way for pressing the WPS buttons on each device Step 4 Enter Sapido APP then log in your security network then click IOT Settings Step 5 You can see the new IPJC2n device is already under the list...

Page 139: ...2n device Step 8 Under connecting Please wait Step 9 Complete IPJC2n setting with new name Step 10 Go back to the home page and click Camera for real time monitoring from your phone Step 11 Camera ten functions available below Step 12 Please go back to the home page and click Security and Sensor you will find the camera ...

Page 140: ... at your home 13 1 Wired network connecting Transfer to wireless network mode Step 1 Use the Ethernet Cable to hook up Sapido router and Sensor Router WDG71n and switch to the A mode Plug in To install Security Alarm Router WDG71n and Door Window Sensor DDLA0z please reference 1 2 Hardware Installation instruction Step 2 WAN LAN light will turn red to green while starting up About after 30 seconds...

Page 141: ... connecting to Wi Fi network by Sapido router Wait for about 30 seconds for starting up Step 4 Wait for 30 sec when and turns green the boot is succeeded Step 5 Switch the WSG70n to W network mode and Plug in Wait for 30 seconds to start up When Wireless WPS light turns to green which means the start up was successful ...

Page 142: ...they are closer to each other Please press the WPS button on both Security Alarm Router WDG71n and WSG70n separately When both of the lights stop blinking it means the connection is completed Step 7 Wait for 30 sec when and turns green the boot is succeeded Step 8 Open the Settings page on your phone Step 9 Turn on Wi Fi and search the signal of your sensor ...

Page 143: ...der to protect your network domain security please click Change Password and enter the new password Then click New IOT to finish the process Now you have to enter your new password to access the domain security IOT name of Domain You can give your IOT Name in the blank Device Name The Device name will show up automatically doesn t need to change User name of Domain The account will show up automat...

Page 144: ... will see all the Sapido routers and devices under connecting after enter the page of IOT Settings You can rename them Later on you will see all the devices with new name and battery status Step 17 Rename the router Select the router and click Rename Step 18 Enter the new name and click Apply then complete rename the router Step 19 The routers complete setting with new name ...

Page 145: ...click Apply then complete rename the IP Cam Step 22 Complete the IP Cam IPJC2n setting with new name Step 23 Rename the Security Alarm Router Select the Sensor Alarm Router and click Rename Step 24 Enter the new name and click Apply then complete rename the Security Alarm Step 25 Complete the Security Alarm Router WDG71n setting with new name ...

Page 146: ...ame and click Apply then complete rename the Door Window Sensor Step 28 Complete the Door Window Sensor DDLA0z setting with new name Step 29 Rename the Motion Sensor Select the Motion Sensor and click Rename Step 30 Enter the new name and click Apply then complete rename the Motion Sensor Step 31 Complete the Motion Sensor MDKA0z setting with new name ...

Page 147: ...art Switch setting with new name Step 35 After rename all devices please set up Wi Fi password to protect your network for Sensor Alarm Router WDG71n Select the sensor and click GUI on the top right Step 36 You will see IOT Network of the router Please select the type of encryption to WPA2 and enter the new password at least 8 characters numbers click Apply You can arrange the screen for easier wa...

Page 148: ...stem Arm Once you are sleeping or go out please set the shield as green which represents the security system is working Alarm Triggered When the security system was triggered the shield will turn red Click the shield from red to green to turn off the alert sound and stay security mode Security System Disarm To click the shield to turn gray represents turn off the security system ...

Page 149: ...ee lights and Wireless lights will turn on Step 3 Get started to make the WPS wireless Wi Fi connection of Sensor Alarm Router WDG71n Please press the WPS button on both Sensor Alarm Router WDG71n and Sapido router separately When both of the lights stop blinking it means the connection and encryption are completed To understand more about Motion Sensor MDKA0z and Door Window Sensor DDLA0z follow ...

Page 150: ... 5 Get started to make the WPS wireless Wi Fi connection of Sensor Alarm Router WDG71n Please press the WPS button on both Sensor Alarm Router WDG71n and IPJC2n separately When both of the lights stop blinking it means the connection and encryption are completed If they cannot auto make connection press RESET for 10 seconds to reset the IP Cam Step 6 Wait for 30 sec when and turns green the boot i...

Page 151: ...hen press the WPS key of Sapido router until the indicator blinks as well after both indicators stop blinking the wireless connection is succeeded and encryption is automatically done at the same time Step 8 Switch the Smart Switch to the W mode Wi Fi mode and plug in WAN LAN light will turn red to green while starting up About after 30 seconds Wireless lights will turn green means that starting u...

Page 152: ...ghts stop blinking it means the connection is completed If it is closer to the IP Cam then make the WPS wireless Wi Fi connection of IP Cam IPJC2n and Smart Switch WSG70n Please press the WPS button on both Smart Switch WSG70n and IPJC2n separately When both of the lights stop blinking it means the connection and encryption are completed Step 10 WAN LAN light will turn red to green while starting ...

Page 153: ... sapido com tw 153 Step 11 Open Settings of smartphone Step 12 Switch on Wi Fi and search WiFi signal Step 13 Get on Wi Fi from either Sensor Alarm Router WDG71n or other Sapido routers Step 14 Open Sapido APP and click New IOT ...

Page 154: ...in security IOT name of Domain You can give your IOT Name in the blank Device Name The Device name will show up automatically doesn t need to change User name of Domain The account will show up automatically doesn t need to change Password of Domain Need to enter the default password admin The Options of Changing Password You can change the password for your domain Step 16 Connecting please await ...

Page 155: ...nter the new name and click Apply then complete rename the router Step 21 The routers complete setting with new name Step 22 Rename the IP Cam IPJC2n Select the IPJC2n and click Rename Step 23 Enter the new name and click Apply then complete rename the IP Cam Step 24 Complete the IP Cam IPJC2n setting with new name ...

Page 156: ... click Apply then complete rename the Security Alarm Step 27 Complete the Security Alarm Router WDG71n setting with new name Step 28 Rename the Door Window Sensor Select the Door Window Sensor and click Rename Step 29 Enter the new name and click Apply then complete rename the Door Window Sensor Step 30 Complete the Door Window Sensor DDLA0z setting with new name ...

Page 157: ...ick Apply then complete rename the Motion Sensor Step 33 Complete the Motion Sensor MDKA0z setting with new name Security System finish set up already Step 34 Rename the Switch WSG70n_xxx Select the Switch and click Rename Step 35 Enter the new name and click Apply then complete rename the Switch Step 36 Complete the Smart Switch setting with new name ...

Page 158: ...are sleeping or go out please set the shield as green which represents the security system is working Alarm Triggered When the security system was triggered the shield will turn red Click the shield from red to green to turn off the alert sound and stay security mode Security System Disarm To click the shield to turn gray represents turn off the security system ...

Page 159: ... the security system still working while powering cut A3 The Security Alarm Router WDG71n has inserted lithium battery and both Motion Sensor MDKA0z and Door Window Sensor DDLA0z have inserted AAA batteries in order to remain the security system working So that when it detects the door is opened the alarm system will still on function However you cannot receive the alert message since there is no ...

Reviews: