background image

OPERATING THE UNIT

52


© 2021 SAPPHIRE 

SAPPHIRE Ice Machine Operator’s Manual

EXPECTING NORMAL SOUNDS

Your new ice machine may make sounds that are not familiar to you. Hard surfaces like the fl oor and 
walls can make the sounds seem louder than they actually are. The following describes the kinds of 
sounds that might be new to you and the source of those sounds: 

• 

Rattling noises may come from the fl ow of the refrigerant or the water line. Items stored on top of 
the ice machine can also make noises.

• The 

high-e

  ciency compressor may make a pulsating or high-pitched sound.

• 

Water running from the evaporator to the water reservoir may make a splashing sound.

• 

As each cycle ends, you may hear a gurgling sound due to the refrigerant fl owing in your ice 
machine.

• 

You may hear the sound of the condenser fan forcing air over the condenser. 

• 

During the harvest cycle, you may hear the sound of ice cubes falling into the ice bin.

DEALING WITH POWER FAILURE

Most power failures are corrected within a few hours and should not a

 ect the temperature of your ice 

machine if you minimize the number of times you open the ice machine door. If the power is going to 
be o

  for a longer period of time, take the proper steps to disconnect your appliance.

!

 WARNING

Failure to unplug the ice machine could result in electrical shock or personal injury.

OTE: 

N

When the ice machine is operating, the evaporator is only component that is cold to make ice. A power failure will 
only impact the machine making ice. The ice in the bin would slowly melt as normal.

Summary of Contents for SIIM15

Page 1: ...15 Clear Ice Machine Operator s Manual Individual SIIM15 Slab Cube Models SSIM15 With and Without Factory Installed Drain Pump Indoor ADA Outdoor Models ...

Page 2: ...accessories contain chemicals known to the state of California to cause cancer birth defects or other reproductive harm PRODUCT REGISTRATION INFORMATION Please record your model s information You will need to know this information whenever you call to request information or service The model s information appears on a serial number plate Model Number Serial Number You can register your appliance a...

Page 3: ...15 Inch Indoor Built In Cabinet Dimensions 10 SAPPHIRE 15 Inch ADA Height Compliant Built In Cabinet Dimensions 11 ELECTRICAL CONNECTION 12 AVOIDING USE OF EXTENSION CORDS 13 GRAVITY DRAIN MODELS 13 DRAIN PUMP MODELS 13 CONNECTING THE WATER SUPPLY 13 LEVELING THE UNIT 14 REVERSING THE DOOR 15 CUSTOM DOOR PANEL 17 15 Inch Indoor Solid Integrated Panel 18 15 Inch Indoor Framed Integrated Panel 19 15...

Page 4: ...Hours 31 Exiting or Stopping Quiet Mode 4 Hours 32 Setting Schedule Quiet Mode 33 Adjusting Ice Thickness 41 Enter Sabbath Mode 44 Exiting or Cancelling Sabbath Mode 45 Exiting the Menu 46 Clean Alert indicated 47 Filter Alert Indicated 48 Clearing Simple Error Codes 49 Error Codes That Require Contacting Customer Service 49 EXPECTING NORMAL SOUNDS 52 DEALING WITH POWER FAILURE 52 CARE AND MAINTEN...

Page 5: ...ABLE OF CONTENTS 3 2021 SAPPHIRE SAPPHIRE Ice Machine Operator s Manual Recommissioning the Unit 56 Starting Up the Unit 57 Cleaning the Condenser 57 TROUBLESHOOTING 58 DISPOSING THE UNIT 60 WARRANTY 61 ...

Page 6: ...TABLE OF CONTENTS 4 2021 SAPPHIRE SAPPHIRE Ice Machine Operator s Manual NOTES ...

Page 7: ...serious injury CAUTION Indicates a hazardous situation that if not avoided could result in minor or moderate injury NOTICE Indicates a situation that can cause damage to the appliance and or the environment or cause the appliance to operate improperly SAFETY PRECAUTIONS POWER CORD PRECAUTIONS Do not use the appliance if the power cord is damaged If the power cord is damaged have a qualified electr...

Page 8: ...use this appliance if they have been given supervision or instruction concerning use of the appliance in a safe way and they understand the hazards involved Never allow children to operate play with or crawl inside the appliance Never allow children to clean and maintain the machine without supervision Do not use the appliance other than for its intended purpose Do not touch the condenser surfaces...

Page 9: ...arvesting Rated Current 2 4 2 4 amps Ice Quantity per Cycle 24 Ice Production Capacity at 70 F 21 C 68 lb 31 kg per Day 63 lb 28 5 kg per Day Ice Storage 25 lb 11 kg SAPPHIRE 15 INCH SLAB CLEAR ICE FEATURES 15 INCH INDOOR SLAB CUBE ICE MACHINE WITH PUMP 15 INCH ADA INDOOR SLAB CUBE ICE MACHINE WITH PUMP Electrical Requirement 115V 60Hz Maximum Amp Fuse 15 amp Power Consumption 9 93 kWh 100 lb 45 4...

Page 10: ...ordinances The fuse or circuit breaker size should be 15 amperes for 115V The manufacturer recommends that you provide a separate circuit that services only your appliance Use receptacles that cannot be turned off by a switch or pull chain Plug the appliance into a grounded three prong outlet Do not remove the grounding prong do not use an adapter and do not use an extension cord Do not kink pinch ...

Page 11: ...pport the unit when the unit is full Keep the ice machine level to help ensure it works properly Keeping an ice machine on an unlevel surface may cause water to flow improperly through the evaporator ice mold and will reduce ice production You may need to make several adjustments to level the unit If necessary adjust the height of the ice machine by turning the feet See Leveling the Unit on page 1...

Page 12: ...earance for water drain and electrical connections in the rear of the unit BUILT IN CABINET DIMENSIONS A built in installation requires for a water line and plug clearance for proper operation A built in unit is designed for zero clearance at the top and each side of the unit The unit uses fan forced condenser cooling which requires air circulation through the lower section of the unit OTE N To en...

Page 13: ...Ensure that the air path for the grill remains unrestricted Any restriction of airflow through the grill will disrupt normal operation of the unit resulting in damage to components and voids warranty Connect the unit to a potable water supply only The minimum distance the unit needs to be installed when adjacent to a wall is 7 5 in 190 mm is required to obtain full swing 135 of the door and 2 75 i...

Page 14: ...d with a properly grounded three prong wall outlet Always plug the appliance into its own individual electrical outlet The voltage rating of the outlet must match the rating label on the appliance This match provides the best performance and also prevents overloading the electrical circuits which could cause a fire hazard from overheated wires Never unplug your appliance by pulling on the power co...

Page 15: ...lugged into the outlet 2 Place the drain hose into a suitable container that can hold at least one gallon 3 Pour one gallon of water into the ice storage bin 4 Plug the power cord into a properly grounded polarized electrical outlet 5 The drain pump should start and pump the water into the container 6 Unplug the power cord CONNECTING THE WATER SUPPLY 1 Turn off the main water supply Turn on the nea...

Page 16: ...tap Check for leaks in the water supply connection Tighten all connections LEVELING THE UNIT The appliance requires leveling before it can work properly If necessary raise or lower the unit by turning the four leveling feet on the bottom The manufacturer recommends using a carpenter s level to check the appliance ...

Page 17: ...ng feet as follows Turn the leveling feet to the right to lower that side of the appliance Turn the leveling feet to the left to raise that side of the appliance REVERSING THE DOOR This appliance has the capability of the door opening from either the left or right side The appliance is delivered to you with the door opening from the left side Follow these instructions should you desire to reverse ...

Page 18: ... turns in the left side outer top and bottom screw locations 5 Lift the door off the partially loosened right side screws Rotate the door and position it on the two partially installed left side screws 6 Finish removing the outer top and bottom screws from the right side hinges Install these screws in the open holes in the left side hinge location Tighten all screws ...

Page 19: ...ual 7 Install the plugs into the four open holes on the right side CUSTOM DOOR PANEL A custom door panel frame can be fabricated for the appliance Handle hardware must also be provided if needed Finish all sides of the custom panel They may be visible when the door is open ...

Page 20: ...INSTALLING THE UNIT 18 2021 SAPPHIRE SAPPHIRE Ice Machine Operator s Manual 15 INCH INDOOR SOLID INTEGRATED PANEL P ...

Page 21: ...INSTALLING THE UNIT 19 2021 SAPPHIRE SAPPHIRE Ice Machine Operator s Manual 15 INCH INDOOR FRAMED INTEGRATED PANEL ...

Page 22: ...RE SAPPHIRE Ice Machine Operator s Manual 15 INCH ADA HEIGHT COMPLIANT INTEGRATED DOOR PANEL INSTALLING THE CUSTOM DOOR PANEL 1 Remove the door from the unit 2 Remove the door seal to gain access to the custom door panel mounting holes ...

Page 23: ...hine Operator s Manual 3 Align the top of the custom door panel flush with the top of the door 4 Adjust the overlap of the custom door panel so it is equal on both sides of the door 5 Secure the custom door panel to the door using six wood screws provided ...

Page 24: ...ance for securing into an adjacent cabinet INTEGRATED GRILL PLINTH An integrated grill plinth can be fabricated if desired The thickness of the panel should be between in to 3 8 in 6 mm to 9 mm and the height will vary between 3 5 16 in to 4 5 16 in 84 mm to 110 mm depending on you grill grille plinth height 1 4 3 8 in 6 9 mm 3 5 16 4 5 16 in 84 110 mm Double Sided Tape Back Side OTE N When finish...

Page 25: ...ine message appears on the control panel In areas with hard water cleaning may have to be more frequent Never touch the evaporator when the unit is running Keep the door closed to reduce ice melting and to promote proper ice formation Open the door only when taking ice from the appliance Turn on the water supply tap before switching on the ice machine Never turn the water supply tap off when the ic...

Page 26: ...nual Individual Ice Slab Ice 1 1 4 32 mm 1 1 8 29 m m 1 1 8 29 mm 7 8 22 mm 7 8 22 mm 7 8 22 mm USING THE CONTROLS The control panel is located at the top of the appliance OTE N You have 30 seconds to make a control change before the display reverts to the default screen ...

Page 27: ...T 25 2021 SAPPHIRE SAPPHIRE Ice Machine Operator s Manual TURNING THE UNIT ON 1 Press the ON OFF button 2 The ice machine powers up and displays ICE TURNING THE UNIT OFF 1 Press the ON OFF button and hold for 3 seconds ...

Page 28: ...OPERATING THE UNIT 26 2021 SAPPHIRE SAPPHIRE Ice Machine Operator s Manual 2 The ice machine powers off and nothing is displayed ENTER THE DISPLAY OF MENU ITEMS 1 Press the ENTER button ...

Page 29: ...or s Manual 2 The display shows the first menu item CLEAN ICE MACHINE 3 Scroll to the next menu item by pressing the DOWN ARROW button 4 Scroll to the next menu item by pressing the DOWN ARROW button 5 Scroll to the next menu item by pressing the DOWN ARROW button ...

Page 30: ...Ice Machine Operator s Manual 6 Select the desired setting by pressing the ENTER button 7 To exit the menu scroll down to EXIT MENU then press the ENTER button OTE N Once a menu item is selected it takes the user directly to the particular setting ...

Page 31: ...E SAPPHIRE Ice Machine Operator s Manual RUNNING THE CLEAN ICE MACHINE CYCLE 1 Press the ENTER button to enter the menu 2 Press the ENTER button to select CLEAN ICE MACHINE 3 To CONFIRM the CLEANING function press the ENTER button again ...

Page 32: ...PHIRE SAPPHIRE Ice Machine Operator s Manual 4 The display shows CLEANING and the time remaining for the CLEAN ICE MACHINE cycle to complete OTE N Once the CLEAN cycle has completed the display reverts back to the default ICE screen ...

Page 33: ...DE 4 HOURS 1 Press the ENTER button to enter the menu 2 Scroll down to TURN ON QUIET 4 HOURS setting and press the ENTER button 3 QUIET MODE is set and new ice production is now suspended for 4 hours OTE N QUIET MODE 4 HOURS suspends ice production for 4 hours and otherwise functions normally ...

Page 34: ...Operator s Manual EXITING OR STOPPING QUIET MODE 4 HOURS 1 Press the ENTER button to enter the menu 2 Scroll down to TURN OFF QUIET 4 HOURS setting and press the ENTER button 3 The display reverts back to the default ICE screen and is no longer in QUIET mode ...

Page 35: ... THE UNIT 33 2021 SAPPHIRE SAPPHIRE Ice Machine Operator s Manual SETTING SCHEDULE QUIET MODE 1 Press the ENTER button to enter the menu 2 Scroll down to the SCHEDULE QUIET MODE setting 3 Press the ENTER button ...

Page 36: ... then prompted to set the clock time first prior to setting the desired SCHEDULE QUIET MODE setting pressing the ENTER button 5 The display will show the clock at 00 00 and prompt the user to set the hour with the hour position flashing the 00 6 Using the UP DOWN arrow button set the HOUR ...

Page 37: ...HIRE Ice Machine Operator s Manual 7 Once the HOUR is set press the ENTER button and the display will show the minutes position blashing the 00 8 Using the UP DOWN arrow button set the MINUTES 9 Once the MINUTES are set press the ENTER button ...

Page 38: ...AM or PM and the AM PM will flash until the user makes the selection 11 Once the AM PM is set press the ENTER button 12 Once the time is properly set the display prompts the user to set the START TIME HOUR for the SCHEDULE QUIET MODE pressing the UP or DOWN arrow and the display will show the hour section flashing 00 ...

Page 39: ... Machine Operator s Manual 13 Using the UP DOWN arrow button set the START TIME HOUR 14 Once the HOUR is set press the ENTER button and the display will show the minutes section flashing 00 15 Using the UP DOWN arrow button set the START TIME MINUTES ...

Page 40: ...Ice Machine Operator s Manual 16 Once the MINUTES are set press the ENTER button 17 Using the UP DOWN arrow button select START TIME AM or PM and the AM PM will flash until the user makes a selection 18 Once the AM PM is set press the ENTER button ...

Page 41: ...TIME is properly set the display prompts the user to set the END TIME HOUR for the SCHEDULE QUIET MODE pressing the UP or DOWN arrow and the display will show the hours section flashing 00 20 Using the UP DOWN arrow button select the END TIME HOUR 21 Once the HOUR is set press the ENTER button ...

Page 42: ...Using the UP DOWN arrow button set the END TIME MINUTES and the display will show the minutes sectin flashing 00 23 Once the MINUTES are set press the ENTER button 24 Using the UP DOWN arrow button select END TIME AM or PM and the AM PM will flash until the user makes a selection ...

Page 43: ...roduction is suspended for the scheduled duration The display will show QUIET the crescent moon icon and the time set OTE N QUIET will display ONLY during the set duration of QUIET MODE Otherwise the display will show the default ICE screen Additionally the crescent moon icon will display ONLY when in SCHEDULED QUIET MODE ADJUSTING ICE THICKNESS 1 Press the ENTER button ...

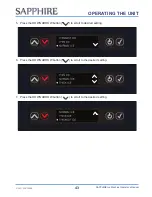
Page 44: ... SAPPHIRE SAPPHIRE Ice Machine Operator s Manual 2 Scroll to ADJUST ICE THICKNESS and press the ENTER button 3 Press the UP or DOWN ARROW button to scroll to desired setting 4 Press the ENTER button to scroll to desired setting ...

Page 45: ...PPHIRE SAPPHIRE Ice Machine Operator s Manual 5 Press the DOWN ARROW button to scroll to desired setting 6 Press the DOWN ARROW button to scroll to the desired setting 7 Press the DOWN ARROW button to scroll to the desired setting ...

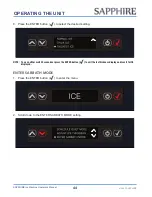
Page 46: ...s the ENTER button to select the desired setting OTE N You can either wait 30 seconds or press the ENTER button to exit the ice thickness display and revert to ICE displayed ENTER SABBATH MODE 1 Press the ENTER button to enter the menu 2 Scroll down to the ENTER SABBATH MODE setting ...

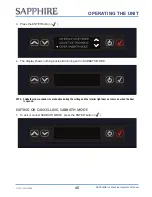
Page 47: ... button 4 The display shows nothing but is still running and in SABBATH MODE OTE N Sabbath mode suspends ice production during the setting and the interior light does not come on when the door is opened EXITING OR CANCELLING SABBATH MODE 1 To exit or cancel SABBATH MODE press the ENTER button ...

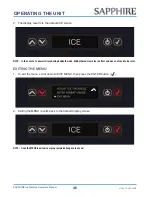
Page 48: ...N In the event of a power failure during Sabbath mode Sabbath mode remains in effect and does not need to be reset EXITING THE MENU 1 To exit the menu scroll down to EXIT MENU then press the ENTER button 2 Exiting the MENU reverts back to the default display screen OTE N Once the MENU is exited user programmed changes are saved ...

Page 49: ...TED 1 When the ice machine recognizes that cleaning is needed CLEAN ICE MACHINE will be displayed The user must press the ENTER button 2 To CONFIRM the CLEANING function press the ENTER button again 3 The display shows CLEANING and the time remaining for the CLEAN ICE MACHINE cycle to complete ...

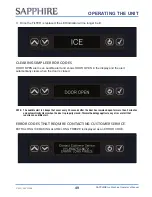
Page 50: ... When the ice machine has completed the CLEAN cycle the default ICE screen will display FILTER ALERT INDICATED 1 When the ice machine recognizes that the filter needs to be replaced the FILTER indicator LED will automatically light 2 Replace the old dirty FILTER with a new one ...

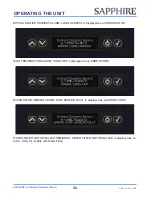
Page 51: ... the alert automatically clears when the door is closed OTE N The audible alert is 3 beeps that occur every 30 seconds after the door has remained open for more than 2 minutes and automatically clears when the door is properly closed This methodology applies to any error or alert that requires an audible alert ERROR CODES THAT REQUIRE CONTACTING CUSTOMER SERVICE EXTRA LONG ICE MAKING ALARM LONG FR...

Page 52: ...played as an ERROR CODE 1 866 754 6672 HIGH TEMPERATURE ALARM COND HOT is displayed as an ERROR CODE 1 866 754 6672 EVAPORATOR SENSOR ALARM EVAP SENSOR FAULT is displayed as an ERROR CODE 1 866 754 6672 WATER FILTER NOT INSTALLED REMINDER WATER FILTER NOT INSTALLED is displayed as an alarm Only for models with Water Filter ...

Page 53: ...yed as an ERROR CODE 1 866 754 6672 WATER SHORTAGE ALARM WATER FAULT is displayed as an ERROR CODE 1 866 754 6672 DRAINAGE FAULT ALARM DRAINAGE FAULT is displayed as an ERROR CODE 1 866 754 6672 BIN SENSOR FAULT ALARM BIN SENSOR FAULT is displayed as an ERROR CODE Only for Ice Shot Glass Models 1 866 754 6672 BIN SENSOR FAULT ...

Page 54: ...cycle ends you may hear a gurgling sound due to the refrigerant flowing in your ice machine You may hear the sound of the condenser fan forcing air over the condenser During the harvest cycle you may hear the sound of ice cubes falling into the ice bin DEALING WITH POWER FAILURE Most power failures are corrected within a few hours and should not affect the temperature of your ice machine if you min...

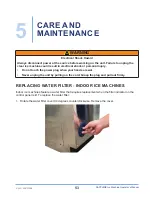
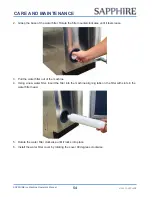
Page 55: ...ectrical shock or personal injury Do not touch the power plug when your hands are wet Never unplug the unit by pulling on the cord Grasp the plug and pull out firmly REPLACING WATER FILTER INDOOR ICE MACHINES Indoor ice machines feature a water filter that requires replacement when the filter indicator on the control panel is lit To replace the water filter 1 Rotate the water filter cover 90 degre...

Page 56: ...erclockwise until it feels loose 3 Pull the water filter out of the machine 4 Using a new water filter insert the filter into the machine aligning tabs on the filter with slots in the water filter head 5 Rotate the water filter clockwise until it locks into place 6 Install the water filter cover by rotating the cover 90 degrees clockwise ...

Page 57: ...ct plumbing connections to ensure that no leaks exist Disconnect the water supply hose if the ice machine will not be used for a long period of time Never keep anything in the ice storage bin that is not ice Objects such as wine and beer bottles are not sanitary CLEANING THE UNIT S EXTERIOR Clean the door and cabinet with a mild detergent and warm water solution such as 1oz 28 g of dish washing li...

Page 58: ... 2 Disconnect the water supply line from the water inlet of the ice machine 3 Turn off the electric supply at the main power source Remove the power cord from the electrical outlet 4 Remove any remaining ice from the storage bin 5 Press and hold the UP and DOWN buttons together for at least 3 seconds to open the drain valve or enter the service menu to open the drain valve and then drain all water ...

Page 59: ... or less under normal conditions CLEANING THE CONDENSER WARNING Electrical Shock Hazard Always disconnect the power at the source before working on the unit CAUTION Sharp Object Hazard DO NOT touch the condenser surface The condenser has sharp edges and can be easily damaged A dirty or clogged condenser prevents proper airflow reduces ice making capacity and causes higher than recommended operatin...

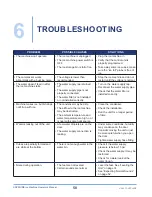
Page 60: ...the water filter is installed correctly Machine makes ice but bin does not fill up with ice The condenser may be dirty The airflow to the ice machine may be obstructed The ambient temperature and water temperature are high or it is near with some heat source Clean the condenser Check the installation Run the unit for a longer period of time Water is leaking out of the unit A few water droplets are...

Page 61: ...phire Service Department The recommended water pressure is 58 psi Pressures must not fall below 15 psi and static pressure must not exceed 80 psi The ice machine stops suddenly while making ice The electricity is off The room temperature is out of the stated range Reconnect the power supply line Cut off the electricity and let the ice machine stop working until the temperature returns within the sta...

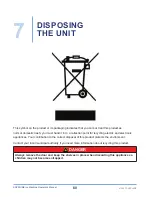
Page 62: ... must hand it in to a collection point for recycling electric and electronic appliances Your contribution to the correct disposal of this product protects the environment Contact your local municipal authority if you need more information about recycling this product DANGER Always remove the door and keep the shelves in place when discarding this appliance so children may not become entrapped ...

Page 63: ...and made in lieu of all other warranties including any implied warranties or any warranties of merchantability or fitness for a particular purpose FILING WARRANTY CLAIMS All warranty claims for SAPPHIRE products must be made directly through The Legacy Company s Technical Service Department All claims should include model and serial number proof of purchase date of installation location purchased ...

Page 64: ...o or resulting from ordinary wear and tear handling abuse misuse or harsh chemical action nor shall it extend to any product from which the serial number has been removed or altered or modifications made by unauthorized service personnel or damage by flood fire earthquake or other Acts of God OUTSIDE U S CANADA This warranty does not apply to and SAPPHIRE and The Legacy Companies are not responsib...

Page 65: ......

Page 66: ...ces com 866 754 6672 SAPPHIRE Appliances The Legacy Companies 3355 Enterprise Avenue Suite 160 Weston FL 33331 The Beautiful Adaptable Sapphire bellied Hummingbird Lepidopyga lilliae Sapphie 2021 091421 P N 15IM 1 21 ...

Reviews: