background image

4. Select SmartMic MTV500 as the input/output device on your computer.

6. Choose an appropriate pick-up pattern and keep a certain distance before you 
recording.

5. 

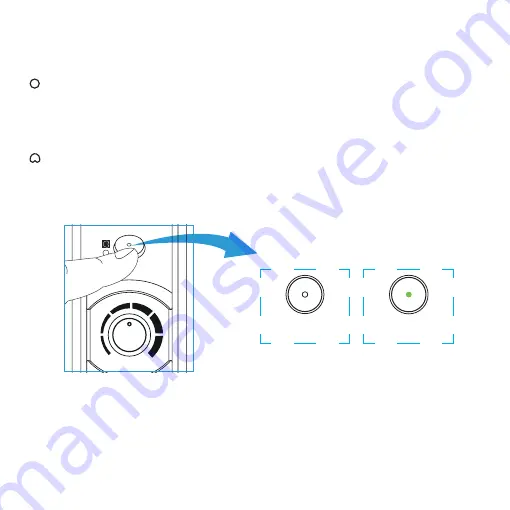
Polar Pattern Introduction

     Omnidirectional  
Pick up sound equally from all directions, capturing a natural blend of voice and 
ambiance with low sensitivity to wind and handling noise, as well as to vocal 
plosives.

     Cardioid 
Maximizes the rejection of sound coming from the sides and rear of the mic and 
can be used as a directional microphone to capture full, rich, natural-sounding 
audio for podcast, speech, dialog, instrument etc.

Omnidirectional

(Lights off)


GAIN

Cardioid

(Solid Green Light)

7. You are ready to record. (The headphone jack supports the real-time monitoring, 
so you can secure the intelligibility of audio.)

Summary of Contents for SmartMic MTV500

Page 1: ...SmartMic MTV500 USB Desktop Microphone USB 桌面式麦克风 User Manual 鋀宔寯㘄 ...

Page 2: ...pay attention to dust and moisture 4 Be careful to violent collision 5 To avoid acoustical feedback do not hold the microphone close to the loudspeakers 6 For the best pick up pattern do not hold your hand against the microphone cover Statement Cautions Please read this manual carefully before using and strictly operate and store in accordance with the instructions Please save it for your future r...

Page 3: ...le audio as you wish The SmartMic MTV500 also incorporates real time monitoring features like a built in headphone jack with a volume control allowing you to directly monitor zero latency microphone signal No need to install any driver the SmartMic MTV500 can be directly connected to the computer through the supplied cable Introduction ...

Page 4: ...tton Volume control 3 5mm headphone jack Connect a headphone to monitor the audio output Polar pattern switch Mode Indicator Status Omnidirectional Lights off Cardioid Green Light Mode Indicator Status Power ON Solid Green Light Mute ON Flashes Green Light ...

Page 5: ...onal Instruction Standard USB C output DC 5V Desktop stand 1 Unfold the microphone and lay it flat on the table adjust it to an ideal angle And always face the front side of the microphone s pop filter to you ...

Page 6: ...uiet you can slightly turn up the volume 3 No need to install any driver the SmartMic MTV500 can be directly connected to the computer Connect to the computer through the supplied cable and plug into the USB C output at the back of the microphone The POWER indicator lights green GAIN VOLUME ...

Page 7: ... ambiance with low sensitivity to wind and handling noise as well as to vocal plosives Cardioid Maximizes the rejection of sound coming from the sides and rear of the mic and can be used as a directional microphone to capture full rich natural sounding audio for podcast speech dialog instrument etc Omnidirectional Lights off GAIN Cardioid Solid Green Light 7 You are ready to record The headphone j...

Page 8: ...stem Preferences 3 Select the icon of Sound 4 Choose SmartMic MTV500 as input device and click OK 5 Choose SmartMic MTV500 as output device and click OK Windows Setup Procedure 1 Connect the microphone to your computer via the supplied USB C to USB A cable 2 Open the control panel and select the SmartMic MTV500 3 Select Audio tab and choose SmartMic MTV500 as input device ...

Page 9: ...arity and intelligibility position the microphone pointed directly at the subject s mouth Before adjusting the angle slightly loosen the knobs Avoid tightening or loosening knobs with great force as it might damage the screw threads Always mount the pop filter to avoid plosive when recording 5 30cm ...

Page 10: ...nal to noise ratio 80dB Maximum SPL 130dB Gain Control 0 39dB Operating Voltage 5V 150mA Headphone Amplifier Impedance 16ohms Output power 130mW THD 0 01 Frequency Response 15Hz 20 000Hz Signal to noise ratio 100dB Headphone gain 0 35 dB Material ABS housing Output USB C Dimensions 88 100 171mm 3 5 3 9 6 7 Weight 300 5g 10 6 oz ...

Page 11: ...Packing Lists SmartMic MTV500 Microphone 1 2m 3 9 USB C to USB A audio cable Warranty Card User Mannual ...

Reviews: