background image

6

ΐ

or – button

Select functions or values shown on the display.

Α-

CD display

Display menus, please refer to "1.4.3 LCD 
Display Operation Guide" for more details.

Β

Battery compartment

Install and remove the battery instructions are 
the same as receiver.

Γ

Mic input jack

Connect to the supplied lavalier microphone.

Δ

Line input jack 

Connect to audio devices with line output.

Ε

Belt clip

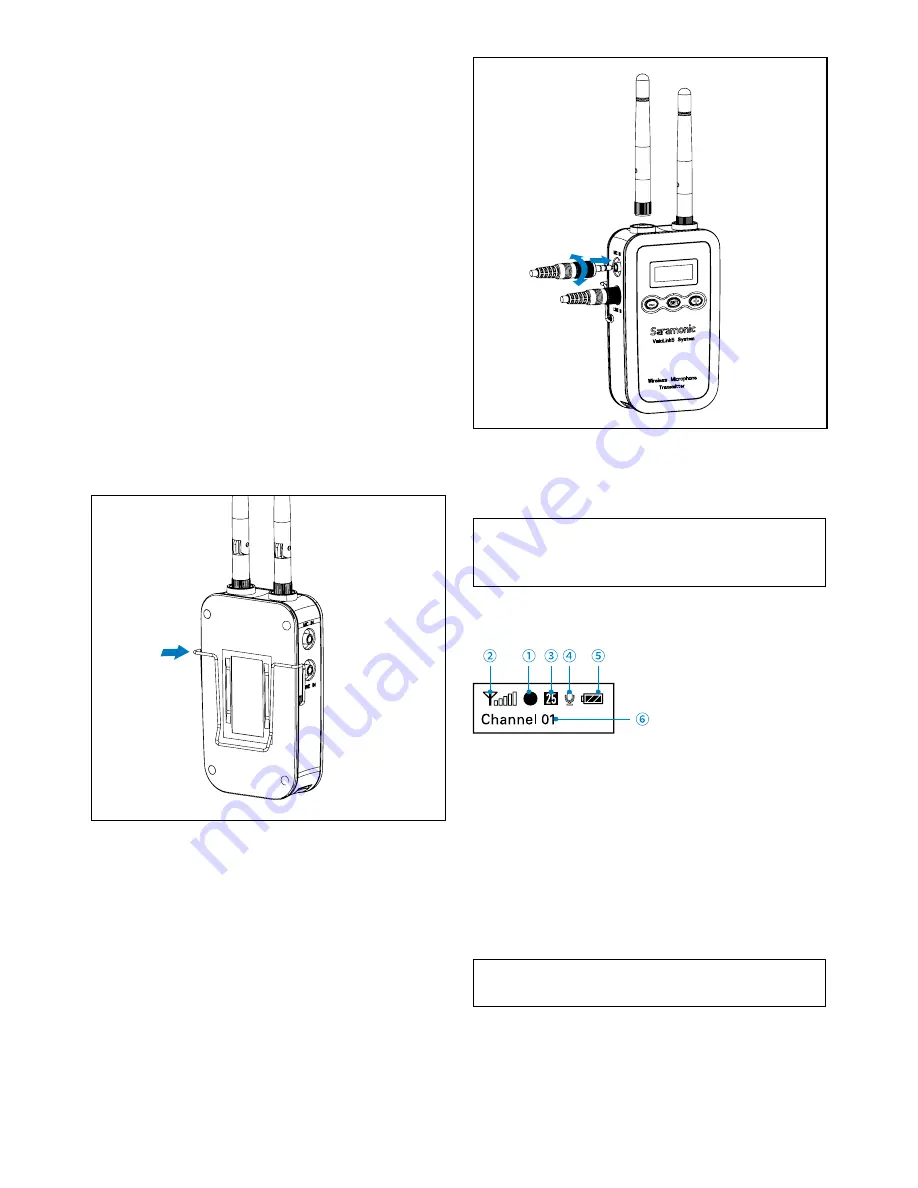
4.2  Attaching Accessories

Attach a belt clip

Insert one end of the belt clip into one of two 
holes on either side of the transmitter, and then 
insert the other end into the hole on the other 
side.

Connect the supplied cable to the Line out

• Connect the microphone / audio device.
• For a secure connection, turn to lock the connector.

NOTE:

 Please turn off the transmitter before 

attaching or removing the microphone / audio 
device.

4.3  LCD Display Operation Guide

Home screen

If no operation is performed for 20 seconds on 
the other screens, the display will automatically 
return to the home screen.

΍

RX & TX connecting indicator 

"

A

 or 

B

 or 

C

": The TX has been matched with the 

RX successfully.
"

" & "

" flashing

The TX hasn't been 

matched with the RX.

NOTE:

 Details please refer to "Match with TX" 

& "Match with RX" (page 4/7).

Ύ

RF level indicator

Indicates the current transmission level.

Summary of Contents for VmicLink5 RX

Page 1: ...5 8GHz Wireless Microphone System VmicLink5 User Manual ...

Page 2: ...e it in a cool dry place 2 Please use and store it in normal temperature Do not move it from overheated to supercooled condition frequently as well as keep away from heat sources such as heater and oven 3 When using and storing please pay attention to dust and moisture 4 Be careful to violent collision 5 To avoid acoustical feed back do not hold the microphone close to the loudspeakers 6 For the b...

Page 3: ...ver VmicLink5 RX 2 Product Structure 2 Attaching Accessories 3 LCD Display Operation Guide 3 Body pack Transmitter VmicLink5 TX 5 Product Structure 5 Attaching Accessories 6 LCD Display Operation Guide 6 Battery Charger 8 Specifications 8 Packing List 9 Package 9 ...

Page 4: ...a can be rotated 360 accordingly for best sound Rechargeable li ion battery included 3 Portable Receiver VmicLink5 RX TheSaramonicVmicLink5 RXisa camera mountable integrated wireless receiver It features an easy to read LCD display and DigRF synchronization between transmitter and receiver The selectable output mode allows you to choose the output signal to be mono or stereo 3 1 Product Structure ...

Page 5: ...upplied output cable Ε Standard mount cold shoe Ζ Belt clip 3 2 Attaching Accessories Connect the supplied cable to the Line out Plug the supplied 3 5mm cable into the LINE OUT For a secure connection rotate clockwise to lock the connector Attach the shoe mount adapter Please attach the belt clip upside down before attaching the shoe mount adapter Ύ Push the bottom of the belt clip to make some sp...

Page 6: ...nd Match with RX in the TX simultaneously to match the TX with RX The RX can t match with two or three TXs RX TX connecting indicator The RX hasn t been matched with a TX in this group A or B or C flashing The RX has been matched but hasn t been connected with the TX in this group A or B or C solid The RX has been matched with the TX successfully in this group NOTE Details please refer to Match wi...

Page 7: ...stored to their factory default settings NOTE The matching setting will also be cleared after restoring Version of the RX Serial number 4 Body pack Transmitter VmicLink5 TX The VmicLink5 TX is a compact transmitter that employs a crystal controlled PLL synthesizer It is equipped with a muting function and lock type Mic and Line input connectors 4 1 Product Structure Antennas Screw clockwise to ins...

Page 8: ... and then insert the other end into the hole on the other side Connect the supplied cable to the Line out Connect the microphone audio device Forasecure connection turn to lockthe connector NOTE Please turn off the transmitter before attaching or removing the microphone audio device 4 3 LCD Display Operation Guide Home screen If no operation is performed for 20 seconds on the other screens the dis...

Page 9: ...nwittingly while using Unlocked Long press the power key to turn on off the receiver System default Locked The receiver will not be turned off even after pressing the power key Mute key enable disable Long press the SET button to enable disable Mute function Enable Press power button to turn Mute On Off Disable The audio will not be muted during using Default is enable Match with RX Long press the...

Page 10: ...el 3CH RX channel changeable TX follow with RX Transmission distance 30m with no obstacle Interface Transmitter Mic in Max 160mV 13dBu 1 8V phantom power Transmitter Line in Max 2V 8dBu 50V DC isolation Receiver Phone out Max 70mW 32Ω 10V DC isolation Receiver Line out 4 times mic in gain 50V DC isolation Receive sensitivity 98dB THD N 92dB Sample rate 48K 16bit Audio frequence response 40Hz 18KHz...

Page 11: ...lip Antenna Rechargeable Li ion battery Microphone holder clip Omni directional lavalier microphone Warranty card User manual 7 Packing List 8 Package VmicLink5 RX TX This package includes one receiver RX and one transmitter TX VmicLink5 RX TX TX This package includes one receiver RX and two transmitters TX VmicLink5 RX TX TX TX This package includes one receiver RX and three transmitters TX NOTE ...

Page 12: ...www saramonic com The Saramonic logo is trademark which is registered and owned by Saramonic International COPYRIGHT 2011 2021 SARAMONIC INTERNATIONAL A brand of DSQN Email info saramonic com ...

Reviews: