background image

14          1-800-810-WIRE • www.sargentlock.com • 

A7786E

Copyright © 2011, Sargent Manufacturing Company

, an ASSA ABLOY Group company

. All rights reser

ved. 

Reproductions in whole or in part without express written permission of Sargent Manufacturing Company is prohibited.

01/29/11

Profile Series v.S2 WiFi Mortise Lock

IMPORTANT: 

 Batteries are optional if controller is powered by external power supply.

1.  To install or replace batteries, first remove the battery cover  

(if necessary) using the provided security tool (Fig.13A). 

2.  Unscrew the bottom screw of the battery keeper  

and remove the battery keeper, being careful  

not to break the tabs at top that hold it in  

place  (Fig.13B) 

3.  Place (6) “AA” alkaline batteries in the  

compartment, being careful to align  

polarity properly.

4.  Replace battery keeper being careful to engage  

tabs at top to hold it in place (Fig. 13B).

5.  Attach battery cover to inside escutcheon,  

making sure to line up tabs with retaining  

slots in battery cover. 

6.  Secure with the security screw  

using tool. (Fig. 13A).

Step #13 – Install (or Replace) Batteries

Fig. 13B

Fig. 13C

Tabs

Retaining 

Slots

Inside of Door

Fig. 13A

Security Tool 

(01-029)

Battery 

Cover

Security 

Screw

Summary of Contents for Profile Series v.S2

Page 1: ...ax 770 831 8598 Certification Exhibit FCC ID U4A SCYPROX3 IC 6982A SCYPROX3 FCC Rule Part 15 209 IC Radio Standards Specification RSS 210 ACS Report Number 10 0443 W06 11 A Manufacturer Assa Abloy Mod...

Page 2: ...acturing Company an ASSA ABLOY Group company All rights reserved Reproduction in whole or in part without the express written permission of Sargent Manufacturing Company is prohibited Profile WiFi Mor...

Page 3: ...l interference to radio communications However there is no guarantee that interference will not occur in a particular installation If this equipment does cause harmful interference to radio or televis...

Page 4: ...and iCLASS are registered trademarks of HID Global Corporation Wireless WiFi 802 11 b g online battery operated 2400 users per lock 10 000 Event audit trail Centralized lock management Door Status Mon...

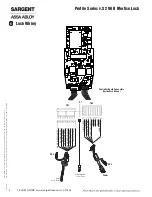
Page 5: ...ing Company is prohibited 01 29 11 Profile Series v S2 WiFi Mortise Lock 6 Lock Wiring DX NC GREEN WHITE RX COM WHITE RX NC GREEN DX WHITE BLACK LX NO RED YELLOW LX COM RED GREEN Motor B BLACK Motor A...

Page 6: ...SSA ABLOY Group company All rights reserved Reproductions in whole or in part without express written permission of Sargent Manufacturing Company is prohibited Profile Series v S2 WiFi Mortise Lock Pa...

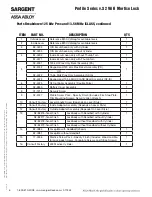
Page 7: ...S2 IK 6 52 4425 S2 Controller Assembly Double Pulse 1 7 52 3855 Battery Cover Assembly 1 8 01 1212 Security Screw 1 9 52 2427 Profile Screw Pack Specify Finish Includes Fire Stop Plate Trim Mounting S...

Page 8: ...debris and sharp edges Prepare door according to appropriate template see website www intelligentopenings com Door Manufacturing Template 4533 LH Left Hand Hinges Left Open Inward LHRB Left Hand Rever...

Page 9: ...e of door To rotate locking piece Fig 2A 1 Position lock body with red surface of locking piece visible 2 Insert blade type screwdriver into locking piece slot to rotate locking piece toward back of l...

Page 10: ...12 24 x 1 2 Long Flat Head Screws for Metal Doors 2 12 x 1 1 4 Long Flat Head Screws for Metal Doors Fig 3A Mortise Connectors Inside of Door Step 4 Door Options A Fire Stop Plate P N 52 0033 Fire rat...

Page 11: ...ribbon cable with connector and ground wire from outside of door through weatherseal gasket and fire stop plate Fig 6A Note Install ribbon cable with cable exiting down 1B For non fire rated doors fee...

Page 12: ...the door when mounted Fig 7A 2 Attach the antenna to the circuit board in the plastic housing under the controller assembly Note The difference between the wiring for the iCLASS 13 56 MHz reader and...

Page 13: ...Fig 10A 2 Tighten the set screw securely with 1 8 hex wrench Step 10 Install Inside Lever Step 9 Install Inside Escutcheon 1 Gently fold the excess ribbon connector and ground wire into the top hole...

Page 14: ...der should be flush with escutcheon Note The 43 cylinder may be used when installing this product with or without a gasket Note SARGENT logo must be horizontal and on the top of the cylinder Fig 11B 2...

Page 15: ...provided security tool Fig 13A 2 Unscrew the bottom screw of the battery keeper and remove the battery keeper being careful not to break the tabs at top that hold it in place Fig 13B 3 Place 6 AA alka...

Page 16: ...friction against lock case wire harness or any other obstructions Refer to Section 7 Step 8 if harness friction exists 2 The key will retract the latch Key should rotate freely 3 If the deadbolt is th...

Page 17: ...on and replacement applications The company s customer base includes commercial construction institutional and industrial markets Copyright 2011 Sargent Manufacturing Company an ASSA ABLOY Group compa...

Reviews: