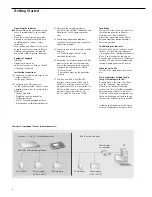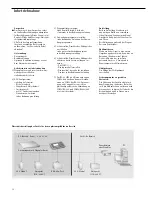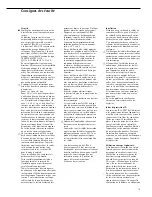
Overview of equipment for use in hazardous areas:
Ex zone 1, 2, 20, 21, 22 (hazardous area)
Non-Ex area (safe area)
Zener barrier
PC
or converter
Indicator with weighing platform
24 V module
Power supply
Battery pack
24 V module
Power supply
(110 V–230 V)
(110 V–230 V)
Unpacking the Indicator
§
After unpacking the equipment, please
check it immediately for any external
damage.
$
If you detect any damage, proceed as
directed in the chapter entitled “Care
and Maintenance,” under “Safety
Inspection.”
$
Save the box and all parts of the pack-
aging for any future transport. Before
packing your equipment, unplug all
connected cables to prevent damage.
Equipment Supplied
– Indicator
– Operating instructions
– Special accessories as listed on the bill
of delivery, if ordered
Installation Instructions
1) Connecting a weighing platform to the
Combics indicator:
see the page after next.
2) Configuring the A/D converter:
see the chapter entitled “Service” in the
operating instructions to configure the
following:
– Trade | Standard
– Weighing capacity, readability
– Calibration weight
– mV/V | Entering geographical data
– Linearization, calibration/adjustment
3) Adjusting the weighing platform:
see the section entitled “Calibration and
Adjustment” in the operating instruc-
tions.
4) Configuring application programs:
see the enclosed instruction manual for
application programs.
5) Connecting an interface, printer or Alibi
memory:
see “Pin Assignment Charts” in the
operating instructions.
6) Activating the interface, printer or Alibi
memory in the indicator Setup menu:
refer to the operating instructions and
configure the following for COM1/2:
– Printout format
– Printed lines/areas for the particular
printer
7) You may use the RS-422/RS-485
interface connector on COM2 only if
the RS-232 interface connector is not
plugged into COM2. In other words, it is
NOT permitted to have a simultaneous
electrical connection of both the
RS-232 and RS-422/485 on COM2.
Installation
Choose a location that is not subject to
the following negative influences:
– Heat (heater or direct sunlight)
– Drafts from open windows and doors
– Extreme vibrations during weighing
– Excessive moisture
Conditioning the Indicator
Moisture in the air can condense on the
surfaces of a cold indicator whenever
it is brought into a substantially warmer
place. If you transfer the indicator to
a warmer area, make sure to condition it
for about 2 hours at room temperature,
leaving it unplugged from AC power.
Indicator not In Use
Switch off the equipment when not in
use.
Seal on Indicators Verified for Use
in Legal Metrology in the EU*
A control seal in the form of a sticker
with the “Sartorius” logo has been
affixed to the indicator following
verification. This seal will be irreparably
damaged if you attempt to remove it.
If this seal is damaged or removed, veri-
fication will become null and void and
the indicator will have to be re-verified.
* including the Signatories of the Agree-
ment on the European Economic Area
4
Getting Started


