background image

11

Troubleshooting

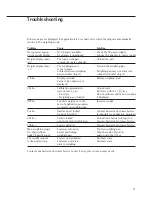
Error messages are displayed for approximately 2 seconds, after which the program automatically
returns to the weighing mode.

Problem

Cause

Solution

No segments appear 

– No AC power available 

– Check the AC power supply

on the weight display

– AC adapter is unplugged

– Connect AC adapter to power supply

Weight display shows

– The load on the pan 

– Unload the scale

oL

exceeds the scale’s capacity

Weight display shows

– The weighing pan is 

– Position the weighing pan

UL

is not in place

– Contact between weighing 

– Weighing pan may not come into 

pan and other objects 

contact with other objects

disErr

Display overload: 

Reduce weighing load

Value to be output is not 
displayed

calErr

– Calibration prerequisites

Unload scale

were not met, e.g.,:

Zero/tare with the 

U

key 

– Zero/tare

Do not calibrate until a zero readout

– Weighing pan is loaded

is displayed 

appErr

Too little weight or, in the 

Increase weight

case of application programs, 
no sample on weighing pan

PrtErr

– Interface port locked 

– Contact Sartorius Customer Service 

for print function

responsible for application programs

bAL.Err

– Scale is loaded 

– Unload scale before turning it on

or defective when turned on

– Contact Sartorius Customer Service 

SYS.Err

– Scale is defective

– Contact Sartorius Customer Service 

Max. weighing range 

– Scale was turned on

– Position weighing pan

less than defined 

before positioning

– Turn the scale off and on 

under “Specifications“

weighing pan

again using the 

Q

key

The weight readout 

– Scale is not calibrated

– Calibrate scale

is obviously wrong 

– Scale was not tared

– Zero/tare scale

prior to weighing

Contact your Sartorius Customer Service Center if any other error messages occur.

Summary of Contents for PMA.Economy

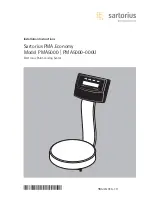
Page 1: ...98648 016 10 Economy PMA Installation Instructions Sartorius PMA Economy Model PMA5000 PMA5000 000U Electronic Paint mixing Scales...

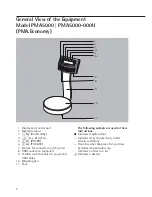
Page 2: ...ection to AC power 8 USB connection optional 9 Column with channels for power and USB cables 10 Weighing pan 11 Foot The following symbols are used in these instructions Indicates required steps Indic...

Page 3: ...0 PMA5000 000U into operation Warnings and Safety Precautions This scale meets the guidelines and stan dards governing electronic equipment electromagnetic compatibility and the stipulated safety stan...

Page 4: ...ousing must have foil shielding that is suitable for high fequen cies in accordance with CE regulations The operator shall be solely responsible for any damage or injuries that occur when using cables...

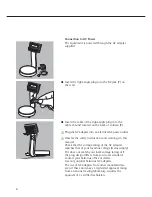
Page 5: ...pan AC adapter or power supply USB cable only supplied with the PMA5000 000U Setting Up the Scale Choose a suitable place to set up the scale Avoid exposure to drafts heat moisture and vibration Make...

Page 6: ...ns and warnings in this manual Check that the voltage rating of the AC adapter matches that of your local line voltage mains supply If it does not match your local voltage rating or if the plug design...

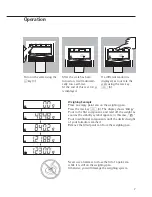
Page 7: ...your formula is reached Remove the filled paint can from the weighing pan Never use a hammer to close the lid of a paint can while it is still on the weighing pan Otherwise you will damage the weighin...

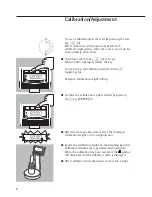
Page 8: ...y 6 Example calibration weight 5000 g Confirm the calibration weight selected by pressing the L key ENTER 5 After the scale has been tared place the displayed calibration weight on the weighing pan Ce...

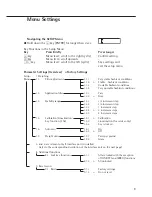
Page 9: ...2 Application filter 1 2 1 Tare 1 2 2 o Dose 1 3 Stability range 1 3 1 1 4 increment step 1 3 2 1 2 increment step 1 3 3 1 increment step 1 3 4 o 2 increment steps 1 3 5 4 increment steps 1 5 Calibrat...

Page 10: ...0 baud 5 1 8 19200 baud 5 2 Parity 5 2 3 o Odd 5 2 4 Even 5 2 5 None 5 3 Number of stop bits 5 3 1 o 1 stop bit 5 3 2 2 stop bits 5 4 Handshake 5 4 1 Software handshake mode 5 4 2 o Hardware handshake...

Page 11: ...e not met e g Zero tare with the U key Zero tare Do not calibrate until a zero readout Weighing pan is loaded is displayed appErr Too little weight or in the Increase weight case of application progra...

Page 12: ...to the AC adapter power supply or cables The AC adapter power supply no longer functions properly The AC adapter power supply has been stored for a relatively long period under unfavorable conditions...

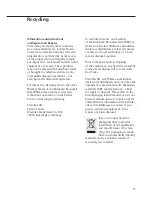
Page 13: ...t members of the European Economic Area EEA or where no Sartorius affiliates subsidiaries dealers or distributors are located please contact your local authorities or a com mercial disposal operator P...

Page 14: ...mes equipped with an integrated interface port Disconnect power supply Unplug the AC adapter Turn the scale onto its side Slide off the plate located on the back of the display and control unit Insert...

Page 15: ...n of Windows may have slightly different procedures for upload ing the driver from the CD All versions have a Wizard for adding and removing hardware which guides you through the process 3 After you c...

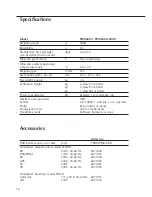
Page 16: ...kg 1 class M1 or better Power consumption VA Average 1 6 maximum 5 8 Interface port optional USB Format 7 bit ASCII 1 start bit 1 or 2 stop bits Parity Even odd or no parity Transmission rates 300 to...

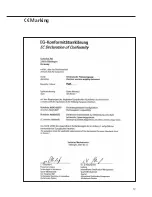
Page 17: ...17 C Marking...
Page 18: ...ngen Germany All rights reserved No part of this publication may be reprinted or translated in any form or by any means without the prior written permission of Sartorius AG The status of the informati...

Reviews: