background image

3

ENGLISH

HELPFUL HINTS—BEFORE YOU BEGIN

Please take time to read through this manual and plan out your

installation before you begin!

Locate an area in the rear of the vehicle where you would like to place

the Bazooka speaker systems. The location you have selected must

meet the following requirements in order for the Bazooka to be properly

installed in the vehicle:

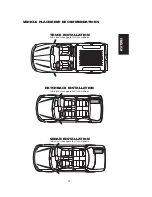
1) The woofer (grill end) should be facing into a corner. (See

vehicle placement recommendations on pg. 5-6)

2) Ideally, there should be 2 to 4 inches between the woofer and

the corner it is pointing into.

3) The mounting area should be carefully checked to be sure

that the mounting screws will not damage the gas tank,

electrical wiring, fuel lines, or the spare tire during the mounting

of the strap bases.

4) The strap mounting bases should be screwed securely to a

rigid surface that is part of, or anchored to, the structure of

the vehicle.

Summary of Contents for Bazooka BTA850FH

Page 1: ...TA850C BTA850FH...

Page 2: ...nd so we made a commitment to design manufacture and deliver the most efficient speaker systems possible Today we market our patented speaker systems worldwide and the high quality of the Bazooka bran...

Page 3: ...HELPFUL HINTS BEFORE YOU BEGIN PG 3 VEHICLE PLACEMENT RECOMMENDATIONS PG 4 MOUNTING THE BAZOOKA PG 5 7 WIRING DIAGRAM PG 8 SPECIFICATIONS PG 9 WIRING PG 10 12 TROUBLESHOOTING PG 13 14 WARRANTY PG 15 1...

Page 4: ...lled in the vehicle 1 The woofer grill end should be facing into a corner See vehicle placement recommendations on pg 5 6 2 Ideally there should be 2 to 4 inches between the woofer and the corner it i...

Page 5: ...HATCHBACK INSTALLATION tube size is exaggerated for emphasis TRUCK INSTALLATION tube size is exaggerated for emphasis SEDAN INSTALLATION tube size is exaggerated for emphasis VEHICLE PLACEMENT RECOMM...

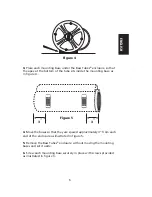
Page 6: ...ted in figure 2 MOUNTING THE BAZOOKA 2 After the strap is completely laced through the mounting base make a loop with the strap where it runs across the middle of the base as illustrated in figure 3 T...

Page 7: ...in figure 5 5 Remove the Bass Tubes enclosure without moving the mounting bases and set it aside 6 Screw each mounting base securely in place with screws provided as illustrated in figure 3 3 Place ea...

Page 8: ......

Page 9: ...BTA850C WIRING DIAGRAM...

Page 10: ...Not applicable to the TA850C BTA850FH TA850C BTA850FH are 2 Ohm products...

Page 11: ......

Page 12: ...battery wire short to ground Wait to insert the fuse into its holder until all wire connections have been made If it is necessary to lengthen the battery wire add the required length between the ampl...

Page 13: ...down during tape operation you can connect the Amplified Bazookas Remote Turn On Wire to an accessory or ignition point at the vehicle fuse block In this configuration the Amplified Bazooka subwoofer...

Page 14: ...hase switch on the amplified Bazooka When the input signal is in correct electrical phase the level of bass output will be greatest when the balance control of the radio is set to the center position...

Page 15: ...single unit If the Bass Response increases the Phasing is correct and you can repeat this process on the next Bazooka If the level of the Bass Response drops the Phasing is incorrect and you should re...

Page 16: ...not cover the following 1 Damages occurring during shipment of the product to SAS for repair claims must be presented to the carrier 2 Damages caused by accident abuse negligence misuse or improper op...

Page 17: ...PURCHASED FROM ____________________________________________ DEALER ADDRESS ____________________________________________ TELEPHONE ____________________________________________ PURCHASERS NAME ________...

Page 18: ......

Reviews: