background image

IMPORTANT 

The device should be installed by qualified personnel. 
 
Prior to installation, please read carefully this manual. 
 
Changes, modifications or repairs not authorized by the manufacturer shall void your rights 
under the warranty. 
 
The rating plate of the device is located on the enclosure base. 


SATEL aims to continually improve the quality of its products, which may result in changes in 

their technical specifications and software. Current information about the changes being 

introduced is available on our website. 

Please visit us at: 

http://www.satel.eu 


Hereby, SATEL sp. z o.o. declares that the radio equipment type ASP-200 is in 

compliance with Directive 2014/53/EU. The full text of the EU declaration of conformity 

is available at the following internet address: www.satel.eu/ce 


The following symbols may be used in this manual: 

 - note, 

 - caution. 


Summary of Contents for ASP-200

Page 1: ...ASP 200 Wireless outdoor siren Firmware version 1 00 asp 200_en 01 19 SATEL sp z o o ul Budowlanych 66 80 298 Gda sk POLAND tel 48 58 320 94 00 www satel eu...

Page 2: ...improve the quality of its products which may result in changes in their technical specifications and software Current information about the changes being introduced is available on our website Pleas...

Page 3: ...annels for automatic selection of the one that will enable transmission without interference with other signals in the 868 MHz frequency band ABAX 2 system only Remote update of siren firmware ABAX 2...

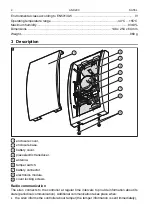
Page 4: ...base battery cover piezoelectric transducer antenna tamper switch battery connector electronics module cover locking screws Radio communication The siren connects to the controller at regular time in...

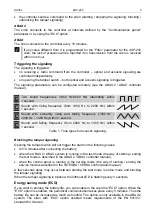
Page 5: ...and falling frequency 1450 Hz 2000 Hz 1450 Hz within 1 second 4 Sound with falling frequency from 2000 Hz to 1450 Hz within 1 second Table 1 Tone types for acoustic signaling Blocking the tamper signa...

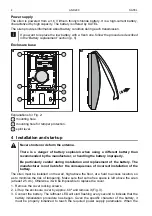
Page 6: ...ed by the manufacturer or handling the battery improperly Be particularly careful during installation and replacement of the battery The manufacturer is not liable for the consequences of incorrect in...

Page 7: ...it 11 Place the enclosure base on the wall and mark the location of mounting holes Fig 2 Remember to take into account the mounting hole for tamper protection 12 Drill the holes for wall plugs anchor...

Page 8: ...he battery cover 6 Install the battery cover in the siren enclosure 7 Press and hold down the tamper switch 8 Connect the new battery 9 When the leftmost LED on the siren starts flashing every second...

Reviews: