SATEL ASP-200
5
battery is being initialized, you can add the siren to the wireless system but the siren will
not be ready for normal work until the LED stops flashing.
4. Add the siren to the wireless system (see the ABAX 2 / ABAX controller manual). The
sticker with serial number which shall be entered when registering the siren in the system
can be found on the electronics module.
In the INTEGRA / VERSA alarm system, the siren is identified as ASP-100.
Simultaneous operation of the siren by the ABAX 2 and ABAX controller is not
possible.
5. Replace the siren cover.
6. Place the siren in the location intended for its installation.
7. Check the level of signal received from the siren by the ABAX 2 / ABAX controller. If the
signal level is lower than 40%, select another place for installation. Sometimes, it is
sufficient to shift the device ten or twenty centimeters to obtain a considerable
improvement in the signal quality.
The ARF-200 tester makes it possible to check the radio signal strength at the place of
future installation without having to put the siren there.
8. Remove the siren cover.
9. Disconnect the battery.
10. Move aside the catches holding the electronics module and remove it.
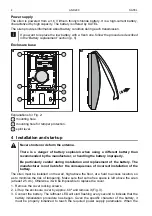
11. Place the enclosure base on the wall and mark the location of mounting holes (Fig. 2).
Remember to take into account the mounting hole for tamper protection.
12. Drill the holes for wall plugs (anchors).
13. Use wall plugs (anchors) and screws to secure the enclosure base to the mounting
surface. Remember about the mounting hole for tamper protection. The wall plugs
delivered with the device are intended for concrete, brick, etc. For other types of surface
(drywall, styrofoam), use the appropriately selected wall plugs.
14. Secure the electronics module in the enclosure base.
15. Connect the battery.
16. Replace the siren cover and fasten it with screws.
17. Configure the siren settings (e.g. the signaling parameters – see the ABAX 2 / ABAX
controller manual).
5 Battery replacement
The new battery must be connected as described below to run the battery
initialization procedure. The required power supply parameters are only
possible with the properly initialized battery.
The used batteries must not be discarded, but should be disposed of in
accordance with the existing rules for environment protection.
1. Start the service mode in the control panel (if the ABAX 2 / ABAX controller is connected
to a SATEL alarm control panel) or the test mode in the ABAX 2 / ABAX system.
2. After the leftmost LED on the siren starts flashing every 3 seconds, you can open the
siren enclosure.
3. Disconnect the battery.


