SATEL
MSP-300
5
The battery is to be connected just before installing the siren.
5. When the leftmost LED on the siren starts flashing every second, release the tamper
switch.
6. Register the siren in the system (see: PERFECTA control panel installer manual /
MTX-300 controller manual).
7. Replace the siren cover.
8. Place the siren in the location intended for its installation.
9. Open the enclosure but do not remove the front cover. If the transmission from the siren is
received, continue with the installation. If the transmission from the siren is not received,
select a different mounting location and repeat the test. Sometimes, it is sufficient to shift
the device ten or twenty centimeters.
10. Remove the siren cover.
11. Disconnect the battery from the electronics module.
12. Move aside the catches holding the electronics module and remove it.
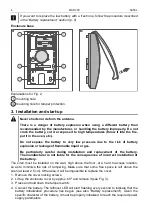
13. Place the enclosure base on the wall and mark the location of mounting holes (Fig. 2).
Be sure to take into account the mounting hole for tamper protection.
14. Drill the holes for wall plugs (screw anchors).
15. Secure the enclosure base to the wall with wall plugs (screw anchors) and screws.
Remember about the mounting hole for tamper protection. The wall plugs (screw anchors)
and screws delivered with the siren are intended for brick, concrete and similar mounting
surfaces. For other surfaces (e.g. drywall, wood, styrofoam), use other wall plugs (screw
anchors), as required.
16. Secure the electronics module in the enclosure base.
17. Connect the battery to the electronics module.
18. Replace the siren cover and fasten it with screws.
19. Test the siren for proper operation.
4. Battery replacement
The new battery must be installed as described below to run the battery
initialization procedure. The required power supply parameters are only
possible with the properly initialized battery.
The used batteries must not be discarded, but should be disposed of in
accordance with the existing rules for environment protection.
1. Start the service mode in the control panel / controller.
2. After the leftmost LED on the siren starts flashing every 10 seconds, you can open the
siren enclosure.
3. Disconnect and remove the discharged battery.
4. Press and hold down the tamper switch.
5. Connect the new battery.
6. When the leftmost LED on the siren starts flashing every second, release the tamper
switch. Flashing of the leftmost LED indicates that the first phase of battery initialization is
in progress. After 5 minutes, when this phase is completed, the siren is ready for work.
The second phase of battery initialization lasts 3 hours, without however limiting
functionality of the siren. This phase is signaled by two flashes every 30 seconds.

