background image

THE PROFESSIONAL EQUIPMENT------------------|USER’S MANUAL|

THE PROFESSIONAL EQUIPMENT------------------|USER’S MANUAL|

1.2 Unpacking  Equipment

Open the package and make sure it includes all below items, if 
any  is missing, please contact the reseller for replacement.
      

1.Digital Satellite Meter
2.User’s manual
3.AV cable
4.Car charger cable
5.Adaptor
6.Silicone case

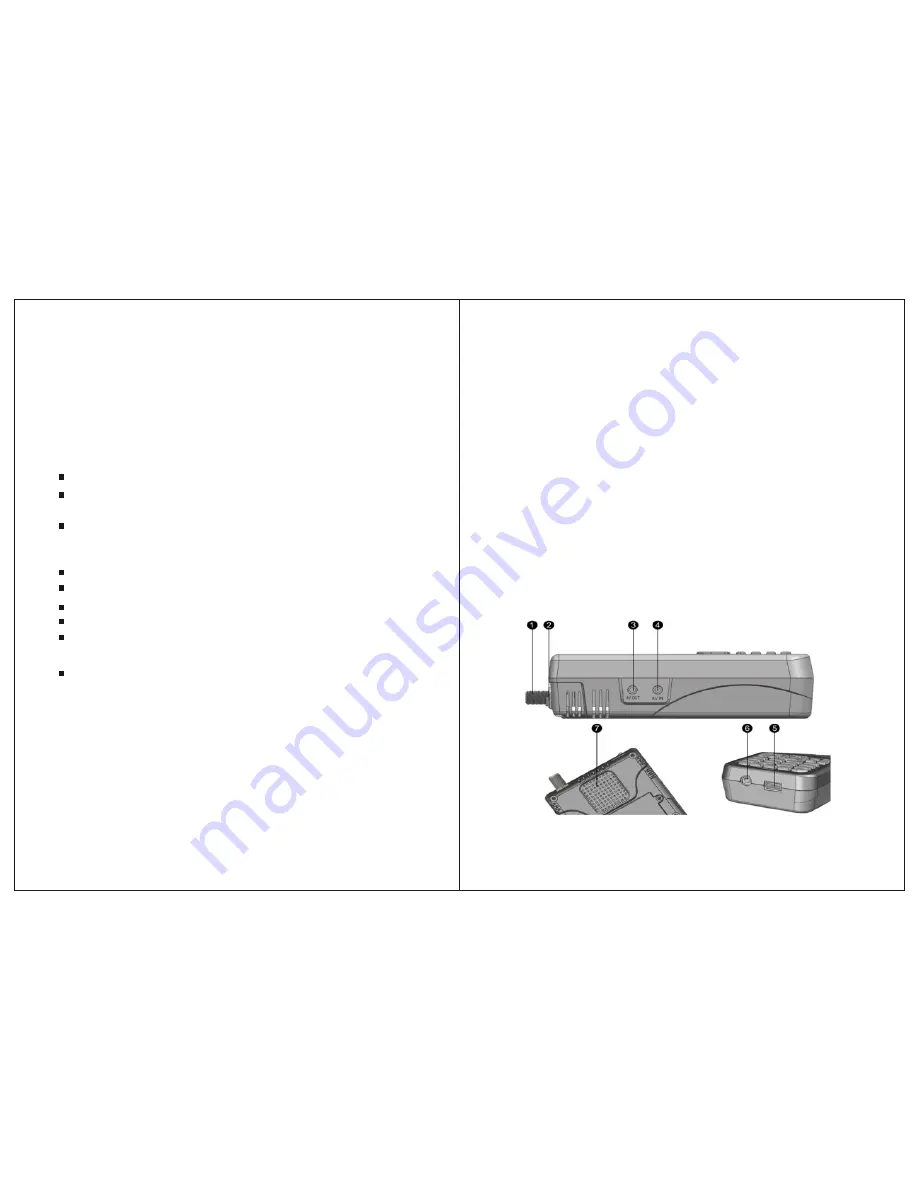
1.3 Product  Overview & Illustration

01-Digital Satellite Meter    

Digital Satellite Meter-02   


    Do not remove the cover.
    Do not let the unit exposed to extreme heat, cold or humid 
conditions.

Thank  you  for  choosing  our  product.  Before  installation,we 
would like to remind you some notes, which is very important 
for operating safely and properly, as follows:

1.GUIDE

1.1 Important Safety Instructions

    Be sure to read this user manual before starting your operation.

    You must install the dish with correct direction and angle. If 
the dish is not working properly, contact your local dealer.

    When the unit is suddenly moved to a hot area from a cold 
area, it may cause some problems. In that case, turn off the 
power,and turn on again after 1-2 hours.

    Keep meter placed in clean space with sufficient ventilation.

    Do not cover the meter with or place it on a unit that emits heat.

 Clean the case by a soft cloth with a little washing liquid.

    No liquids or any other materials to come inside of the unit.

Warning:

All instructions are subject to the latest version 

of software without prior notice if any new functions are 
added to the equipment.

Summary of Contents for WS-6926

Page 1: ...USER S MANUAL USER S MANUAL WS 6926 ...

Page 2: ... 1 0 1 Quick Search 3 2TP Manager 3 3 3 PICTRUE 3 3 4 Upgrade 3 4 System Setting 3 4 1 Language 3 4 2 Screen format 3 4 3 3 4 4 3 4 5 Time Zone 3 4 6 Channel reset 3 4 7 Mode SW VER Release Time 4 Channel 4 1 Manager Channel 4 1 1 Rename Channel 4 1 2 Del Channel 4 1 3 Lock Channel 4 1 4 Skip Channel 4 2 Favorite Manager 4 2 1 4 2 2 4 2 3 4 2 4 4 2 5 4 3 EPG 4 4 Program List 4 5 5 Technical Specif...

Page 3: ...rtant for operating safely and properly as follows 1 GUIDE 1 1 Important Safety Instructions Be sure to read this user manual before starting your operation You must install the dish with correct direction and angle If the dish is not working properly contact your local dealer When the unit is suddenly moved to a hot area from a cold area it may cause some problems In that case turn off the power ...

Page 4: ...adio switch F2 Note 2 1 Shows the EPG menu 2 Audio select F3 Note 2 1 Shows the Favorite Manager menu 2 lock beep alarm F4 Note 2 1 Shows Manager Channel menu 2 TV system switch B Light Display of LCD ON OFF MENU Show the main menu on the screen or jump back to previous menu in sub menu setting conditions NEVIGATION KEY Volume Control or move cursor channel or change confirm etc EXIT Escape from p...

Page 5: ...Sound and Light Alarm for Locking Signal Speaker Integrated Support both AV out and AV in Ant short protect PAL NTSC auto conversion 8 4V 3000mAh Lion Battery Included Software upgrade via USB port Easy to carry Fully DVB S DVB S2 3 THE MENU OSD INSTRUCTION If you have installed and connected the cables of the meter pressing MENU key to display the Main Menu Satellite Finding System Multimedia TP ...

Page 6: ...eric keys or pressing keysenter the proper LNB frequency refe rring to your LNB 3 1 5Frquency Frequency of the current transport Input the value by using the numeric keys 3 1 6Symbrate Symbol rate of the current transport Input the value by using the numeric keys 3 1 7Pol Press key to changeVertical or horizontal of polarization 3 1 8 Search mode Press key to select search mode TV Only All Service...

Page 7: ... Input the value by using the numeric keys Pos Command Check the signal locked the motor moves correct position press OK key to store the present position Satellite Press key to select the desired satellites DiSEqC1 2 SET Go to Reference A starting point for the satellite search fun ction can be selected by pressing the OK key If the signalis locked the present position is automatic stored Frequen...

Page 8: ... and Latitude Under the 3 6 system setting the angle of LNB theorientation and elevation of antenna all will be displayed on the screen Press key to select the TP frequency Press key to select S Q Monitor Scan Auto Blind then press OK key into function S Q Enlarge showing of the strength and quality Monitor Level Showing the strength and quality Scan According to the current TP search channel Auto...

Page 9: ...ss F2 OK key to edit TP Press F3 key to delete the current TP Press F4 Key to search the current TP 3 3 Multimedia support the following device The meter intergrates USB port which lUSB portable harddisk lUSB memory It will appear storage device is inserted when USB device is inserted to the USB port that means the usb device has been recognized and can be used Otherwise will appear USB Device Not...

Page 10: ...re are functions of Backward Forward Play Pause Previous file Next file Stop 3 3 3 PICTURE Press key to select picture then press OK key to play Press MENU key to appear playing bar Press move the cursor then press OK key to operate function key to There are functions of Rotating Delay setting ZOOM Play Pause Previous Picture Next picture Stop 3 3 4 Upgrade Press F1 key to dump user database Press...

Page 11: ...em Setting This menu consists of sub menus shownas below 3 4 1Language Press key to select language 3 4 2Screen format Press key to select Screen format 4 3PS 4 3LB 16 9PS 16 9LB 3 4 3Factory reset The factory default allows user to res tore the factory reset values when you press OK key the Warning window will appear if you select yes the system setup will be reset to the default values Warning O...

Page 12: ... lock press F1 key to backspace press F4 key to complete the edit 4 Press MENU key the Warning window will appear ifyou select yes the modification will be saved 4 1 2 Del Channel 1 Press key to select TV 2 Press F2 key the TV will be marked with the symbol X marking all channels that you need to delete 3 Press MENU key the Warning window will appear if you select yes the modification will be save...

Page 13: ...e Manager Press F3 key into the manager channel sort interface then press menu key to return favorite manager 4 2 1Rename Please make reference to rename of 4 1 1 Rename channel 4 2 2Sort order 1 Press F2 key you will notice the sub menu with sort order in screen 2 Select the desired one of the four sort order in screen and press OK 3 Press MENU key the Warning window will appear if you select yes...

Page 14: ... F1 key to cancle the current item press menu to return Press F1 key to items setecting 4 2 6Sat sort 1 Press F4 key you will notice the sub menu with sort order in screen 4 2 4 Favorite Sort Press F3 key you will notice the sub menu with sort order in screen Press key to select sort Favorite setting will be put into this sort Press MENU key the Warning window will appear if you select yes the mod...

Page 15: ...deo Output CVBS Symbol Rate 2 Rs 45 Mband SCPC MCPC Audio output Stereo Audio L R output AV input interface Connector Type 3 5 mm Jack Video input CVBS Audio input Stereo Audio L R input AUDIO VIDEO PROCESSING Video decompression H 264 MP HP L4 HW JPEG decoding Resolving rate PAL 25 frame 720 576 NTSC 30 frame 720 480 Press F1 key return to channel select 1 Press key to select item 2 Press F4 key ...

Page 16: ...sound or picture but the front panel power light is ON AV IN jack insert but no video input Pull out AV IN cable No sound or picture Adjust the dish Check the Signal Level in the Antenna Setup Menu The satellite dish is not pointing at the satellite No signal or weak signal Check the cable connections LNB and other equipment connected between the LNB and the meter and adjust the dish The satellite...

Reviews: