the middle of recording, press the REC / PRINT key. The REC
display and the file number will disappear and the recording will
be stopped. When you check the stored data again, perform the
above procedure for calling stored data.
Note : To switch auto storage mode to manual storage mode, you must
clear stored data from the memory with the procedure below:
•
Press the POWER and SET / CLEAR keys simultaneously
while in normal measurement mode.
•
Press the SET / CLEAR key alone to clear the remaining stored
data. You will now be able to enter manual storage mode.
• With the Auto power-off function active, the LCD display will be
turned off after approximately 30 minutes since recording started.
At every data storing process, the LCD display will be turned on
and off. This on-and-off process will continued up until 120 data are
stored. The longer the recording interval the longer the time the
LCD display is off. This is not malfunction of display.
Note : When auto storage ends, confirm the following procedure.
1. Be sure to turn the main unit off first when the auto storage ended.
2. If the auto storage ends while power is ON and AC adapter is
connected with unit, be sure to firstly pull out the jack of AC adapter
from the unit. At this time, batteries have been installed in the unit.
3. If the plug of AC adapter is pulled first while power is ON, the
stored data will be erased.
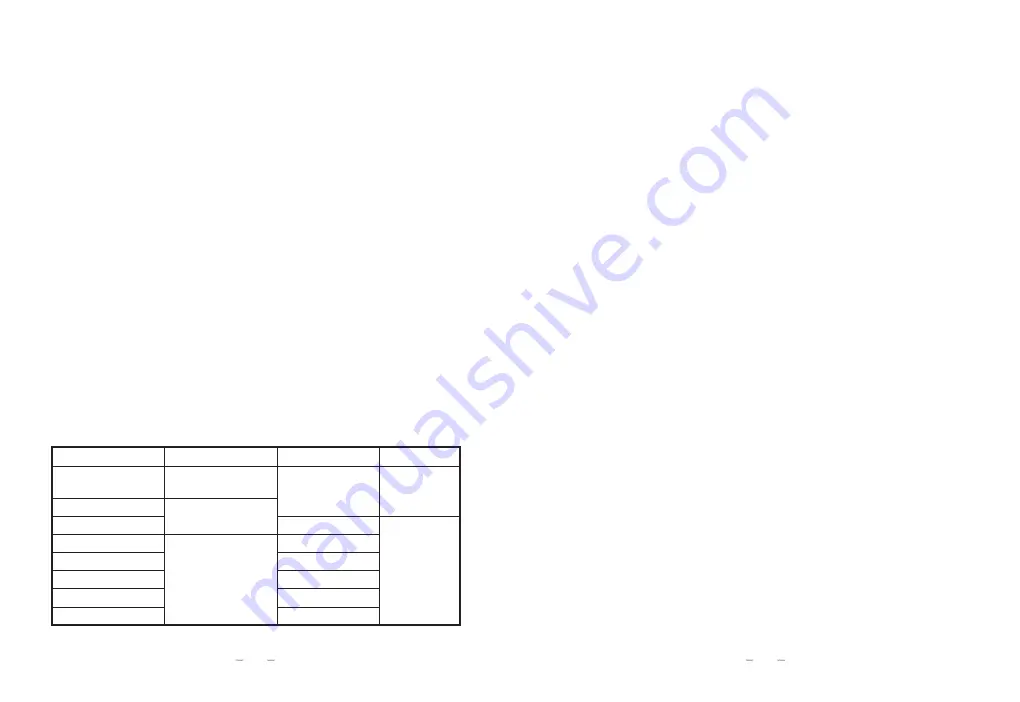
Recording interval Recording start timing Display interval Display time
1 min. 2 min. 3 min. Every min.
on the hour
Continuous
display
-------
5 min. 10 min.
Every 10 min.
on the hour
30 min.
Every 30 sec.
For about
7 sec.
1 hour
Every hour
on the hour
Every 1 min.
2 hours
Every 2 min.
3 hours
Every 3 min.
4 hours
Every 5 min.
6, 12 and 24 hours
Every 10 min.
• Be sure to turn the power off by pressing the POWER key in
following procedures.
・
Switching the power from batteries to AC adapter.
・
Switching the power from AC adapter to batteries.
・
Replacing batteries.
If the power is turned back on within 50 seconds after the manner, all
recorded data are obtained. Switching or replacing the power source
without turning the power off may cause malfunctions and errors in
display.
Ⅲ
Printing Stored Data
Ⅲ
-1. Connecting the Main Unit and the Printer
⑴
Make sure that both of the thermometer and the printer are turned
off, then connect the printer cable between the terminal on the
printer and the printer terminal on the main unit.
⑵
Thoroughly read the instruction manual of printer provided with
the printer.
⑶
This is a dedicated printer (option) for the SK-1260. To purchase
this printer, contact the dealer from which the SK-1260 was
purchased, or our service network.
Ⅲ
-2. Printing Stored Data
⑴
Confirm that the printer is turned on.
⑵
Press the POWER and REC / PRINT keys simultaneously, "Prn" is
displayed on the main 7-segment display and starts printing data.
*
Holding down the REC / PRINT key for 3 sec. or more can also
start printing.
⑶
The printer will output all data from the first file to the last file.
⑷
After printing, all data still remains in the main unit.
19
20
Summary of Contents for SK-1260
Page 16: ......


