wraps. Adding a “width” statement to your program can help to suppress
these extra 0D
H
0A
H
characters by expanding the line length up to 255
characters. See the beginning of
Section 5: Programming Reference
for
details on writing a program in BASIC.
If you’re not programming in BASIC, check to see if you have an
equivalent statement in the language you’re using to suppress extra
carriage returns and line feeds from your data being sent out to the
printer. We want the data stream to be one complete line going to the
printer.
USING THE RS232C SERIAL INTERFACE
1. Is the RS232C Serial cable connected securely to your serial port on the PC
(DB- 25S or DB-9S Male) and to the RS232C connector on the printer?
WARNING: Never connect or disconnect interface cables (or use a switch box)
with power applied to either the printer or the host. This may cause damage
to the interface circuitry and is not covered by warranty
.
2. Is the cable defective? At the very least, you should be using a “Null
Modem Cable,” which crosses pins in a specific manner. This should
enable your printer to print. But we recommend that you eventually use a
cable built to specifications as described in Section 6: Interface
Specifications.
3. Is the RS232 Interface Module installed in the printer? The M-8400RVe
requires the new Hi Speed Serial Interface (PN WCL40451)to take
advantage of the faster data transmission speeds. The older Serial
Interface Modules will work, but at a reduced capability.
4. Check for obvious errors in the data stream. Is the data properly framed
with the <ESC>A and <ESC>Z commands? See
Section 5: Programming
Reference
if necessary.
5. If after sending your job to the printer, it only “beeps” and displays an
error message on the LCD display, you may have a configuration problem.
There may be some inconsistencies with the Baud Rate, Parity, Data Bits,
or Stop Bits in relation to your host computer. If you are confused as to
what the printer’s current RS232 settings are, print a Configuration Test
label(see Section 3). It will list all of the current printer configuration
settings.
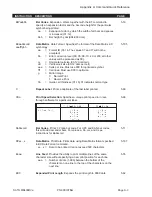
6. If you still are unable to get printer output, try the Hex Dump as described
in Step 5 under the Parallel Interface troubleshooting. In this case, the
printer monitors the RS232C interface for incoming data.
7. From the Hex Dump, if you are seeing extra 0D
H
0A
H
(CR and LF)
characters, and are using BASIC, refer to the beginning of the Command
Code section. It provides hints for writing a SATO program in BASIC.
SATO M8400RVe
PN 900107
5A
Page 7-3
Section 7: Troubleshooting


