


7 | page
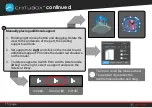
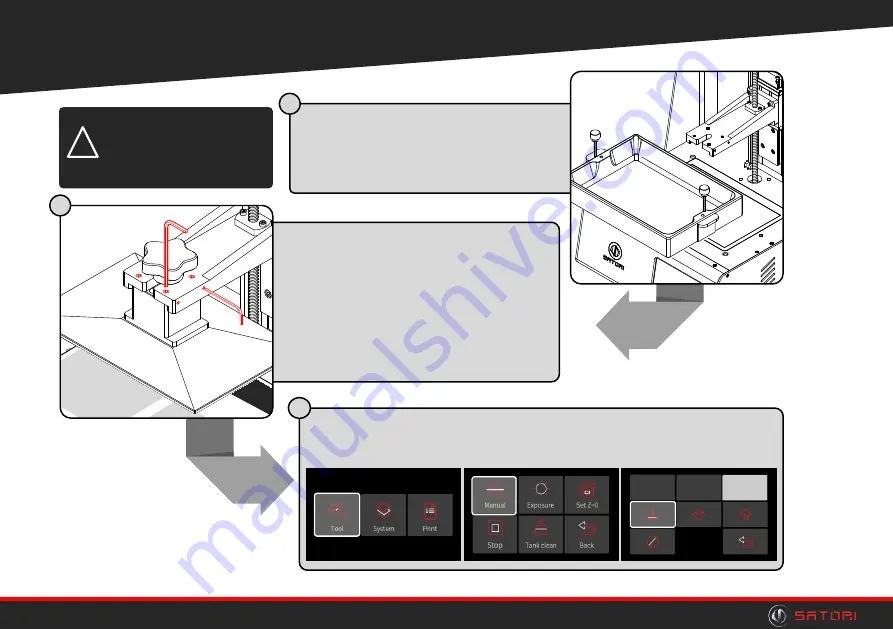
Align the build platform
Lift the UV protection lid.
Remove the resin tank using the
2 screws. Place the alignment
card on the curing screen.
Loosen the 4
M3
locking screws
on the sides of the Z-axis arm,
and loosen the red hand dial.
Back off the 4
M4
alignment
screws around the hand dial by
a single rotation.
Navigate on the touchscreen to the
Tool
Menu,
Manual
movement. Select the
Align Build Platform
icon.
C
15
0.10mm
1.00mm
10.00mm
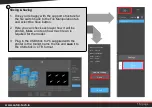
6.
Adju
st th
e Alig
nm
ent
scre
ws
till 4
corn
ers
of th
e be
d
are
bala
nced
. W
hen
the
are
tigh
ten
the
2
lock
ing
scre
ws
on e
ach
side
.
7.
Tigh
ten
the
red
han
d dia
l
on to
p of
the
build
platf
orm
.
8.
Lift
the
build
platf
orm
usin
g th
e
lift u
p
butto
n an
d
rem
ove
the
align
men
t car
d, to
plac
e th
e res
in ta
nk
back
in th
e prin
ter.
9.
Mak
e su
re to
secu
rely
faste
n
the
resin
tank
with
the
two
han
d sc
rew
s pro
vide
d. C
lose
the
UV
prote
ctio
n
lid.
10.
You
’re n
ow
read
y fo
r prin
ting
.
1.
Turn
the
mac
hine
on. L
ift th
e UV
prote
ctio
n lid
and
rem
ove
the
resin
tank
usin
g th
e 2
scre
ws.
2.
Loo
sen
the
4
lock
ing
scre
ws
, 2 o
n ea
ch s
ide
of th
e
Z-ax
is ar
m
with
a M
3 he
x ke
y. Lo
osen
the
build
platf
orm
’s re
d ha
nd d
ial to
o.
3.
Slig
htly
loos
en th
e 4
alig
nm
ent
scre
ws
loca
ted
arou
nd th
e red
han
d dia
l with
an M
4 he
x ke
y.
4.
Plac
e th
is ali
gnm
ent
card
on th
e cu
ring
scre
en. P
ress
alig
n bu
ild p
latfo
rm
in th
e m
anu
al m
ove
men
u.
5.
The
re w
ill be
a sp
ace
betw
een
the
build
platf
orm
and
the
align
men
t car
d. T
ighte
n ea
ch o
f the
alig
nm
ent
scre
ws
arou
nd th
e red
han
d dia
l to
clos
e th
at g
ap.
Alig
nm
ent
Guid
e
Alig
ning
the
build
platf
orm
for p
erfe
ct p
rintin
g
Furth
er in
form
atio
n in
the
getti
ng s
tarte
d m
anu
al
Kee
p m
e fo
r futu
re
use
B
Keep hands away
from the Z-axis
and build platform
while in motion.
!
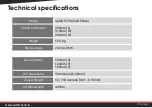
A
Summary of Contents for ST1600
Page 1: ...GETTING STARTED WITH THE ST1600 3D PRINTER FIRST PRINT ...
Page 2: ......
Page 24: ......