background image

4

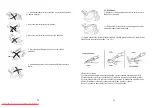
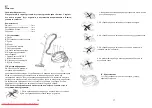
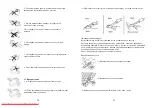
2. Don’t run the appliance over the power cable when operating.

3. Don’t absorb the burning  cigarette.

4. Don’t absorb water and other liquid.

5. Don’t absorb sharp things or too heavy things.

6. Don’t place it near the heat source.

5

IV. How to use

1. Preparation
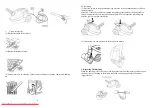
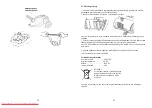
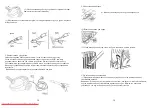
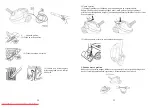
(1) Let the end of the hose insert into the air intake socket until clicking position.

(2) After using, press the button and drag the end of  the hose out.

(3) Fit the extension tube to the handle, tube and tube to floor brush as showing in the 
picture.

2.Using the machine
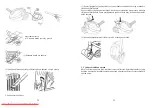
Pull the wire to suitable length, insert the plug into power socket.
Then make the speed control button on MIN, press the switch to run the machine. The 
vacuum cleaner  begins  to  work.  The  part,  which  can adjust wind volume,  is  on the 
handle.  The speed control button can adjust the power.
Attention: Don't extend the cable beyond the RED mark.

Downloaded From Vacuum-Manual.com Manuals

Summary of Contents for ST-VC 7271

Page 1: ...1 ST VC 7273 Vacuum Cleaner Vysava Usisiva Downloaded From Vacuum Manual com Manuals...

Page 2: ...er Plug K Narrow Nozzle L Floor Brush II Brief Introduction The vacuum cleaner features exquisite appearance graceful in color reasonable in internal structure There are foot push switch and automatic...

Page 3: ...using press the button and drag the end of the hose out 3 Fit the extension tube to the handle tube and tube to floor brush as showing in the picture 2 Using the machine Pull the wire to suitable len...

Page 4: ...he power cable can t rewind completely please pull out the power cable a little bit and press the cord rewinder button again You can repeat the rewinding step until the cable is rewined completely 2 A...

Page 5: ...nts to an appropriate waste disposal centre 9 CZ Vysava V en z kazn ku Dovolte abychom V m blahop li k zakoupen v robku zna ky Saturn Jsme p esv d eni e na e v robky budou v rn mi a spolehliv mi pomoc...

Page 6: ...e pru nou hadici stisknut m odpov daj c ho tla tka 3 Spojte sti trubky potom p ipojte trubku k dr adlu pru n hadice a na druh konec trubky nasa te kart na podlahu viz obr 2 Pou v n p stroje Vyt hn te...

Page 7: ...e se kabel nenavinul lpn trochu ho povyt hn te a potom znovu stiskn te tla tko nav jen kabelu Tento postup m ete opakovat do t doby dokud nebude kabel pln navinut 2 Po pou it m ete p stroj slo it tak...

Page 8: ...em nebo houbi kou namo enou do vody s myc m prost edkem Pozor V dob i t n nesm b t hadr nebo houbi ka p li mokr aby se voda nedostala do motoru V p pad po kozen kabelu nap jen mus b t kabel vym n n v...

Page 9: ...16 RU Saturn 1 1 1 1 I A B C D E F G H I ON OFF J K L II III 1 17 2 3 4 5 6 IV 1 1 Downloaded From Vacuum Manual com Manuals...

Page 10: ...18 2 3 2 MIN 19 3 1 2 3 5 1 Downloaded From Vacuum Manual com Manuals...

Page 11: ...20 2 V 21 VI 1 2 3 Downloaded From Vacuum Manual com Manuals...

Page 12: ...22 220 230 50 1500 6 8 23 UA Saturn 1 1 1 1 I A B C D E F G H I ON OFF J K L II III Downloaded From Vacuum Manual com Manuals...

Page 13: ...24 1 2 3 4 5 6 IV 1 1 2 25 3 2 MIN 1 2 3 Downloaded From Vacuum Manual com Manuals...

Page 14: ...26 5 1 2 27 V VI 1 2 Downloaded From Vacuum Manual com Manuals...

Page 15: ...r napunjenosti kese I ON OFF Prekida J Utika K Usisnik L Podna etka II Kratko predstavljanje Usisiva je odli nog izgleda lepe boje dobre unutra nje strukture Uredjaj poseduje prekida za automatsko umo...

Page 16: ...aj klikom 2 Nakon upotrebe pritisnuti dugme i povu i crevo napolje 3 Povezati produ nu cev sa ru icom cev sa cevi i cev sa podnom etkom kao na slici 2 Upotreba Izvu i kabl na potrebnu du inu insertova...

Page 17: ...se kabl ne mo e potpuno uvu i malo ga izvu i pa opet pritisnuti prekida za uvla enje kabla Mogu e je uzastupno pritiskanje prekida a sve dok se isti ne uvu e kompletno 2 Nakon upotrebe uredjaj se mo...

Page 18: ...om te no u Ne dozvoliti da voda dospe do unutra njosti usisiva a Ukoliko je naponski kabl o te en mora biti zamenjen od strane proizvodja a ili njegovog servisnog agenta ili od sli ne kvalifikovane os...

Reviews: