background image

18

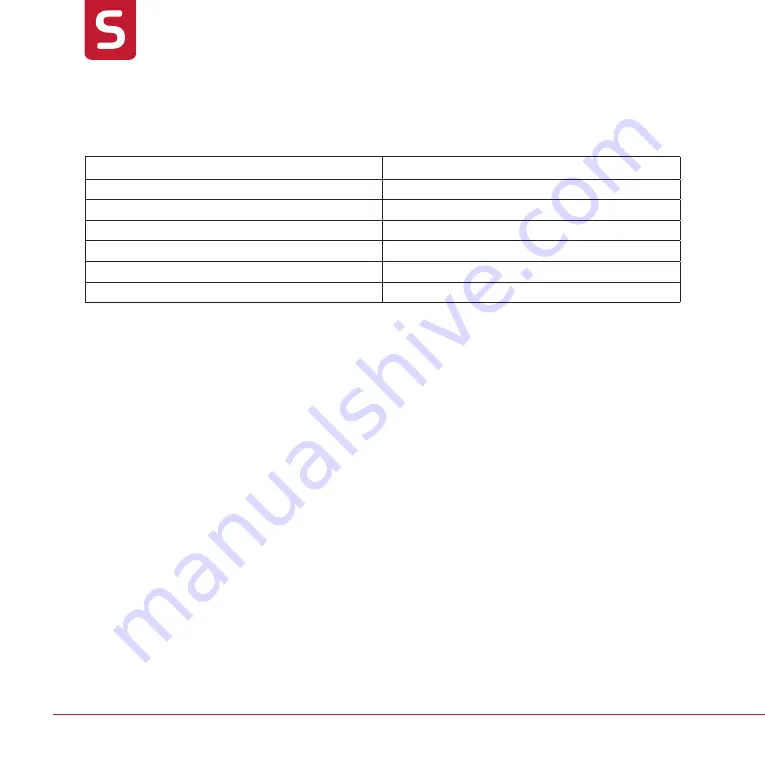
Spare Parts

Part

Part Number

Hard Water Filter

32201756

Clean Water Tank

33156384

Mop Pad

31400290

Carpet Glider

31155597

Dust Canister

33156385

Dust Canister Filter

32201757

Summary of Contents for Steam and Vacuum SV-100

Page 1: ...steam and vacuum SV 100...

Page 2: ...2 G H I J K L N M O P A C B D E F Q R S Accessories...

Page 3: ...gratulations on the purchase of your new Sauber Steam and Vacuum cleaner There are many useful features built into your cleaner We recommend that you carefully read this instruction manual for the bes...

Page 4: ...and remove the plug from the electricity supply before cleaning your appliance when not in use or attempting any maintenance task This cleaner should only be used for its intended purpose as described...

Page 5: ...n this manual Use only manufacturer s recommended attachments 8 Do not pull or carry by the power cord do not use cord as a handle do not close a door on the power cord or pull the power cord around s...

Page 6: ...animals or plants risk of scalding 26 Do not aim the steam cleaner at electrical systems or wires 27 Connecting the steam cleaner to improper voltage may result in damage to the steam cleaner and poss...

Page 7: ...of the cleaner to the cleaner head and press until you hear it click into place Important Please ensure the main body is fully inserted into the mop head until you hear a click sound WARNING Disconnec...

Page 8: ...t IMPORTANT Always unplug the cleaner when adding water or changing a Mop Pad NOTE Wash the Textile Pad prior to use to remove any lint 1 Fitting Place the machine onto the carpet glider until it lock...

Page 9: ...p and make sure no water leaks before you refit the clean water tank 4 Ensure the Hard Water Filter is in place before you refill the clean water tank WARNING Do not add any cleaning solution detergen...

Page 10: ...10 Control panel description To increase the steam High Steam Light Indicator Low Steam Light Indicator To decrease the steam Ready Light Indicator Machine is preheating and it is ready to use...

Page 11: ...to be used Press the Steam Trigger Unlock Button and the Steam Trigger at the same time to release steam 4 You can use the steam function and the vacuum function at the same time you only need to pres...

Page 12: ...the cleaner 3 Open the Clean Water Tank cap 4 Empty any excess water from the tank 5 Replace the cap and reassemble to the cleaner Switching on the vacuum function Empty the Clean Water Tank Steam cle...

Page 13: ...er 2 Lift up the filter and empty the dust from the Dust Canister 3 Unlock the HEPA Filter Cap by turning anti clockwise 4 Clean the HEPA Filter regularly to maintain the suction performance 5 Place t...

Page 14: ...ter and the Clean Water Tank to your cleaner Replacing the Hard Water Filter The cleaner is fitted with a Hard Water Filter If you live in an area of hard water the filter will discolor over time Depe...

Page 15: ...one time on the Mop Pad Holder Release Button and lift the main cleaner to take out the Mop Pad Holder 3 Wash the Mop Pad in a washing machine with a mild detergent at max temperature 40 C Ensure the...

Page 16: ...m the power outlet whilst stored 3 Neatly tie the cord onto the Cord Holder 4 Place the back of the appliance into the hook 1 Fix the wall hook by using a screw driver not provided and the three screw...

Page 17: ...The steamer will not switch on Check the steamer is plugged in Plug the steamer into a different socket The steamer will not produce steam Check the Hard Water Filter is assembled Check there is enoug...

Page 18: ...18 Spare Parts Part Part Number Hard Water Filter 32201756 Clean Water Tank 33156384 Mop Pad 31400290 Carpet Glider 31155597 Dust Canister 33156385 Dust Canister Filter 32201757...

Page 19: ...19 Notes Spare Parts Notes...

Page 20: ...ids Pty Limited Level 1 Building 3 Brandon Business Park 530 Springvale Road Glen Waverley Victoria 3150 or on 1800 815 270 AUS or 0800 282 288 NZ Monday Friday 9am 5pm EST The decision to repair or r...

Reviews: