Savant Lamp Control Deployment Guide
Copyright © 2016 Savant Systems, LLC
009-1388-01 | 160810
17
of
38
7.6
Populate/Update the Lighting Data Table
Once the Lamp Control(s) are added and configured, the information needs to be populated in the
lighting data table. Follow the steps below to do this.
1.
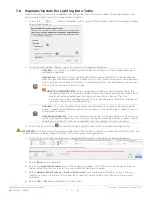
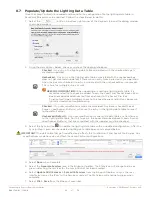
Select the
button in bottom right corner of the Keypads tab and the dialog window
shown below opens.
2.
Using the descriptions below, check or uncheck the appropriate boxes.
Checked
– An entry in the lighting data table associated with the checked box gets
created or updated.
Unchecked
- Any entry in the lighting data table associated with the unchecked box
does not get created or updated. If there was an entry from a previous Sync operation
when the box was checked, the entry associated with the unchecked box is removed.
This is true for multiple entries as well.
HELPFUL INFORMATION!
When updating or creating a lighting data table, it is
recommended that a check be added to only the Loads and Scenes boxes. Each
box checked adds additional buttons and icons to the Savant Pro 8 or
TrueControl II Apps. Adding a check to the Load Scenes and Buttons boxes are
typically used when troubleshooting.
Checked
– Any user modifications made are discarded. Any boxes checked (Loads,
Scenes, Load Scenes, Buttons) will cause the entry in the lighting data table to revert
to the default values.
Unchecked (Default)
– Any user modifications made to the data table are transferred
to the lighting data table. For this to occur, the boxes described above (Loads, Scenes,
Load Scenes, Buttons) that are associated with the updates must be checked.
3.
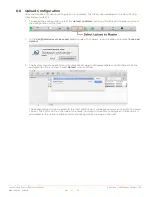
Select the Sync button
to update the lighting data table with an updated configuration.
IMPORTANT!
The data table that gets modified only affects the TrueControl II and Savant Pro 8 Apps. Any
modifications made here do not affect the Lamp Control configurations.
4.
After the Sync button is pressed, the updated lighting data table opens as displayed below.
5.
Select
Done
when Complete.
6.
Select the
Generate Services
icon in the Blueprint toolbar. The State icon will change to blue or
green indicating the services for the Lamp Control has been created.
7.
Select
Update All UI Screens > Sync with Services
from the Blueprint toolbar to sync the user
interfaces such as the iPad® to the Services created. The State icon will change to green when
complete.
8.
Select
File > Save
from the Blueprint menu bar.
A
B
C

