

SHC-S2-00 | 009-1775-00 | 181204
Copyright 2018 Savant Systems, LLC
45 Perseverance Way, Hyannis, MA 02601
| 508.683.2500
2 of 2
GPIO - General Purpose Input/Output
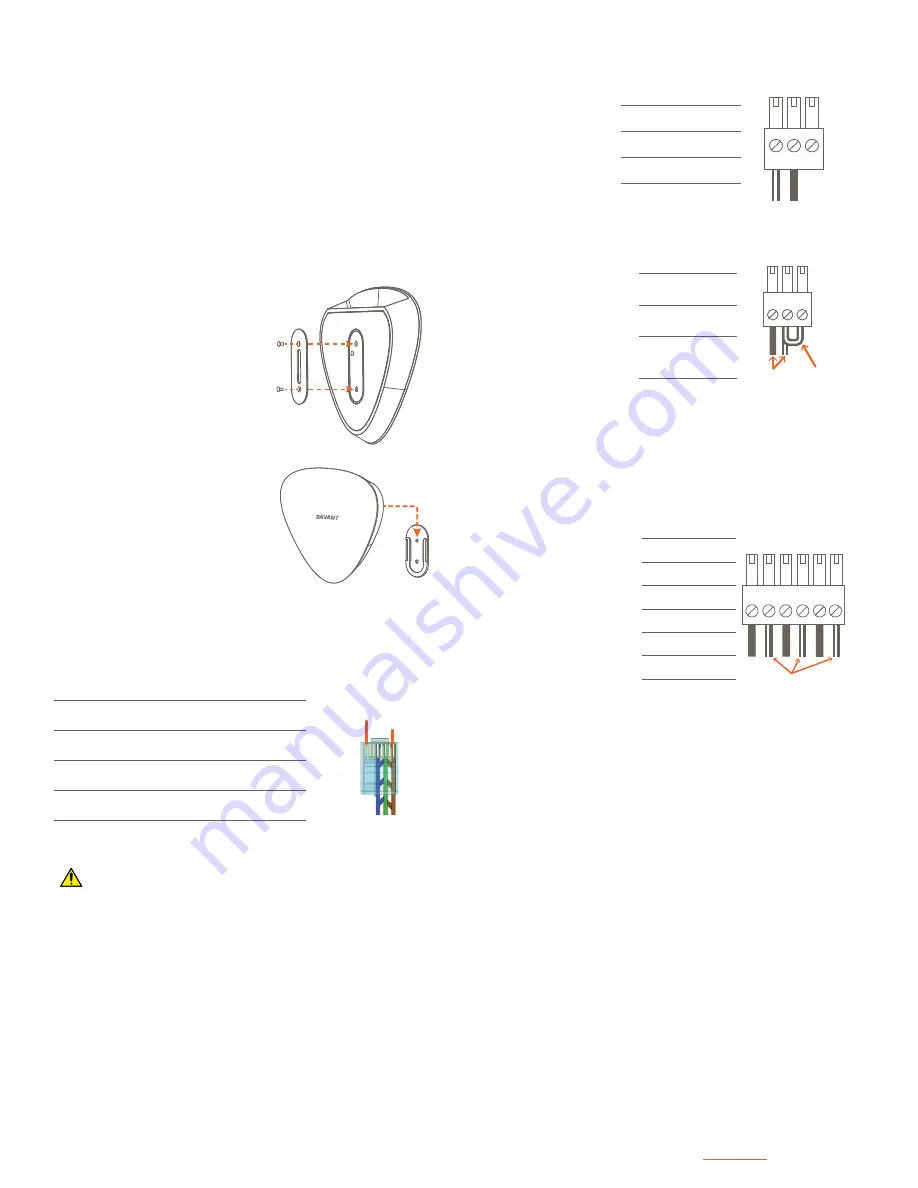
A two-piece wall mount bracket is included for installation to a wall or
similar. Wall mount instructions are provided below.
Wall Bracket
Control Connections
RS-232 Wiring
IR Wiring (Infrared)
Relay Wiring
– Ensure the all IP emitters
are within 15 feet (4.6
meters) from the control-
lers location.
– Use of 3rd party flashing
IR emitters with Talk
Back is not recom-
mended. These types
of emitters can draw
voltage away from the IR
signal that can degrade
IR performance.
1
IR1
+
-
+
-
+
-
2
IR2
3
IR3
4 5 6
Use White Stripe
for Positive (+)
Pin 1: IR1 -
Pin 2: IR1 +
Pin 3: IR1 -
Pin 4: IR1 +
Pin 5: IR1 -
Pin 6: IR1 +
– IR connections IR4 to IR6 (not shown in diagram) follow the
same wiring as connections IR1 to IR3.
– GPIO’s configured as an
output can be used to
trigger an action within
the system such as
switching a device.
– GPIO configured as an
input can detect a state
change and trigger a
workflow.
3
2
1
GPIO 1
Standard
GPIO Using
PD Jumper
Gnd
I/O PD
Pin 1: GND
Pin 2: GPIO 1
Pin 3: PD (Pull-
down)
– GPIO pins configured as an input are pulled high to (+12V) during
the boot process. To force the GPIO signal low during a boot-up.
Connect the PD pin to the GPIO pin. This forces the GPIO output
to (< 0.8V) during the processor boot times.
– Both Normally Open
and Normally Closed
outputs are available.
3
2
1
NC
NO
C
/ /
Pin 1: NC
Pin 2: Common
Pin 3: NO
1. Attach bracket that mounts to
the bottom of the chassis using
the included M3 x 6mm flat-
head screws.
Host Mount
(074-0584-xx)
2. Attach the wall bracket securely
to the wall. If mounting to dry-
wall, a sturdy anchor such as a
threaded drywall anchor should
be used.
3. Position the Smart Host over
the wall bracket and gently slide
into place. See image to the
right.
Wall Mount
(074-0585-xx)
The optional RCK-3000-xx provides a ventilated shelf for mounting up
to two Smart Hosts. When rack mounting, the wall bracket must not
be installed to allow for a flat, level installation.
Rack
The Smart Host can be installed on a solid, flat, level surface such as
a table, cabinet, or shelf, or can be wall mounted using the included 2
piece bracket. The location should be dry, well ventilated, and out of
direct sunlight. When placing the Smart Host on a flat surface, do not
install the wall bracket. The wall bracket will not allow the Host to lay
flat. Mounting the Host is described below.
Chassis Installation
Refer to the following documents located on the
Savant Customer
Community
for additional information.
– Savant Smart Host Deployment Guide.
Additional Information
Pin 1: ------
Pin 5:
RXD (RS232)
Pin 1
Pin 8
RJ-45 Connector
(Gold Pins Facing Up)
Pin 2: ------
Pin 6:
TXD (RS232)
Pin 3: ------
Pin 7:
CTS (RS232)
Pin 4:
GND (RS232)
Pin 8:
RTS (RS232)
IMPORTANT!
– Wire colors are included to identify the pins used for this con-
nection. Colors shown do not represent any wiring standard.
– When wiring, DO NOT connect any wires within the cable that
are not required for communications.
– Pins 7 & 8 are only required for CTS/RTS handshaking.
– CTS/RTS handshaking is supported for flow control based on the
profile used in the Blueprint configuration.
– RS-422/485 is not supported
– Refer to the
RS-232 Conversion to DB9 and RS-422/485 Pin-out
Application Note
on the
Savant Customer Community
for more
information on RJ-45 to DB9 adapters offered by Savant.
Refreshing the IP Connection
Network Configuration
– Hot Plug the Ethernet (LAN) Connection
– Cycle power
After connecting to a new network, changing routers, or if the IP
Address range in the router was changed, the IP connection should be
refreshed. To refresh the IP connection, do one of the following:
To ensure the IP Address will not change due to a power outage, a
static IP Address or DHCP reservation should be configured. Savant
recommends using DHCP reservation within the router. By using this
method, static IP Addresses for all devices can be managed from a
single UI, avoiding the need to access devices individually.
Setting DHCP reservation varies from router to router. Refer to the
documentation for the router to configure DHCP reservation.


