background image


EN 


3


SAFETY INFORMATION


  For your safety and correct operation of the appliance, read this manual 

carefully before installation and use. Always keep these instructions 
with the appliance even if you move or sell it. Users must fully know the 
operation and safety features of the appliance. 
 

 The wire connection has to be done by specialized technician. 


The manufacturer will not be held liable for any damages resulting from 
incorrect or improper installation. 


The minimum safety distance between the cooker top and the extractor 
hood is 650 mm (some models can be installed at a lower height, 
please refer to the paragraphs on working dimensions and installation). 


If the instructions for installation for the gas hob specify a greater 
distance, this must be respected.  


Check that the mains voltage corresponds to that indicated on the 
rating plate fixed to the inside of the hood. 


Means for disconnection must be incorporated in the fixed wiring in 
accordance with the wiring rules. 


For Class I appliances, check that the domestic power supply 
guarantees adequate earthing. 


Connect the extractor to the exhaust flue through a pipe of minimum 
diameter 120 mm. The route of the flue must be as short as possible. 


Regulations concerning the discharge of air have to be fulfilled. 


Do not connect the extractor hood to exhaust ducts carrying 
combustion fumes (boilers, fireplaces, etc.). 


Summary of Contents for C-6906

Page 1: ...C 6906 C 6908 Instructions Manual K ytt ohje Bruksanvisning...

Page 2: ...CHARACTERISTICS 6 INSTALLATION 8 USE 11 MAINTENANCE 12 SIS LT TURVALLISUUSTIETOJA 14 MITAT JA OSAT 17 ASENNUS 19 K YTT 22 HUOLTO 23 INNEH LL S KERHETSINFORMATION 25 EGENSKAPER 28 INSTALLATION 30 ANV...

Page 3: ...eight please refer to the paragraphs on working dimensions and installation If the instructions for installation for the gas hob specify a greater distance this must be respected Check that the mains...

Page 4: ...to be adopted for fume discharging it is important to closely follow the regulations provid ed by the local authorities WARNING Before installing the Hood remove the protective films Use only screws a...

Page 5: ...s not applicable to appliances that only discharge the air back into the room The symbol on the product or on its packaging indicates that this product may not be treated as household waste Instead it...

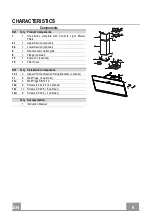
Page 6: ...e 9 1 Flange optional 15 1 Angle iron optional 16 1 Filter cover Ref Q ty Installation Components 7 2 1 2 Upper Chimney Section Fixing Brackets optional 11 6 Wall Plugs 4 optional 11a 2 Wall Plugs SB...

Page 7: ...EN 7 7 Dimensions...

Page 8: ...other side checking that the two marks are levelled Drill at the marked points 1 using a 12 mm drill bit Drill at the marked points 2 using a 8 mm drill bit Insert the bracket plugs 11a into the holes...

Page 9: ...rews Vr to level the hood body itself Fasten the safety screw 12a Close the doors the door again 12a Vr 11a Connections DUCTED VERSION AIR EXHAUST SYSTEM When installing the ducted version connect the...

Page 10: ...g sure that the connector of the feeding cable is correctly inserted in the socket placed on the side of the fan Flue assembly The chimney can only be installed with exhausting hood Fasten the angle i...

Page 11: ...ble to change the op erating speed when this function is enabled The respective buttons T1 T2 or T3 or T4 will flash T4 Turns the Motor on at speed three Buttons T1 T4 are on Press and hold for 2 seco...

Page 12: ...tly for particularly heavy usage and can be washed in a dishwasher Pull the comfort panels to open them Remove the filters one by one pushing them towards the back side of the hood unit and simultaneo...

Page 13: ...frequently with heavy usage REPLACING THE ACTIVATED CHARCOAL FILTER Open the comfort panels pulling them downwards Remove the metal grease filters Remove the saturated activated charcoal filter as sh...

Page 14: ...mallit voidaan asentaa alemmas katso ty ja asennusmittoja koskevaa kappaletta Jos kaasuk ytt isen keittotason asennusohjeet m r v t ett et isyyden on oltava yll mainittua suurempi ohjeita on noudatett...

Page 15: ...isuuteen liittyvien toimenpiteiden suhteen on noudatettava tarkkaan paikallisten viranomaisten antamia m r yksi VAROITUS Poista suojakalvot ennen liesituulettimen asentamista K yt vain liesituulettime...

Page 16: ...ta k ytet n samanaikaisesti kaasulla tai muilla polttoaineilla toimivien laitteiden kanssa ei koske laitteita jotka poistavat tilaan vain ilmaa Merkki tuotteessa tai sen pakkauksessa osoittaa ett tuot...

Page 17: ...til 9 1 Sovituslaippa 150 120 mm 15 1 Kulmaosa lis varuste 16 1 Suodatuskansi Viite Lkm Asennuksen osat 7 2 1 2 Yl hormin kiinnitystuet lis varuste 11 6 Ruuvitulpat 4 lis varuste 11a 2 Ruuvitulpat SB...

Page 18: ...FI 1 8 18 Mitat...

Page 19: ...puolelle Toista toimenpide toiselle puolelle ja tarkista ett ne ovat samalla tasolla Poraa merkittyihin kohtiin 1 rei t 12 mm Poraa merkittyihin kohtiin 2 rei t 8 mm Aseta reikiin 1 tulpat ja tuki 11a...

Page 20: ...n runko sis puolelta ruuveilla Vr Ruuvaa kiinni turvaruuvi 12a Sulje ovi ovet 12a Vr 11a Ilmanpoistoputket HORMILIIT NT INEN MALLI T m malli asennetaan liitt m ll koneisto hormiin oman valintasi mukaa...

Page 21: ...rasvasuodattimet katso kappaletta Huolto ja varmista ett virtajohdon liitin on kunnolla kiinni imulaitteessa Hormin kokoaminen Hormi voidaan asentaa vain liesituulettimen imuversioon Kiinnit kulmaosa...

Page 22: ...tty sammutus moottori valot K ytt nopeutta on mahdollista vaihtaa toiminnon ollessa aktiivisena Vastaavat painikkeet T1 T2 tai T3 tai T4 vilkkuvat T4 K ynnist moottorin kolmannella nopeudella Painikke...

Page 23: ...pesukoneessa On suositeltavaa pest ne joka toinen kuukausi Jos tuulettimen k ytt on erikoisen runsasta suositellaan suodattimien pesua useammin Avaa Comfort Panel osat vet m ll niit kevyesti ulosp in...

Page 24: ...VIHIILISUODATTIMEN VAIHTAMINEN Avaa Comfort Panel vet m ll niit kevyesti ulosp in Irrota metalliset rasvasuodattimet Irrota vanhat aktiivihiilisuodattimet kuten kuvassa A Asenna uudet suodattimet paik...

Page 25: ...kten r 650 mm vissa modeller kan installeras p en l gre h jd se avsnittet g llande drift och installationsm tt Om installationsanvisningarna f r gasspish llen anger ett st rre avst nd n det ovan angi...

Page 26: ...kerhetsm ssiga tg rder som ska vidtas f r avledning av r k VARNING Ta bort skyddsfilmen innan du installerar k ksfl kten Anv nd endast skruvar och beslag som r l mpliga f r k ksfl kten VARNING Om det...

Page 27: ...k ksfl kten anv nds samtidigt med andra apparater som anv nder gas eller andra br nslen g ller inte apparater som endast sl pper ut luft i lokalen Symbolen p apparaten eller emballaget anger att appar...

Page 28: ...l ns tillval 15 1 Vinkelst l tillval 16 1 Filtrerande lock Ref Ant Installationskomponenter 7 2 1 2 F ststag f r vre fl ktr r tillval 11 6 Expansionspluggar 4 som tillval 11a 2 Expansionspluggar SB 12...

Page 29: ...SE 2 9 29 M tt...
Page 30: ...referensstrecket och 540 mm ver kokh llen Upprepa detta moment fr n den motsatta delen kontrollera nivelleringen Borra 12 mm h l i de markerade punkterna 1 Borra 8 mm h l i de markerade punkterna 2 S...

Page 31: ...Vr Skruva fast s kerhetsskruvarna 12a St ng luckan luckorna 12a Vr 11a Anslutningar ANSLUTNING AV VERSION MED FR NLUFTKANAL Vid installation av versionen med fr nluftkanal anslut k ksfl kten till sko...

Page 32: ...en se avsnitt Underh ll och se till att n tsladdens kontaktdon r r tt isatt i fl ktens uttag Montering av fl ktr r Fl ktr ret kan endast installeras om fl kten har insugningsfunktion F st vinkelst let...

Page 33: ...er Motor Belysning Med aktiv funktion r det m jligt att ndra drifthastigheten De respektive knapparna T1 T2 eller T3 eller T4 blinkar T4 Sl r p motorn p den tredje hastigheten Knapparna T1 T4 r t nda...
Page 34: ...ter RENG RING AV SJ LVB RANDE METALLFETTFILTER Dessa kan ven diskas i diskmaskin de ska diskas varannan m nad cirka eller oftare vid intensiv anv ndning ppna Comfortpanelerna genom att dra i dem Ta bo...

Page 35: ...BYTE AV LUKTFILTER MED AKTIVT KOL ppna Comfortpanelerna genom att dra i dem Ta bort metallfettfiltren Avl gsna de m ttade luktfiltren med aktivt kol som visas A Montera de nya filtren som visas B Mont...

Page 36: ...991 0285 073_ver5 181114 D000000000576_03...

Reviews: