background image

10

Figure 20

Figure 21

12. OPERATING YOUR FAN

NOTE:

 Wait for fan to stop before 

changing the setting of the slide switch.

Turn on the power and check the 

operation of your fan. The pull chain 

controls the fan speed as follows: 1 pull- 

High, 2 pulls-Medium, 3 pulls- Low, and 4 

pulls-Off.

Light pull chain it controls the light in "ON" 

or "OFF".

Speed settings for warm or cool weather 

depend on factors such as the room size, 

ceiling height, number of fans and so on.

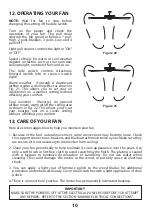
The slide switch controls directions: 

forward (switch left) or reverse (switch 

right)

Warm weather - (Forward) A downward   

airflow creates a cooling effect as shown in 

Fig. 21. This allows you to set your air 

conditioner on a warmer setting without  

affecting your comfort. 

Cool weather - (Reverse) An upward 


airflow moves warm air off the ceiling area 

as shown in Fig. 22. This allows you to set 

your heating unit on a cooler setting  

without  affecting your comfort.

Here are some suggestions to help you maintain your fan

1. Because of the fan's natural movement, some connections may become loose. Check 

the support connections, brackets, and blade attachments twice a year. Make sure they 
are secure. (It is not necessary to remove fan from ceiling.)

2. Clean your fan periodically to help maintain its new appearance over the years. Use 

only a soft brush or lint-free cloth to avoid scratching the finish. The plating is sealed 
with a lacquer to minimize discoloration or tarnishing. Do not use water when 
cleaning. This could damage the motor, or the wood, or possibly cause an electrical 
shock.

3. You can apply a light coat of furniture polish to the wood blades for additional 

protection and enhanced beauty. Cover small scratches with a light application of shoe 
polish.

4. There is no need to oil your fan. The motor has permanently lubricated bearings. 

13. CARE OF YOUR FAN

IMPORTANT

MAKE SURE THE POWER IS OFF AT THE ELECTRICAL PANEL BOX BEFORE YOU ATTEMPT 

ANY REPAIRS.  REFER TO THE SECTION "MAKING ELECTRICAL CONNECTIONS".

Summary of Contents for 52-CDC-5RV-13

Page 1: ...READ AND SAVE THESE INSTRUCTIONS FAN RATING AC 120V 60Hz UL LISTED MODEL AC 552 MODEL 52 CDC 5RV 13 52 CDC 5RV SN CEILING FAN OWNER S MANUAL ...

Page 2: ...ass shade l Pull chain and fob 2 m Extra plastic plug n Package hardware 1 Mounting hardware screws 2 lock washers 2 star washers 2 wire nuts 3 wood screws 2 washers 2 2 Blade attachment hardware screws 16 fiber washers 16 3 Blade arm hardware screws with lock washers 11 4 Safety cable hardware wood screw lock washer metal washer 5 Balance Kit Philips screw driver Blade screw driver 11 mm wrench S...

Page 3: ...ious when working around or cleaning the fan 10 Do not use water or detergents when cleaning the fan or fan blades A dry dust cloth or lightly dampened cloth will be suitable for most cleaning 11 After marking electrical connections spliced conductors should be turned upward and pushed carefully up into outlet box The wires should be spread apart with the grounded conductor and the equipment groun...

Page 4: ...ort the moving weight of the fan at least 50 lbs Do not use plastic outlet boxes Figures 1 2 and 3 are examples of different ways to mount the outlet box Note You may need a longer downrod to maintain proper blade clearance when installing on a steep sloped ceiling Fig 3 To hang your fan where there is an existing fixture but no ceiling joist you may need an installation hanger bar as shown in Fig...

Page 5: ...th your outlet box Step 3 Remove the hitch pin lock pin and set screws from the top of the motor assembly Step 4 Route wires exiting from the top of the fan motor through the canopy coupling cover and then through the ball downrod Fig 6 Step 5 Align the holes at the bottom of the downrod with the holes in the collar on top of the motor housing Fig 6 Carefully insert the hitch pin through the holes...

Page 6: ...e the ceiling canopy over the collar at the top of the motor Align the mounting holes with the holes in the motor and fasten using the screws and lock washers provided Fig 9 6 Tighten the mounting screws securely WARNING Failure to completely tighten the three screws in step 5 could result in fan loosening and possibly falling 7 Hang the fan on the hook of the hanger bracket Be certain that the ca...

Page 7: ...ecting nuts upward and push the wiring into the outlet box Figures 12 and 13 illustrate the wiring connections for optional wall control The wire color out of wall control may vary see wall control s installation manual for correct wire connections NOTE LIGHT KITS ARE AVAILABLE AT YOU SAVOY HOUSE RETAILER THE FAN IS ALREADY WIRED TO SUPPORT THE LIGHT KIT OPTION WARNING TO REDUCE THE RISK OF FIRE E...

Page 8: ...Secure the canopy to the hanger bracket with the four screws with your fan CLOSE TO CEILING INSTALLATION Remove the fan from the hook on the hanger bracket Secure the canopy to the hanger bracket as shown in Figure 15 with four screws included with your fan Figure 14 Figure 15 Outlet box Hanger bracket Screws Outlet box Hanger bracket Ceiling canopy Screws Ceiling canopy ...

Page 9: ...or using the screws supplied Fig 16 Figure 17 Figure 16 9 INSTALLATING THE MOUNTING PLATE Step 1 Remove the 1 of 3 screws from the mounting ring and loosen the other 2 screws Do not remove Step 2 Place the key holes on the mounting plate over the 2 screws previously loosened from the mounting ring turn mounting plate until it locks in place at the narrow section of the key holes Secure by tighteni...

Page 10: ... 18 Step 3 Install the two 60W candelabra bulbs included Figure 18 Step 4 Raise glass shade up against the light kit and secure it to fan by turning glass clockwise until snug Do not overtighten Restore power and your light kit is ready for operation Figure 18 Figure 18 Figure 19 Mounting plate Wire connection plugs Light kit assembly Bulbs Glass shade Srews 11 FAN WITHOUT LIGHT KIT OPTIONAL 1 Dis...

Page 11: ...thout affecting your comfort Here are some suggestions to help you maintain your fan 1 Because of the fan s natural movement some connections may become loose Check the support connections brackets and blade attachments twice a year Make sure they are secure It is not necessary to remove fan from ceiling 2 Clean your fan periodically to help maintain its new appearance over the years Use only a so...

Page 12: ...t fan wobbling problems are caused when blade levels are unequal Check this level by selecting a point on the ceiling above the tip of one of the blades Measure this distance Rotate the fan until the next blade is positioned for measurement Repeat for each blade The distance deviation should be equal within 1 8 3 Use the enclosed Blade Balancing Kit if the blade wobble is still noticeable 4 If the...

Reviews: