background image

READ AND SAVE THESE INSTRUCTIONS

FAN RATING AC 120V. 60Hz

CUL LISTED MODEL : AC-552A

MODEL: 54-660-5WA-25

54-660-5MP-188

CEILING FAN
OWNER'S MANUAL

Summary of Contents for 54-660-5MP-188

Page 1: ...READ AND SAVE THESE INSTRUCTIONS FAN RATING AC 120V 60Hz CUL LISTED MODEL AC 552A MODEL 54 660 5WA 25 54 660 5MP 188 CEILING FAN OWNER S MANUAL...

Page 2: ...mitter incl 2 mounting screws and 3 wire nuts n Wall plate w 2 mounting screws o 40 Watt candelabra bulbs 3 p Package hardware 1 Mounting hardware screws 2 lock washers 2 star washers 2 wire nuts 3 wo...

Page 3: ...leaning the fan 10 Do not use water or detergents when cleaning the fan or fan blades A dry dust cloth or lightly dampened cloth will be suitable for most cleaning 11 After marking electrical connecti...

Page 4: ...ight of the fan at least 50 lbs Do not use plastic outlet boxes Figures 1 2 and 3 are examples of different ways to mount the outlet box Note You may need a longer downrod to maintain proper blade cle...

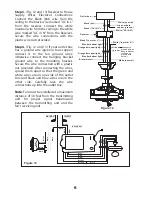
Page 5: ...of the fan motor through the coupling cover decorative scroll ring decorative canopy cover canopy and then through the ball downrod Fig 7 Step 7 Align the holes at the bottom of the downrod with the...

Page 6: ...are set to the same position any combination of settings will operate the fan as long as the transmitter and receiver are set to the same position Figure 10 Step 1 Fig 11 Insert the receiver into the...

Page 7: ...white wires are on one side of the outlet box and black and blue wires are on the other side Carefully tuck the wire connections up into the outlet box Note Fan must be installed at a maximum distance...

Page 8: ...refully tuck the wire connections inside the junction box Secure the wall transmitter with the two screws provided Attach the wall plate over the wall transmitter and secure with the two screws provid...

Page 9: ...Fig 16 Step 2 Secure the decorative scroll ring with setscrew tightly Figure 16 Figure 17 Screws Set screws Decorative scroll arms Decorative scroll ring Blade brackets Screws Blades Screws Fiber was...

Page 10: ...INSTALLING THE LIGHT KIT NOTE Before starting installation disconnect the power by turning off the circuit breaker or removing the fuse at fuse box Step 1 Loosen the one of three screws from the moun...

Page 11: ...eady for operation 15 OPERATING INSTRUCTIONS Restore power to ceiling fan and test for proper operation A HI MED and LOW buttons These three buttons are used to set the fan speed as follows HI high sp...

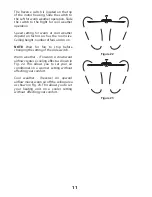
Page 12: ...eiling height number of fans and so on NOTE Wait for fan to stop before changing the setting of the slide switch Warm weather Forward A downward airflow creates a cooling effect as shown in Fig 22 Thi...

Page 13: ...e ceiling It should not touch the ceiling 1 Check that all blade and blade arm screws are secure 2 Most fan wobbling problems are caused when blade levels are unequal Check this level by selecting a p...

Reviews: