background image

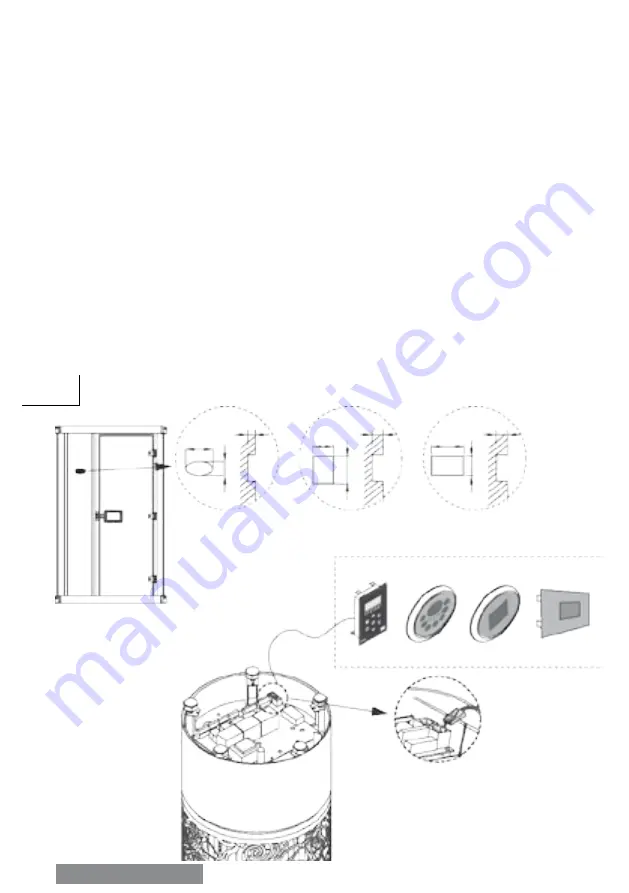
ERILLISEN KÄYTTÖPANELIN ASENNUS

4.  Liitä käyttöpaneli ja tehoyksikkö 

toisiinsa mukana tulevalla RJ 10 

kaapelilla.

5.  Asenna käyttöpaneli seinään tehtyyn 

aukkoon ja kiinnitä se ruuveilla.

1.  Asenna erillinen käyttöpaneli 

haluamaasi paikkaan.

2.  Tee seinään aukko annettujen mittojen 

ja määräysten mukaan.

3.  Tee aukon ympärille viisteet, jotta 

asennusrasia istuu hvin aukkoon. 

INSTALLATION OF THE CONTROL PANEL  

(SEE ILLUSTRATION)

1.  Mount the separate control panel 

casing in preferred location.

2.  Cut the wall section according to the 

specifications.

3.  Cut tapered edges to the hole for the 

user interface to be flushed nicely to 

the wall. 

4.  Connect the RJ10 cable from the 

control panel to the Power Controller.

5.  Insert the casing on the cut section 

and screw the Control panel to the 

wall tightly.

Kuva 5

Fig. 5

161mm

25mm

85mm

1.

4.

81mm

40mm

126mm

155mm

40mm

80mm

SEPARATE CONTROL INTERFACE

Touch

SS Touch

SS Touch

Classic

Classic / Touch

Classic 2.0

Classic 2.0

3.

Tehoyksikkö

Power Controller

Kytkentäkaavio sivulla 16-19

Refer to Electrical Diagram on 

pages 16-19

12

SUOMI | ENGLISH

Summary of Contents for HEATERKING ROUND DRFT12-150Ni

Page 1: ...ustu käyttöohjeisiin huolellisesti ennen käyttöönottoa DRFT5 80Ni HEATERKING ROUND DRFT5 90Ni DRFT6 80Ni DRFT6 90Ni DRFT6 105Ni DRFT6 120Ni DRFT9 105Ni DRFT9 120Ni DRFT9 180Ni DRFT12 150Ni DRFT12 180Ni DRFT12 210Ni DRFT12 240Ni COMPATIBLE WITH INNOVA USER INTERFACE YHTEESOPIVA INNOVA KÄYTTÖPANEELIEN KANSSA For control operation Please refer to Innova control manual Käyttöpaneelin ohjeet löytyvät k...

Page 2: ...10 Kivien latominen kiukaaseen 10 Erillisen käyttöpanelin asennus 12 Lämpötilatunnistin 13 Ovitunnistinvaraus lisävaruste 14 Tuuletin lisävaruste 14 Valaistuksen himmennin lisävaruste 14 Kytkentäkaavio 16 Maksimi päälläoloajat 20 Kiukaan pääkytkin 20 Ilmanvaihto 22 Eristys 22 Saunahuoneen lämmitys 24 Löylyveden laatuvaatimukset 24 Saunan huolto 26 Vianetsintäkaavio 28 Tekniset tiedot 30 Tower kiuk...

Page 3: ... of the sauna room 25 Quality requirements for water which is thrown to the heater 25 Sauna maintenance 27 Diagnostic table 29 Technical data 30 Tower Heater Spareparts 31 Heater maintenance 32 HUOM Takuu ei kata ohjeiden vastaista asennusta käytön tai ylläpidon aiheuttamia vikoja Takuuasioissa ota aina yhteyttä jälleenmyyjääsi maahantuojaan ennen toimenpiteiden aloittamista NOTE Warranty is not c...

Page 4: ... valvontaa Älä anna koskaan lasten leikkiä kiukaalla Älä käytä kiuasta grillinä Älä laita puita sähkökiukaalle Älä peitä kiuasta Se aiheuttaa palovaaran Älä kuivata vaatteita kiukaalla Se aiheuttaa palovaaran Älä istu kiukaalla Se on todella kuuma ja aiheuttaa palovammoja Älä käytä kloorivettä esim uima tai porealtaasta tai merivettä löylyvetenä Se tuhoaa kiukaan Kiukaan asentamisen jälkeen lämmit...

Page 5: ...en be allowed to play with the device Do not use the heater as a grill Do not put wood of any kind on the electric heater Do not cover the heater It may cause a fire Do not use the heater as clothes dryer It may cause fire Never sit on the heater It is really hot and can cause serious burns Do not use chlorinated water e g From the swimming pool or jacuzzi or seawater It can destroy the heater Whe...

Page 6: ...silma ei vaikuta niiden toimintaan Julkisessa käytössä olevaan kiukaaseen jossa on viikkoajastin tai kauko ohjaus mahdollisuus on asennettava erillinen ovitunnistin saunan oveen Tunnistin kytkee pois päältä kaikki esiajastustoiminnot kun kiuas on valmiustilassa ja ovi avataan Ennen kiukaan asennusta tarkista valmistajan saunalle määrittelemät maksimi ja minimikoot Katso sivu 30 Varmista että sauna...

Page 7: ...st be mounted outside the sauna cabin If this sauna heater is used for public saunas or saunas that may be switched on by a separate remote control system the door of the sauna room must be fitted with an interlock such that the stand by mode setting for remote operation is disabled if the sauna door is opened when the stand by mode setting for remote operation is set Observe the specifications on...

Page 8: ...imisuojaetäisyyksiä Katso sivu 9 sekä kuutiotilavuuksia kts sivu 28 tekniset tiedot tulee noudattaa Saunaan saa asentaa vain yhden kiukaan ellei sinulla ole erikoisohjeita kahden kiukaan asentamiseen Useimmissa maissa kiukaan kiinnittäminen lattiaan on säädetty lailla Kiuas on todella kuuma Suosittelemme asentamaan kiukaaseen suojakaiteen jolla vähennät kosketusmahdollisuuksia kuuman kiukaan kanss...

Page 9: ...for twin heater installations In most countries there is a law that requires heaters to be screwed to the floor The heater gets very hot To avoid the risk of accidental contact with the heater it is recommended that a heater guard be provided The cable used for sauna wiring must be HO7RN F type or its equivalent A certified electrician must do the installation of the heater to ensure safety and re...

Page 10: ...Älä käytä kiukaassa keraamisia kiuaskiviä KIVIEN LATOMINEN KIUKAASEEN Ennen kivien latomista on suositeltavaa pestä ne mahdollisen lian ja pölyn poistamiseksi Kiviä ladottaessa kiukaaseen on huomioitava että kiukaan läpi virtaavaa ilman kiertoa ei estetä koska tämä johtaa lämmityselementtien ylikuumenemiseen ja niiden käyttöiän merkittävään lyhenemiseen Isokokoisia kiviä ei saa milloinkaan työntää...

Page 11: ...ved Small crumble or stone pieces smaller than 35mm in diameter must not be loaded into the heater because they will block the air circulation and will cause overheating and possible heating element damage Load the stones to the heater so that the heating elements are not visible from any angle If heating elements touch each others it will significantly reduce the life span of heating element NOTE...

Page 12: ...arate control panel casing in preferred location 2 Cut the wall section according to the specifications 3 Cut tapered edges to the hole for the user interface to be flushed nicely to the wall 4 Connect the RJ10 cable from the control panel to the Power Controller 5 Insert the casing on the cut section and screw the Control panel to the wall tightly Kuva 5 Fig 5 161mm 25mm 85mm 1 4 81mm 40mm 126mm ...

Page 13: ... and the heater may overheat Asenna tunnistin kiukaan yläpuolelle Katso kuva 6 Älä asenna tunnistinta lähelle ilmanvaihtoventtiilejä Liian lähellä tunnistimia olevat ilmanvaihtoventtiilit viilentävät tunnistimia ja antavat väärän tiedon tehoyksikölle saunan lämpötilasta ja kiuas saattaa ylikuumentua Kuva 6 Fig 6 HUOM Älä asenna lämpötila anturia alle 1000 mm etäisyydelle suuntaa mattomasta tuloilm...

Page 14: ...Vain hehkulamput ovat säädettävissä OVITUNNISTINVARAUS LISÄVARUSTE Muussa kuin kotikäytössä on suositeltavaa asentaa ovitunnistin lisävaruste Sille on varattu omat riviliitimet ohjauskeskuksessa Katso sivu 24 Ovitunnistin kytkee pois päältä kaikki aktiiviset esiajastustoiminnot mikäli ovi on auki Ovitunnistin myös varmistaa että saunan ovi ei ole liian pitkään avoinna kun kiuas on päällä Jos kiuas...

Page 15: ... unit and wished to be used only incandescent lamp is suitable DOOR SENSOR OPTIONAL In other than household use it is recommended to install door sensor The door sensor disables all pre run operations if the door is opened while the pre run countdown is active The door sensor also ensures that the door is not open for long periods of time when the heater is on If the heater is on and the door is o...

Page 16: ...led Door switch terminals in the Power Controller must be connected with each other by a jumper wire from terminal D to terminal D WHITE BLUE Lämmityksen ohjaus TB Control of Heating NON FUSED kW Model H3 H1 H2 H4 H5 H7 H6 H8 H9 H10 H11 H12 DRFT6 120Ni P DRFT6 105Ni P 10 5 12 0 2 0 2 0 2 0 2 0 1 5 2 0 2 0 2 0 2 0 1 5 2 0 1 5 DRFT9 105Ni P DRFT9 150Ni P DRFT9 120Ni P 10 5 12 0 1 15 1 15 1 15 1 15 1...

Page 17: ...ion Time jumper Adjust this jumper to change max session time 6hrs is factory default 18h BLUE Make sure that pin header terminal is properly inserted to UIB socket terminal WHITE BLUE N R L1 L2 L3 S T N PE 5 core cable Power Supply The cable must be HO7RN F type or its equivalent Contactor Terminal 1 Terminal 2 Do not connect both Optional Sensors same time Only one of the optional sensors at a t...

Page 18: ...taan kyseisen maan lakeja ja säädöksiä tulee noudattaa Mikäli liittimiä ei ole asennettu lainkaan asetus on 6 tuntia Ks Taulukko KIUKAAN PÄÄKYTKIN Kiukaan pääkytkin on sijoitettu kiukaan alaosaan Pääkytkin irroittaa kiukaan elektroniikan verkkojännitteestä Pääkytkimen asento I on tarkoittu normaalia toimintaa varten Ainostaan tässä kytkimen asennossa ohjauskeskus voi ohjata kiuasta ja ohjauskeskuk...

Page 19: ... country where the control unit is installed must be followed when setting the jumpers When no jumpers are placed the default time is 6 hours See the Table THE HEATER MAIN SWITCH The heater main switch can be found on the lower part of the heater Using this switch you can isolate the electronics from the mains power supply In order to put the unit into operation switch to the first position switch...

Page 20: ...a suhteessa Oikealla tavalla järjestetty ilmanvaihto kierrättää kiukaan ympärillä olevan lämpimän ilman saunan kaukaisimpaankin nurkkaan Jokainen saunahuone on kuitenkin ilmankierroltaan yksilöllinen Parhaan löylyn saamiseksi suosittelemme koneel lista ilmanvaihtoa Tulo ja poistoilmaventtiilien sijainnit vaihtelevat saunan mallista sekä omistajan mielty myksistä riippuen Koneellista ilmanvaihtoa k...

Page 21: ...To have a soothing sauna there should be a proper mixing of hot and cold air inside the sauna room Another reason for ventilation is to draw air around the heater and move the heat to the farthest part of the sauna The positioning of the inlet and outlet vents may vary depending on the design of the sauna room or preference of the owner When using mechanical ventilation the inlet vent should be pl...

Page 22: ...ana 3 Anna saunahuoneen tuulettua kunnolla ensimmäisen lämmityskerran jälkeen 4 Jos seuraavalla lämmityskerralla kiuas ei muodosta savua tai hajua voit aloittaa saunan käytön Mikäli savua tai hajua muodostuu yhä poistu saunasta välittömästi ja toista vaiheet 1 3 uudelleen Tarkistasaunaainaennenkiukaanpäällekytkemistä etteikiukaallataisensuojaetäisyyksien sisällä ole mitään palavaa Varmista että sa...

Page 23: ...OT stay in the sauna cabin during this period 3 Allow the sauna cabin to ventilate thoroughly after heating up for the first time 4 If no smoke or odor is produced the next time the sauna heater is heated up you can start to use the sauna If smoke or odor is produced again leave the sauna cabin immediately and repeat the initial heating up process followed by ventilation Always check the sauna roo...

Page 24: ...tia katto ja seinät Älä käytä puupintojen pesuun ammoniakkia tai klooria sisältävää pesuainetta Huuhtele pesuaine pois kylmällä vedellä Tuuleta sauna hyvin Halutessasi voit käsitellä lauteet saunapinnoille tarkoitetulla suoja aineella Lue suoja aineen käyttöohjeet tarkasti pakkauksesta ennen tuotteen käyttämistä 9 9 Jos lauteet eivät puhdistu pesemällä hio lauteet kevyesti ja käsittele suoja ainee...

Page 25: ...es ceiling floor and walls Do not use detergent which includes ammonia or chlorine Rinse surfaces with cold water and ventilate sauna room well If needed protect wood surfaces with wood treatment oil Read carefully the instructions of wood treatment oil from product packaging 9 9 If sauna benches are not getting clean after washing sand the benches with sandpaper Protect benches with wood oil Do n...

Page 26: ... MALLIT Onko kiuas laitettu päälle ohjauskeskuksesta Onko tavoitelämpötila säädetty saunan lämpötilaa korkeammaksi Onko kiukaan pääkytkin päällä Ni malleissa kytkin sijaitsee kiukaan alaosassa ja Ns malleissa tehoyksikössä Ovatko kytkintaulun sulakkeet ehjät ja toiminnassa Sulakkeen laukeamisen syy tulee aina selvittää ennen kiukaan uudelleenkäyttöä Tarkista hehkuvatko kaikki vastukset kiukaan oll...

Page 27: ...rature inside the sauna room Is the main switch ON In Ni models main switch is located at the bottom of the heater and in NS models it is on the power control Are the switchboard fuses ON and unbroken If broken find out the reason before turning ON your heater Are all heating elements glowing red when the heater is ON Is the heater s heating power enough for the sauna room See page 30 Are the saun...

Page 28: ...x 2 5 5 x 1 5 5 x 1 5 5 x 1 5 5 x 2 5 5 x 2 5 5 x 1 5 5 x 2 5 5 x 2 5 5 x 2 5 5 x 4 0 5 x 1 5 5 x 1 5 5 x 1 5 5 x 1 5 5 x 1 5 5 x 4 0 5 x 2 5 5 x 2 5 5 x 4 0 5 x 4 0 5 x 2 5 5 x 4 3 x 2 5 5 x 4 5 x 4 5 x 4 T1 T2 T1 T2 160 160 160 160 230 230 230 230 360 360 360 360 100 100 100 100 165 165 165 165 220 220 220 220 Innova Innova Innova Innova Innova Innova Innova Innova Innova Innova Innova Innova 3 ...

Page 29: ... kW 12mm 2 kW 12mm 1 INN BOARD KIUKAAN VARAOSAT 1 Vastus 2 Vastuspidikkeet 3 Kaapelipidike 4 Säätöjalka 5 Piirilevy 6 Lämpötilatunnistin 7 Lämpötilatunnistinmen johto 8 Huohotin HEATER SPAREPARTS 1 Heating Element 2 Heating Element Holder 3 Cable Holder 4 Leveling Bolt 5 Control Board 6 Temperature sensor 7 Sensor cable 8 Stone Spacer SUOMI ENGLISH 31 ENGLISH 31 ...

Page 30: ...KIUKAAN HUOLTOTOIMENPITEET HEATER MAINTENANCE SUOMI 32 ...

Page 31: ...Heaterking_RND_Ni_FiEn_3P_0119 www sawo com info sawo com Pidätämme oikeuden muutoksiin Subject to change without notice PX 4 ...

Reviews: