background image

ENGLISH

3

WARNING 

TABLE OF CONTENTS

Safety instructions ..........................................................................5

For user: .................................................................................5

For technicians: .......................................................................7

Setup and use of the Combi Heater .................................................9

Assembly of parts ....................................................................9

Ball valve .................................................................................9

Installation .................................................................................. 10

Mounting the Combi Heater on the wall ................................... 10

Combi Heater safety guard .....................................................11

Electrical Wiring and Installation .................................................... 13

Electrical diagram ......................................................................... 13

Installation of external control unit and  sensors ...................... 13 

Effect of moisture during transport and  storage ....................... 13

Using the Steamer ........................................................................ 15

Filling the water tank ..............................................................15

Low water level......................................................................15

Draining and cleaning the water tank ......................................17

Loading the Combi Heater with stones ........................................... 19

Heater Stones ........................................................................19

Loading stones into the heater ................................................19

Heating of the sauna .................................................................... 21

Throwing water on heated stones ...........................................21

Sauna water ..........................................................................21

Sauna room ................................................................................. 23

Climate of the Sauna Room ....................................................23

Drying the Sauna Room after use ............................................23

Ventilation of the Sauna Room ...................................................... 25

Combi Heater Output .............................................................25

Troubleshooting ........................................................................... 26

Spare Parts .................................................................................. 27

Technical data .............................................................................. 28

Combi kiuas 

automaattitäytöllä edellyttää 

lattiakaivon asentamista 

tulvimisen varalta. 

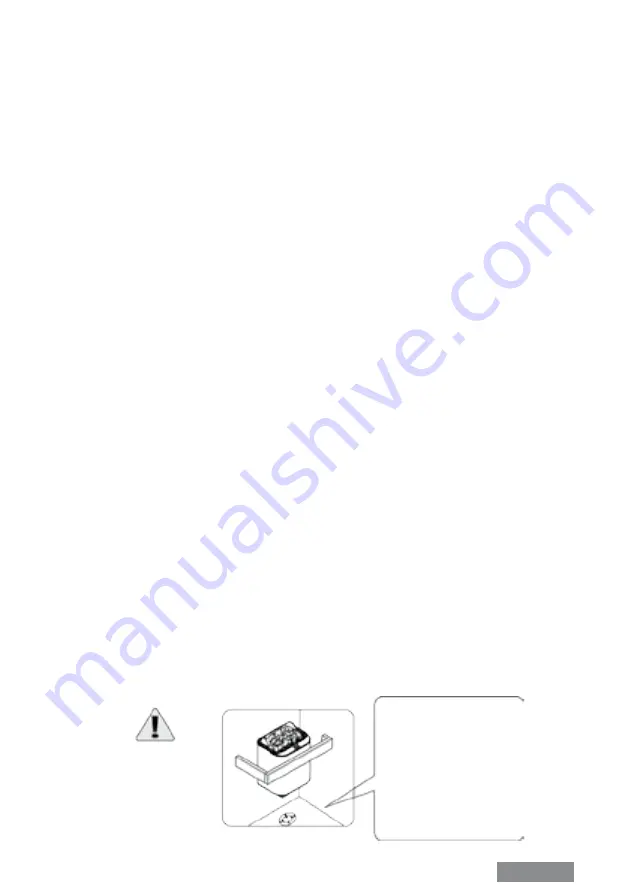
A floor drain must be

provided when installing

Auto Refill Combi Heaters to

avoid accidental flooding.

Summary of Contents for NORDEX COMBI NRC-60NS

Page 1: ...l Number NRC 60NS NRC 80NS NRC 90NS Congratulations on your purchase of SAWO Combi heater Please read the manual carefully before using the heater Onnittelut onnistuneesta Combi kiuas valinnastanne Tutustu käyttöohjeisiin huolellisesti ennen käyttöönottoa Ei käytössä seuraavissa maissa USA Kanada ja Meksiko Not for use in the USA Canada and Mexico ...

Page 2: ...täminen automaattinen 14 Vesisäiliön tyhjennys ja puhdistus 16 Tyhjentäminen 16 Puhdistaminen 16 Kiuaskivet 18 Kivien latominen kiukaaseen 18 Saunahuoneen lämmitys 20 Löylyn heittäminen 20 Löylyvesi 20 Sauna 22 Saunan lämpötila ja kosteus 22 Saunan kuivattaminen 22 Saunan ilmanvaihto 24 Saunan rakenteesta 24 Kiukaan teho 24 Vianhaku 26 Varaosat 27 Teknisiä tietoja 28 SISÄLLYSLUETTELO KATSO OHJEIST...

Page 3: ...15 Filling the water tank 15 Low water level 15 Draining and cleaning the water tank 17 Loading the Combi Heater with stones 19 Heater Stones 19 Loading stones into the heater 19 Heating of the sauna 21 Throwing water on heated stones 21 Sauna water 21 Sauna room 23 Climate of the Sauna Room 23 Drying the Sauna Room after use 23 Ventilation of the Sauna Room 25 Combi Heater Output 25 Troubleshooti...

Page 4: ...a ilman valvontaa Älä anna koskaan lasten leikkiä kiukaalla Älä käytä kiuasta grillinä Älä laita puita sähkökiukaalle Älä peitä kiuasta Se aiheuttaa palovaaran Älä kuivata vaatteita kiukaalla Se aiheuttaa palovaaran Älä istu kiukaalla Se on todella kuuma ja aiheuttaa palovammoja Älä käytä kloori esim uima tai porealtaasta tai merivettä löylyvetenä Se vähentää kiukaan käyttöikää Kiukaan asentamisen...

Page 5: ...nces should children be allowed to play with the device Do not use the heater as a grill Do not put wood of any kind on the electric heater Do not cover the heater It may cause a fire Do not use the heater as clothes dryer It may cause fire Never sit on the heater It is really hot and can cause serious burns Do not use chlorinated water e g from the swimming pool or jacuzzi or seawater It can dest...

Page 6: ...essäsi erillistä ohjausta tulee ohjauskeskus ja ohjauspaneeli asentaa saunan ulkopuolelle Julkisessa käytössä olevaan kiukaaseen jossa on viikkoajastin tai kauko ohjaus mahdollisuus on asennettava erillinen ovitunnistin saunan oveen Tunnistin kytkee pois päältä kaikki esiajastustoiminnot kun kiuas on valmiustilassa ja ovi avataan Ennen kiukaan asennusta tarkista valmistajan saunalle määrittelemät ...

Page 7: ...d control panel must be mounted outside the sauna cabin If this sauna heater is used for public saunas or saunas that may be switched on by a separate remote control system the door of the sauna room must be fitted with an interlock such that the stand by mode setting for remote operation is disabled if the sauna door is opened when the stand by mode setting for remote operation is set Observe the...

Page 8: ...ll Valve in close position Ball Valve in open position NOTE Remove the carton from the heating elements before installing the heat er as it is only intended to protect them during shipment Kuva 1 Fig 1 Tyhjennysventtiili Ball valve Tyhjennysputki Tyhjennysventtiili auki Tyhjennysventtiili kiinni HUOM Poista suojapahvi vastuksista en nen asentamista se on tarkoitettu ainoastaan suojaamaan kuljetuks...

Page 9: ...etaching the ball valve make sure that the valve s handle is in closed position Make sure that the heat reflector shield is placed at the back part of the heater frame Kuva 2 Fig 2 Löylynohjain Reflector Asenna löylynohjain kiu kaan kehyksen takaosaan Ruuvi Screw Löylynohjain Reflector Kehys Frame NOTE Reflector must be installed to prevent risk of fire HUOM Löylynohjain tulee asentaa palovaaran v...

Page 10: ... the heater to the rack lift the heater and fit the nuts that are placed at the back of the heater to the slots on both sides at the top of the rack Lock at least one of the side screws to prevent the heater from being accidentally moved KIUKAAN ASENNUS On suositeltavaa sijoittaa kiuas oven viereiselle seinälle Näin oven aikaansaama ilmankierto yhdistyy kiukaasta tulevaan höyryyn Asennettaessa kiu...

Page 11: ...sisäiliön kansi kehyksen alle Push the steamer cover down below the frame 2 Paina alas Push down Poista vesisäiliön kansi kuvan osoittamalla tavalla Remove the steamer cover as shown Asenna vesisäiliön kansi kuvan osoitamalla tavalla Attach the steamer cover as shown 1 Nosta ylös Lift up 3 Vedä ulospäin Pull out 1 Paina Älä päästä irti ennen kuin kansi on kunnolla paikallaan Push don t release unt...

Page 12: ...ämpötilatunnistin lauteiden alueelle TS2 tai yhdistetty lämpötila ja kosteustunnistin T H Jos kiuas on asennettu alle 200mm seinästä TS1 on asennettava seinään kiukaan yläpuolelle 150 mm etäisyydelle katonrajasta Jos taas kiuas on asennettu yli 200mm seinästä TS1 tulee asentaa suoraan kiukaan yläpuolelle TS2 tai T H tunnistimet on asennettava seinään kiuasta vastapäätä vähintään 300 mm etäisyydell...

Page 13: ...n cable for the Combi Heater is not al lowed because this material easily becomes brittle when subjected to heat ELECTRICAL DIAGRAM INSTALLATION OF EXTERNAL CONTROL UNIT AND SENSORS Innova Control Unit utilizes two sensors to power up the Combi heater One is the Primary Tem perature Sensor TS1 and the other one is either the Secondary Temperature Sensor TS2 or the Temperature and Humidity Sensor T...

Page 14: ...eden määrä säiliössä on helposti nähtävissä kiukaan etureunassa olevasta mittarista Mikäli tankkiin täytetään enemmän vettä kuin mitä mittarin ei Trendline malleissa max imiraja osoittaa saattaa vettä läikkyä lattialle mittarin yläpäästä Mikäli ohjauskeskuksen näytössä lukee FILL on veden määrä säiliössä alhainen ja säiliö pitää täyttää edellä ku vatulla tavalla HUOM Säiliön kansi sekä hajustinkup...

Page 15: ...s a low water detection system which reminds to refill water before the steamer tank runs dry To avoid the activation of the low water detection system refill water once the water level reaches the REFILL mark on the water level indicator tube about 1 5 liter water left in the tank If no water is refilled at that point the low water detection system will automatically turn off the steamer heater a...

Page 16: ...tä tyhjentääksesi säiliön sillä se lyhentää höyrystimen käyttöikää PUHDISTAMINEN Kalkinpoistoon SAWO suosittelee samoja kalkinpoistoaineita joita käytetään esim kahvinkeittimenpuhdistamiseen Käytäkalkinpoistoaineitavalmistajanohjeidenmukaisesti Höyrystimen ulkopinnan puhdistamiseen riittää kostealla kankaalla pyyhkiminen kun höyrystin on jäähtynyt Ennen säiliön puhdistamista varmista että höyrysti...

Page 17: ...njuries caused by the tank s edges To clean the tank separation plate lift it up and clean it with water and a household brush Fig 10 Finally flush the tank with water and close the ball valve by turning its handle clockwise Do not use a steel brush as it might dam age the tank wall or bottom heating plate Do not forget to refill water before turning the steamer on again Do not let the steamer wat...

Page 18: ...tai pehmeitä tai murenevia luonnonkivilajeja kuten vuolukiveä KIVIEN LATOMINEN KIUKAASEEN Ennen kivien latomista on suositeltavaa pestä ne mahdollisen lian ja pölyn poistamiseksi Kivien latomisessa kiukaaseen on huomioitava että kiukaan läpi virtaavan ilman kiertoa ei estetä koska tämä johtaa lämmityselementtien ylikuumenemiseen ja niiden käyttöiän merkittävään lyhenemiseen Kivien latomisen periaa...

Page 19: ...ay cause fire Use only manufacturer recommended stones Using unsuitable stones may lead to heating element damage and will void the warranty Never use ceramic stones or other artificial stones of any type LOADING STONES INTO THE HEATER It is recommended that all stones should be rinsed to remove any stains or dust that can cause unpleasant odour during the first few times of using the heater It is...

Page 20: ...uodostuu yhä poistu saunahuoneesta välittmastömasti ja vaiheet 1 4 uudelleen Tarkistasaunaainaennenkiukaanpäällekytkemistä etteikiukaallataisensuojaetäisyyksien sisällä ole mitään palavaa Varmista että saunan tuuletus on rittävä ja asianmukainen Teholtaan oikean kokoinen kiuas lämmittää saunahuoneen valmiiksi noin tunissa Katso sivu 12 Lämpötilan saunassa tulisi olla noin 60 90 C Saunahuoneen lämp...

Page 21: ...r or on the heater Make sure that sauna room has been efficiently ventilated If the output of the heater is prop er it will take about an hour to reach suitable temperature Temperature in sauna room should be between 60 90 C Temperature is individual in every sauna room depend ing on e g heater model size of heater room air ventilation and bathers preference Too powerful heater will heat sauna roo...

Page 22: ...usyhdistelmää koska henkilökohtaiset mieltymykset määräävät millainen löylyn tai höyryn määrä tuntuu miellyttävältä Saunan ilmanvaihdon pitää olla kuitenkin riittävä Katso sivu 24 SAUNAN KUIVATTAMINEN Saunan tulee antaa kuivua huolellisesti jokaisen höyrykylvyn jälkeen Kuivumisen nopeuttamiseksi voit jättää tuuletusventtiilin täysin auki ja kiukaan täydelle teholle Varmista että kiuas on kytkeytyn...

Page 23: ...u may increase humidity of the sauna room by throw ing water on the stones of the heater The recommended temperature in the sauna is 65 to 85º C at most 100º C In Steam Generator mode the recommended temperature in the sauna room is 40 to 50º C Sauna bathing refreshes your body and is known to benefit your health by muscle relax ation soothes and alleviates tension You may want to mediate inside a...

Page 24: ...ditaanko kiukaan yläpuolelle seinä tai kattopintoihin erilliset palosuojalevyt Noudata annettuja asennusohjeita levyjä asentaessasi Saunan sisäpuolen pinnat tummuvat ajan kanssa Auringonvalo ja lämpö nopeuttavat tummumista Mikäli panelit on käsitelty saunaan tarkoitetulla suoja aineella voi tummuminen erityisesti kiukaan yläpuolella olla jopa nopeampaa kuin täysin käsittelemättömän puun tummuminen...

Page 25: ...or material should be used Any light joint grout often used for tile flooring which absorbs impurities easily as well as plastic floor coverings are not recommended Due to wall surface processing with protective panel agents wall blackening can occur It is expedited by sunlight and heat from the Sauna Heater The maximum allowable temperature for wall and ceiling surfaces in the sauna is 140 C Our ...

Page 26: ... been switched on The heater s fuses in the household s main fuse box The overheat fuse has been replaced if the heater overheated earlier Consult a qualified technician electrician if troubleshooting is not successful VIANHAKU Mikäli höyrystimen käytössä esiintyy ongelmia niin tarkista ensin onko Kombi kiuas kytketty sähköverkkoon onko höyrystin kytketty päälle onko vesisäiliössä vettä riittäväst...

Page 27: ...06 001 HP02 001 HP38 002 HP06 002 HP06 003 HP06 004 HP11 059 HP09 010 HP09 002 N C HP09 018 N O HP09 019 N C HP06 005 HP38 003 HP09 004 HP02 004 H E SCA150 HP02 005 H E SCA200 HP02 007 H E SCA266 HP02 008 H E SCA300 HP06 008 HP02 018 Trendline 1 Reflector 2 SCA Back Frame 3 NR Side Frame 4 Rock Container 5 Steamer Cover 6 Wall Mounting Sheet 7 Middle Reflection Sheet 8 Heating Element 9 Tank Set a...

Page 28: ... ROOM SUPPLY VOLTAGE separate separate separate 18 22 kg 18 22 kg 18 22 kg STONES CONTROL SIZE OF HEATER SIZE OF WIRE WIDTH HEIGHT LENGTH HEATING ELEMENT MIN MAX TYPE NUMBER m3 mm2 mm SCP200 SCA266 TANK100 TANK200 TANK200 SCA300 Width when installed to wall Height with reflector NRC_ML_3P_FiEn_0820 Erillinen Erillinen Erillinen KIUAS MALLI VASTUKSET SAUNAHUONE JÄNNITE KIUKAAN MITAT JOHDON KOKO KIV...

Reviews: