background image

9

ENGLISH

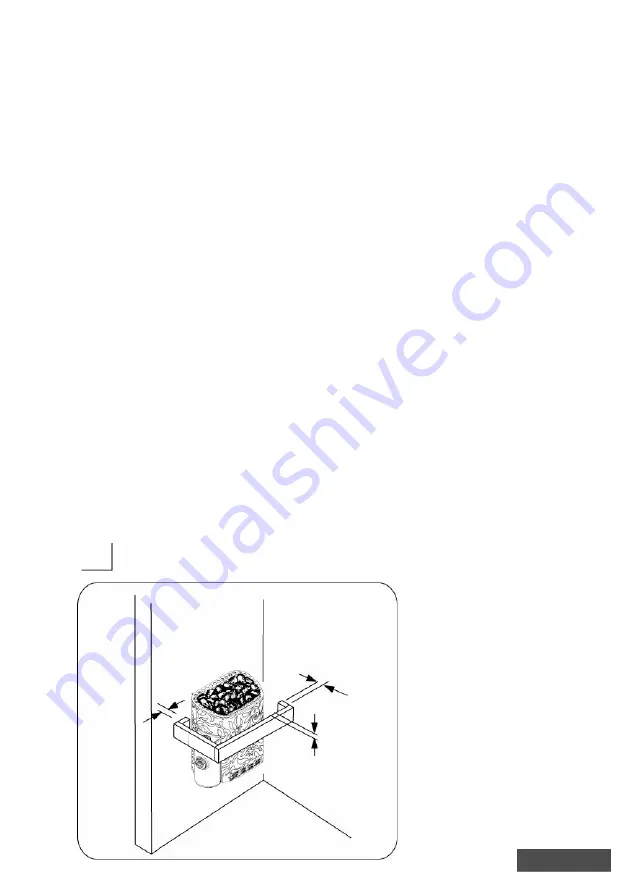
Kuva 2

Fig. 2

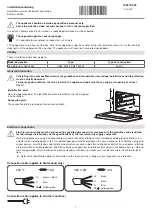
It is recommended that the heater be placed on the wall nearest to the door. The 

air  circulation created  by the door should work  together with the hot air 

generated by the heater. For safety and convenience, follow the minimum safety 

distances as provided in Fig. 1.  Follow the cubic volumes given in Fig. 7. Do not 

install the heater  to the floor or wall niche.  Install only one heater in a sauna 

room.  

Be sure to build a strong foundation for the mounting rack (e.g. cross struts in 

sauna  paneling) or reinforce the wall with a thick board  to prevent the heater 

from collapsing. Attach the heater to the wall with the aid of the mounting rack. 

Screws (6 pieces) are provided for fastening of the rack to the wall. To affix the 

heater to the rack, lift the heater and fit the nuts that are placed at the back of 

the heater to the slots on both sides at the top of the rack. Lock at least one of 

the side screws to prevent the heater from being accidentally moved. 

A certified electrician must do the installation of the heater to ensure safety and 

reliability. Improper electrical connections can cause electric shock or fire. Refer 

to the electrical diagram in Fig.6.An electrical supply cable must be connected to 

the terminal block inside the control unit   through the cable channel. The cable 

must be HO7RN-F type or its equivalent. To connect the cable, the control unit 

must be opened (Fig. 3A). First, pull the temperature knob outward to uncover 

the screws that hold the plastic cover. Second, remove the set of screws under 

the temperature knob and at the bottom (both sides) of the control unit. Detach 

the front plastic cover and finally insert the electrical supply cable into the cable 

channel  by simply slipping it through the hole at the bottom of the channel 

towards the opening  at the other end (Fig.4).  Install the cables tightly  to the 

terminal block. Put back the front plastic cover, screws and temperature knob.  

The heater gets very hot. To avoid the risk of accidental contact with the heater, 

it is recommended that a heater guard  be provided.  Reserve enough space  for 

operation of the timer and thermostat knobs. Follow the directions given in Fig. 2. 

Min. 20

Min. 20

Min 20

Heater Installation

Summary of Contents for SCANDIFIRE

Page 1: ...likuumenemissuojan palautuspainike Reset Button Hole SÄHKÖKIUAS ELECTRIC SAUNA HEATER SCANDIFIRE SCA 45NB DRF SCA 45NS DRF SCA 60NB DRF SCA 60NS DRF SCA 80NB DRF SCA 80NS DRF SCA 90NB DRF SCA 90NS DRF Congratulations on your purchase of SAWO Dragonfire sauna heater Please read the manual carefully before using the heater Onnittelut loistavasta kiuasvalinnastanne Tutustu käyttöohjeisiin huolellises...

Page 2: ... KATSO OHJEISTA TÄRKEÄT LISÄOHJEET Turvaohjeet käyttäjälle Turvaohjeet asentajalle Kiukaan asentaminen Ohjauskeskuksen kääntäminen Kiuaskivet Kytkentäkaavio Vastukset Tekniset tiedot Ohjaussäätimet Saunahuoneen lämmitys Eristys Ilmanvaihto Häiriötilanne Scandia kiukaan varaosat 4 6 8 10 10 12 13 13 14 14 16 16 18 18 SISÄLLYSLUETTELO ...

Page 3: ...ter Installation Repositioning of the Built In Control Unit Heater Stones Electrical Diagram Heating Elements Technical Data Control Settings Heating of the Sauna Insulation Air Ventilation Malfunctions Scandia Heater Spare Parts 5 7 9 11 11 12 13 13 15 15 17 17 19 19 TABLE OF CONTENTS ...

Page 4: ...en joilla on fyysisiä tai henkisiä rajoitteita tai ei ole aiempaa käyttökokemusta kiukaan käytöstä ellei valvomassa ole henkilö jolla on riittävä kokemus kiukaan käyttämiseksi Älä käytä löylyvetenä kloori esim Uima tai porealtaasta tai merivettä Se vähentää kiukaan käyttöikää Kiukaan asentamisen jälkeen kytke se toimintaan n 30 minuutin ajaksi Älä ole saunan sisällä suorittaessasi ensimmäistä lämm...

Page 5: ...y persons including children with limited physical or mental abilities and limited experience and knowledge except under close supervision by a responsible person with knowledge and experience or having been advised by such person Do not use chlorinated water e g From the swimming pool or jacuzzi or seawater It can destroy the heater When installing a new heater switch the heater on for 30mins Do ...

Page 6: ...Käyttäessä erillistä ohjausta tulee ohjauskeskus ja ohjauspaneeli asentaa saunan ulkopuolelle Jos kiuas on julkisessa käytössä ja siinä on viikkoajastin tai jos sen voi kytkeä päälle kauko ohjaimella on saunan oveen asennettava erillinen ovitunnistin joka kytkee pois päältä kaikki esiajastustoiminnot kun kiuas on valmiustilassa ja saunan ovi avataan Ennen kiukaan asennusta tarkista valmistajan ilm...

Page 7: ... If this sauna heater is used for public saunas or saunas that may be switched on by a separate remote control system the door of the sauna room must be fitted with an interlock such that the stand by mode setting for remote operation is disabled if the sauna door is opened when the stand by mode setting for remote operation is set When positioning the sauna heater observe the minimum safety dista...

Page 8: ...köasentaja turvallisuuden ja luotettavuuden varmistamiseksi Väärät kytkennät voivat aiheuttaa oikosulkuja ja palovaaran kytkentäkaavio kuva 6 Sähkökaapeli pitää yhdistää ohjausyksikön sisällä olevaan riviliittimeen kaapelikotelon läpi Johdon täytyy olla tyyppiä HO7RN F tai vastaava Tehdäksesi tämän ohjausyksikkö pitää avata kuva 3A Ensiksi vedä lämpötilansäätimen nuppi pois löytääksesi ruuvit jotk...

Page 9: ... do the installation of the heater to ensure safety and reliability Improper electrical connections can cause electric shock or fire Refer to the electrical diagram in Fig 6 An electrical supply cable must be connected to the terminal block inside the control unit through the cable channel The cable must be HO7RN F type or its equivalent To connect the cable the control unit must be opened Fig 3A ...

Page 10: ...issa HUOM Takuu ei korvaa kiukaan lämmityselementtien rikkoutumisia jotka johtuvat väärän kivilajin käytön tai virheellisen ladonnan aiheuttamasta ylikuumenemisesta tai niiden aiheuttamista mekaanisista vaurioista Ennen kivien latomista on suositeltavaa pestä ne mahdollisen lian ja pölyn poistamiseksi Kivien latomisessa kiukaaseen on huomioitava että kiukaan läpi virtaavan ilman kiertoa ei estetä ...

Page 11: ... ones as described in the heater manual The required amount of stones is also listed in the manual provided See Fig 5 It is recommended that all stones should be rinsed to remove any stains or dust that can cause unpleasant odour during the first few times of using the heater It is important that the stones are loaded carefully in a way that they do not block air circulation through the heater Lar...

Page 12: ... Control of Electric Heating in the Household usage is optional AJASTIN TIMER TERMOSTAATTI THERMOSTAT SENSOR SENSORER PREMIUM ONLY SCA 45NS DRF SCA 60NS DRF SCA 80NS DRF SCA 90NS DRF Erillinen ohjausyksikkö Separate Control Unit N L1L2L3 400V 3N M a1 a B1 A1 A2 B2 A3 B3 b a1 a b a1 a b b0 b0 b0 H1 H2 H3 PL PL J1 N K 230V 400V 3N H1 H2 H3 N N N U V W ...

Page 13: ...F SCA 80NB DRF SCA 90NB DRF SCA 45NS DRF SCA 60NS DRF SCA 80NS DRF SCA 90NS DRF 3 x 1 5 kW 3 x 2 0 kW 3 x 2 66 kW 3 X 3 0 kW 3 x 1 5 kW 3 x 2 0 kW 3 x 2 66 kW 3 X 3 0 kW 3 5 7 8 3 5 7 8 6 8 13 14 6 8 13 14 290 290 290 290 290 290 290 290 450 450 520 520 450 520 520 520 5 x 1 5 5 x 1 5 5 x 2 5 5 x 2 5 5 x 1 5 3 x 1 5 5 x 2 5 5 x 2 5 515 515 515 515 410 410 410 410 8 4h 8 4h 8 4h 8 4h separat separa...

Page 14: ... kiuasta ensimmäista kertaa Ainjäämien hauhtuminen saattaa aiheuttaa savua ja pahaa hajua Savun hengittäminen voi olla terveydelle haitallista Suorita seuraavat toimenpiteet lämminttäessäsi kiuasta kertaa tai vaihtaessa kiukaan lämmityselementit Näillä toimenpiteillä vältetään mahdollisesti terveydelle haitallisten savukaasujen hengittäminen kuumennettaessa uusia lämmityselementtejä ensimäistä ker...

Page 15: ...en heating up for the first time 1 Select the highest possible temperature in the sauna control 2 Heat up the sauna heater for half an hour Do NOT stay in the sauna 3 Allow the sauna cabin to ventilate thoroughly after heating up for the first time 4 If no smoke or odor is produced the next time the sauna heater is heated up you can start to use the sauna If smoke or odor is produced again leave t...

Page 16: ... 8A Koneellista ilmastointia käytettäessä tuloilmaventtiili voidaan asentaa vähintään 60 cm n korkeuteen kiukaan yläpuolelle kuva 8B tai kattoon kiukaan yläpuolelle kuva 8C Näin asennettuna ulkoa tuleva raskas kylmä ilma sekoittuu kevyeen kuumaan kiukaasta tulevaan ilmaan tuoden raikasta ilmaa saunojille Suositeltava tuloilmaventtiilin koko on 10cm Poistoilmaventtiili pitäisi sijoittaa diagonaalis...

Page 17: ... below the heater Fig 8A When using the mechanical ventilation inlet vent is placed at least 60 cm above the heater Fig 8B or on the ceiling above the heater Fig 8C Through these positions the heavy cold air that is blown into the sauna is mixed with the light hot air from the heater bringing fresh air for the bathers The inlet and the outlet vent must have a diameter of 10cm The outlet vent shoul...

Page 18: ...äkiinnitysteline SCA keskiheijastuslevy Vastuspidikkeet o renkailla Ajastimen nuppi Ajastimen lamppu 1 2 3 4 5 6 7 8 9 10 Ajastin Anturinpidike Termostaatti Termostaatin lamppu Premium Malli Riviliitin keskikoko iso ja pieni Etukuori Termostaatin nuppi Kaapelipidike siivillä 11 12 13 14 15 16 17 18 19 SCA kaapelikanava SCA kaapelikanava erilliselle ohjauskeskukselle Kaapelipidike Riviliitin pieni ...

Page 19: ... Reflection Sheet Heating Element Holder with O Rings Timer Knob Timer Pilot Lamp 1 2 3 4 5 6 7 8 9 10 Timer Switch Sensor Lock Thermostat Switch Thermostat Pilot Lamp PREMIUM MODEL Terminal Block Small Big Front Cover Thermo Knob Cable Clip with Wings Control Unit Body 11 12 13 14 15 16 17 18 19 SCA Cable Conduit Channel with Bottom Cover Cable Box for SCA Separate Control Unit Cable Holder Termi...

Page 20: ...ksikköBuilt in Control Unit Anturien sijainnit Sensor Location Mallit erillisellä ohjausyksiköllä For Models With Separate Control Unit Säätöanturi Regulating Sensor Turva anturi Safety Sensor 3 0 kW 4 5 kW 6 0 kW 8 0 kW 9 0 kW 6 0 kW Professional 3 0kW DRF_ML_S_FiEn0716 www sawo com info sawo com www sawodragonfire com Pidätämme oikeuden muutoksiin Subject to change without notice ...

Reviews: