SawStop 10” Contractor Saw 21
Assembling Y
our
Saw
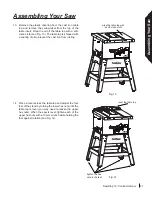
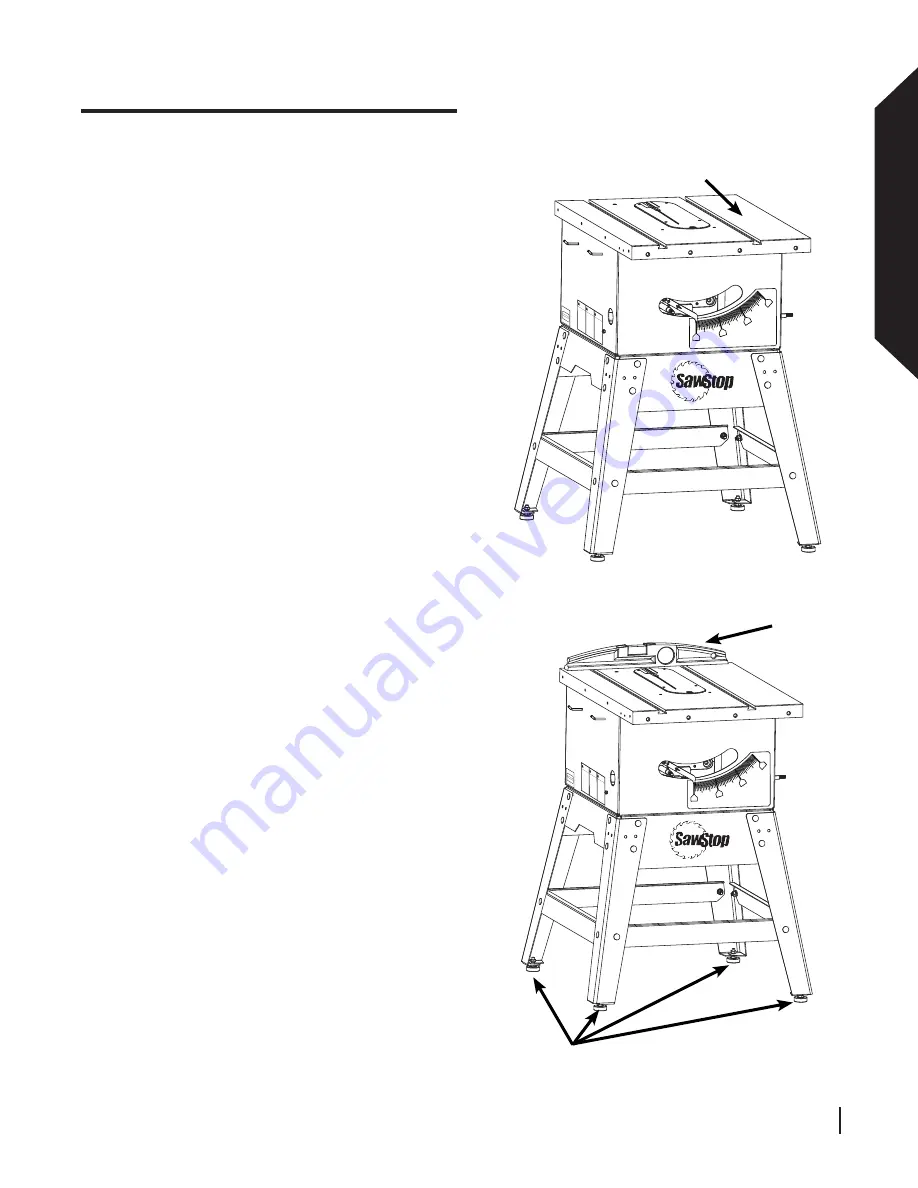
13. Remove the plastic covering from the cast iron table
top and remove the yellow label from the top of the
table insert. Wipe the oil off the table top with a soft,
clean cloth (see Fig. 13). The table top is shipped with
a coating of oil to prevent the cast iron from rusting.
Assembling Your Saw
0
15
30
45
SawStop
10” Contractor Saw
!
WARNING
!
ADVERT
ENCIA
!
AVERTISSEME
NT
Para su
propia
segurid
ad, lea
el man
ual de
instr
ucción a
ntes de
usar la
sierra.
1. Use
las gafa
s de se
guridad
.
2. Use
el disp
ositivo d
e segu
ridad d
e la cuc
hilla y
sep
arador p
ara cua
lquier o
peració
n para l
a
cual
peu
da ser u
tilizada
incluye
ndo to
das las
ope
racione
s de se
rrar com
pleto o
a travé
s.
3. Ma
ntenga
las ma
nos fu
era de l
a traye
ctoria d
e
la c
uchilla d
e la sie
rra.
4. Utili
ce una
vara d
e empu
jar cua
ndo est
á
nec
esario.
5. S
epa red
ucir el r
iesgo d
el retro
ceso.
6. No r
ealice n
inguna
operac
ión a m
ano alz
ada.
7. No p
onga la
mano a
lrededo
r o detrá
s de la
cuc
hilla.
8. Nun
ca trate
de exp
erimen
tar con
el siste
ma de
fren
os.
9. Nun
ca ajus
te la po
sición d
el cartu
cho de
l freno
mie
ntras q
ue la c
uchilla
está g
irando.
10. No tr
ate de d
escone
ctar el s
istema d
e freno
s.
11. Sie
mpre d
esench
ufe la s
ierra an
tes de c
ambiar
la c
uchilla,
el cartu
cho de
l freno, o
de
ma
ntenerla
.
12. No c
onecte
el moto
r directa
mente c
on un
aba
stecim
iento.
13. Utilic
e el inte
rruptor d
el bypa
ss sola
mente
cua
ndo est
á nece
sario.
14. No e
xponga
a la llu
via o al
uso en
localiza
ciones h
úmeda
s.
15. No p
onga la
s mano
s dentro
de ni d
ebajo d
el
gab
inete m
ientras
la cuch
illa gira
.
Pou
r votre p
ropre s
écurité
, lisez le
manue
l
d’instru
ction av
ant d’u
tiliser la
scie.
1. Por
tez des
lunette
s de sé
curité.
2. Util
isez le
protec
teur de
lame q
uel que
soit le
typ
e d'opé
ration.
3. Ga
rdez le
s mains
à l’éca
rt de la
lame
lorsqu’e
lle tourn
e.
4. Utili
sez un p
oussoir
de fin d
e passe
si
néc
essaire
.
5. Lim
itez au m
aximum
le risqu
e de re
jet.
6. Ne t
ravaille
z pas à
la volé
e.
7. Ne p
assez p
as votre
bras p
ar-dess
us
ou auto
ur de la
lame.
8. N
’essaye
z jamais
d'effec
tuer un
essai
du circu
it de fre
inage.
9. N’a
justez ja
mais la
positio
n de la
cartouc
he de fr
ein lors
que la l
ame to
urne.
10. N’e
ssayez
pas de
neutra
liser le
circuit
de
frein
age.
11. Déb
ranche
z la scie
avant d
e chan
ger la
lame, la
cartou
che de
frein, o
u d’en f
aire
l’entretie
n.
12. Ne b
ranche
z pas d
irectem
ent le m
oteur
à une p
rise de
couran
t.
13. N'u
tilisez l’i
nterrup
teur de
by-pas
s qu'en
cas de n
écessité
.
14. Ne p
as expo
ser a la
pluie e
t ne pa
s
utiliser d
ans les
empla
cemen
ts hum
ides.
15. Ne m
ettez p
as les m
ains à l’i
ntérieu
r on
au-d
essous
de cab
inet lors
que la la
me
tourne.
For yo
ur own
safety,
read th
e instru
ction
manu
al befo
re opera
ting this
saw.
1. W
ear eye
protec
tion.
2. Use
the bla
de gua
rd and s
preade
r for
every
opera
tion for
which it
can be
used,
includin
g all hro
ugh sa
wing.
3. Kee
p hand
s out o
f the lin
e of the
saw
blade.
4. Use
a push
-stick w
hen req
uired.
5. Kno
w how
to redu
ce the r
isk of
kickbac
k.
6. Do n
ot perfo
rm any
operatio
n
freehan
d.
7. N
ever re
ach aro
und or o
ver the
saw
blade.
8. Nev
er try to
test fir
e the b
rake sy
stem.
9. Nev
er adju
st the p
osition o
f the b
rake
cartrid
ge whil
e the b
lade is s
pinning
.
10. D
o not try
to disa
ble the
brake s
ystem.
11. Unp
lug the
saw be
fore ch
anging
the
blade,
chang
ing the
brake c
artridge
or serv
icing.
12. Do n
ot conn
ect the
motor d
irectly to
a
power s
upply.
13. Use
the byp
ass sw
itch only
when
necess
ary.
14. Do n
ot expo
se to ra
in or us
e in da
mp
locatio
ns.
15. Do n
ot put y
our han
ds insid
e or
undern
eath th
e cabin
et while
the bla
de is
spinnin
g.
Made in T
aiwan
SawStop
, LLC
www.s
awstop
.com
TCP
10¨ Co
ntract
or Saw
SawSto
p
®
Model No
. CNS 175
Serial No
. C074012
345
Electrical
/ Electricid
ad / Électr
icité
115/230 V
olts, 60 H
z
15/7.5 Am
ps
1 Phase
1.75 HP
3500 RPM
®
c
US
175370
14. Place a level across the table top and adjust the four
feet of the stand by turning the lower hex nuts until the
table top is level (you may need to loosen the upper
hex nuts). When the saw is level, tighten each of the
upper hex nuts with a 13 mm wrench while holding the
foot against rotation (see Fig. 14).
0
15
30
45
SawStop
10” Contractor Saw
!
WARNING
!
ADVERT
ENCIA
!
AVERTISSEME
NT
Para su
propia
segurid
ad, lea
el man
ual de
instr
ucción a
ntes de
usar la
sierra.
1. Use
las gafa
s de se
guridad
.
2. Use
el disp
ositivo d
e segu
ridad d
e la cuc
hilla y
sep
arador p
ara cua
lquier o
peració
n para l
a
cual
peu
da ser u
tilizada
incluye
ndo to
das las
ope
racione
s de se
rrar com
pleto o
a travé
s.
3. Ma
ntenga
las m
anos fu
era de l
a traye
ctoria d
e
la c
uchilla
de la s
ierra.
4. Utili
ce una
vara d
e empu
jar cua
ndo est
á
nec
esario.
5. S
epa red
ucir el r
iesgo d
el retro
ceso.
6. No r
ealice n
inguna
operac
ión a m
ano alz
ada.
7. No p
onga la
mano a
lrededo
r o detrá
s de la
cuc
hilla.
8. Nun
ca trate
de exp
erimen
tar con
el siste
ma de
fren
os.
9. Nun
ca ajus
te la po
sición d
el cartu
cho de
l freno
mie
ntras q
ue la c
uchilla
está g
irando.
10. No t
rate de
descon
ectar e
l sistem
a de fre
nos.
11. Sie
mpre d
esench
ufe la s
ierra an
tes de c
ambiar
la c
uchilla
, el cart
ucho d
el freno
, o de
ma
ntenerla
.
12. No c
onecte
el moto
r directa
mente
con un
aba
stecim
iento.
13. Utilic
e el in
terrupto
r del b
ypass s
olamen
te
cua
ndo est
á nece
sario.
14. No e
xponga
a la llu
via o al
uso en
localiza
ciones h
úmeda
s.
15. No p
onga la
s mano
s dentr
o de ni
debajo
del
gab
inete m
ientras
la cuch
illa gira
.
Pou
r votre p
ropre s
écurité
, lisez le
manue
l
d’instr
uction a
vant d’u
tiliser la
scie.
1. Por
tez des
lunette
s de sé
curité.
2. Utili
sez le p
rotecte
ur de la
me que
l que
soit le
typ
e d'opé
ration.
3. Ga
rdez le
s main
s à l’éc
art de la
lame
lorsqu’e
lle tourn
e.
4. Util
isez un
pousso
ir de fin
de pas
se si
néc
essaire
.
5. Lim
itez au m
aximum
le risqu
e de re
jet.
6. Ne t
ravaille
z pas à
la volé
e.
7. Ne p
assez p
as votre
bras p
ar-dess
us
ou auto
ur de la
lame.
8. N’e
ssayez
jamais
d'effec
tuer un
essai
du circu
it de fre
inage.
9. N’a
justez ja
mais la
positio
n de la
cartouc
he de fr
ein lors
que la l
ame to
urne.
10. N’e
ssayez
pas de
neutra
liser le c
ircuit
de
frein
age.
11. Déb
ranche
z la scie
avant d
e chan
ger la
lame, la
cartou
che de
frein, o
u d’en f
aire
l’entretie
n.
12. Ne b
ranche
z pas d
irectem
ent le m
oteur
à une p
rise de
couran
t.
13. N'u
tilisez l’i
nterrup
teur de
by-pas
s qu'en
cas de n
écessit
é.
14. Ne p
as expo
ser a la
pluie e
t ne pa
s
utiliser d
ans les
empla
cemen
ts hum
ides.
15. Ne m
ettez p
as les m
ains à l’i
ntérieu
r on
au-d
essous
de cab
inet lors
que la la
me
tourne.
For yo
ur own
safety,
read th
e instru
ction
manu
al befo
re opera
ting this
saw.
1. We
ar eye p
rotectio
n.
2. Use
the bla
de gua
rd and s
preade
r for
every
opera
tion for
which it
can be
used,
includin
g all hro
ugh sa
wing.
3. Kee
p hand
s out o
f the lin
e of the
saw
blade.
4. Use
a push
-stick w
hen req
uired.
5. Kno
w how
to redu
ce the r
isk of
kickbac
k.
6. Do n
ot perfo
rm any
operatio
n
freehan
d.
7. Nev
er reac
h aroun
d or ov
er the s
aw
blade.
8. Nev
er try to
test fir
e the b
rake sy
stem.
9. Nev
er adju
st the p
osition o
f the b
rake
cartridg
e while
the bla
de is sp
inning.
10. Do n
ot try to
disable
the bra
ke syste
m.
11. Unp
lug the
saw b
efore c
hangin
g the
blade,
chang
ing the
brake c
artridge
or serv
icing.
12. Do n
ot conn
ect the
motor d
irectly to
a
power s
upply.
13. Use
the byp
ass sw
itch only
when
necess
ary.
14. Do n
ot expo
se to ra
in or us
e in da
mp
location
s.
15. Do n
ot put y
our han
ds insid
e or
undern
eath th
e cabin
et while
the bla
de is
spinnin
g.
Made in T
aiwan
SawStop
, LLC
www.s
awstop
.com
TCP
10¨ Co
ntracto
r Saw
SawSto
p
®
Model No
. CNS 175
Serial No
. C074012
345
Electrical
/ Electricid
ad / Électr
icité
115/230 V
olts, 60 H
z
15/7.5 Am
ps
1 Phase
1.75 HP
3500 RPM
®
c
US
17537
0
wipe the table top with
a soft, clean cloth
level the table top
tighten the hex
nuts in the feet
Fig. 13
Fig. 14


