background image

14

TSG-FDC OWNER’S MANUAL

10

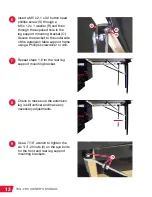
Use a 7/16” wrench to tighten the 
two 1/4”-20 nuts (V) on both leg 
support brackets.

Attaching the Dust Tubes to the Dust Collection Guard Mounting Bracket

1

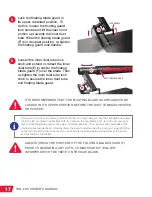
With the help of another person, lift 
the dust tube assembly (comprised of 
the inner and outer dust tubes (D,E)) 
and set them on the dust collection 
guard mounting bracket. Be sure that 
the pins on the dust collection guard 
mounting bracket (B) (indicated by the 
red arrows) pass through the holes 
in the bracket on the outer dust tube 
(indicated by the yellow circles).

IT IS RECOMMENDED THAT TWO PEOPLE ATTACH THE DUST TUBES, 
AS THE DUST TUBE ASSEMBLY IS HEAVY AND COULD CAUSE SERIOUS 
PERSONAL INJURY OR DAMAGE IF DROPPED.

2

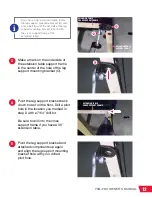
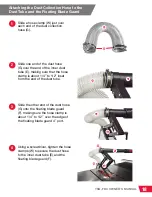
Pivot the dust tubes in towards 
the dust collection guard mounting 
bracket (B), so the dust tube 
assembly rests securely against 
the dust collection guard mounting 
bracket (B).

V

B

B

Summary of Contents for TSG-FDC

Page 1: ...OWNER S MANUAL FLOATING DUST COLLECTION GUARD MODEL TSG FDC...

Page 2: ...ght SawStop LLC All Rights Reserved Updates of this manual may be available at www sawstop com 2nd printing November 2017 SawStop the SawStop blade logo and the configuration of this product are eithe...

Page 3: ...our dust collection guard and how to operate and maintain it Please read the manual carefully The manual also includes our warranty and important safety information If you ever have any questions or c...

Page 4: ...HOW TO GET HELP Missing Parts Have Questions Our technical support team is standing by M F 6 30am 5pm PST to help with whatever you need 503 582 9934 Give us a call at SERVICE SAWSTOP COM Email us at...

Page 5: ...sion Table Attaching the Dust Tubes to the Dust Collection Guard Mounting Bracket Attaching the Floating Blade Guard to the Dust Tube Attaching the Dust Hose to the Dust Tube and the Floating Blade Gu...

Page 6: ...ube Height Above Table 13 6 Outer Dust Tube Height Above Floor 33 5 to 50 The SawStop Floating Dust Collection Guard is designed as a blade cover and dust collection hood It is intended for use on Saw...

Page 7: ...racket 1 Leg Support Bracket 2 Outer Dust Tube 1 Inner Dust Tube 1 Floating Blade Guard 1 Dust Collection Hose 1 Hardware Pack 1 A B C D E F G H Parts E D G C F H B A The Floating Dust Collection Guar...

Page 8: ...Knob 2 M6 x 19 x 1 Washer 8 M6 x 1 0 x 40mm Hex Head Bolt 4 M6 x 1 0 Nut 4 1 4 20 x 3 4 Flat Head Socket Screw 2 1 4 20 x 4 Eye Bolt 2 Leg Support Mounting Bracket 2 1 4 Lock Washer 6 1 4 20 x 1 2 He...

Page 9: ...approximately matches the height of your extension table Thread the two 1 4 20 extension leg lock knobs I into the two nuts on the dust collection guard mounting bracket B Tighten the extension leg l...

Page 10: ...ased on your saw model configuration The mounting pins on the dust collection guard mounting bracket B should align with the center of the blade The elongated mounting slots in the bracket will allow...

Page 11: ...cket B Then place the dust collection guard mounting bracket and extension leg aside 4 Use a 1 4 drill bit to drill four through holes in the extension table at the locations marked in step 3 B 5 Plac...

Page 12: ...g holes aligned insert a single M6 x 1 0 x 40 hex head bolt K through a M6 x 19 x 1 washer J then through one of the four exposed holes in the dust collection guard mounting bracket B and extension ta...

Page 13: ...t tighten the nuts on the bolts to secure the dust collection guard mounting bracket to the extension table Check to make sure that the extension leg is vertical If necessary adjust the extension leg...

Page 14: ...sher P onto the screw followed by a 1 4 20 nut V Only finger tighten the nut at this time Repeat this process for the other eye bolt and leg support mounting bracket Thread a 1 4 20 nut V about half w...

Page 15: ...he leg portion of the dust collection guard mounting bracket B Make sure the bent sections of the leg support bracket C and the leg support mounting bracket O face out toward the front of the saw Inse...

Page 16: ...ard the underside of the wooden extension table support frame Attaching the Leg Support Brackets to the Extension Table 2 Rotate the leg support mounting bracket O and or eye bolt N until the flat sid...

Page 17: ...to the cross support frame if you have a 36 extension table Pivot the leg support bracket and attached components up again and align the leg support mounting bracket hole with your drilled pilot hole...

Page 18: ...the bracket to the underside of the extension table support frame using a Phillips screwdriver or drill 7 8 Repeat steps 1 6 for the rear leg support mounting bracket Check to make sure the extension...

Page 19: ...nting bracket Be sure that the pins on the dust collection guard mounting bracket B indicated by the red arrows pass through the holes in the bracket on the outer dust tube indicated by the yellow cir...

Page 20: ...enter past the depression The amount of clamping force exerted by the lock knob can be adjusted by loosening the nut adjacent the pivot point of the handle using a 9 16 wrench and threading the handle...

Page 21: ...screw T through the two holes in the clamping portion of the floating blade guard F with the threaded portion of the bolt facing towards the front of the floating blade guard It may be useful to loose...

Page 22: ...LWAYS BE LOCKED IN ITS UPPER POSITION BEFORE THE DUST TUBES ARE MOVED OR PIVOTED ALWAYS CHECK THE POSITION OF THE FLOATING BLADE GUARD F PRIOR TO BEGINNING ANY CUTS TO MAKE SURE IT WILL NOT INTERFERE...

Page 23: ...f the inner dust tube E making sure that the hose clamp is about 1 4 to 1 2 inset from the end of the dust tube 3 4 Slide the other end of the dust hose G onto the floating blade guard F making sure t...

Page 24: ...re that both ends of the dust hose are securely connected and tightly sealed Connecting to a Dust Collection System CONNECT YOUR FLOATING DUST COLLECTION GUARD TO A DUST COLLECTION SYSTEM BEFORE START...

Page 25: ...se the dust tube lock knob and pivot the dust tubes towards the rear of the table Loosen the inner dust tube lock knob by turning the handle counter clockwise and slide the inner dust tube in or out o...

Page 26: ...le can be used to secure the floating blade guard and prevent vertical movement Loosen the lock handle by rotating it in a counter clockwise direction Move the floating blade guard up or down to the d...

Page 27: ...the dust collection guard mounting bracket and when adjusting the lateral position of the floating blade guard the floating blade guard should always be locked in its upper or retracted position i Adj...

Page 28: ...on properly replace or repair it before continuing to use the saw When not in use the floating blade guard can be stored in its upper position or the dust tube lock knob can be unlocked and the dust t...

Page 29: ...n guard system is located or has been used outside of the country where the authorized SawStop distributor from whom the floating dust collection guard system was purchased resides Please contact SawS...

Page 30: ...talline silica from bricks cement and other masonry products and arsenic and chromium from chemically treated lumber In addition wood dust has been listed as a known human carcinogen by the U S govern...

Page 31: ...such as blades brake cartridges and the like 9 Check to make sure the saw and floating dust collection guard are in proper working order before using them For example check the alignment of moving pa...

Page 32: ...0 51 58 53 58 59 63 64 66 60 68 54 61 60 39 38 40 41 43 47 46 44 45 42 14 11 22 21 9 20 19 17 18 16 15 12 13 27 23 24 35 28 29 31 28 36 26 25 29 28 4 5 6 8 7 15 13 12 29 28 30 32 33 34 53 54 62 65 50...

Page 33: ...40 Hex Head Bolt TSG FDC 015 4 16 3 8 16 Lock Nut TSG FDC 016 1 17 5 16 18 Nut TSG FDC 017 1 18 5 16 18 x 1 1 2 Hex Head Bolt TSG FDC 018 1 19 5 16 Push Nut TSG FDC 019 2 20 Dust Tube Pivot Plate TSG...

Page 34: ...1 1 52 M5 x 0 8 Lock Nut TSG FDC 052 3 53 1 4 20 Lock Nut TSG FDC 053 6 54 M10 x 20 x 1 5 Plastic Washer TSG FDC 054 6 55 M5 x 16 x 0 7 Washer TSG FDC 055 4 56 Tension Plate Linkage TSG FDC 056 2 57 M...

Page 35: ...30 TSG FDC OWNER S MANUAL This page is blank...

Page 36: ...November 2017 SawStop LLC 11555 SW Myslony St Tualatin Oregon 97062 USA www sawstop com 503 570 3200 503 582 9934 503 570 3303 info sawstop com Main Phone Service Fax Email...

Reviews: