Sawyer Manufacturing Company
7799 S. Regency Dr., Tulsa, OK 74131 USA
F
918.834.0318
info@sawyermfg.com
P
918.834.2550
sawyermfg.com
V1.2
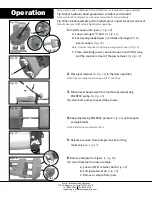
1.
Install coupon into jaws.
(I, Fig. 10)
A. Loosen plunger “L” bolt.
(H, Fig. 11)
B. Push spring loaded jaws
(I)
on back of plunger
(D)
to
insert coupon.
(Fig. 12)
Note: Use jaw tensioner to tighten jaws against coupon. (Fig. 13)
C. Place remaining jaws
(I)
around coupon until it fits snug
and the coupon is clear of the jaw retainer.
(G, Fig. 13)
2.
Place jaw retainer
(G, Fig. 14)
in the down position.
Note: Tighten retainer bolts using a 9/16” nut drive.
3.
Move travel head away from machine by depressing
ENERPAC pump.
(B, Fig. 15)
Tip: Use short pumps to speed the process.
4.
Keep depressing ENERPAC pump
(B, Fig. 16)
until coupon
sample breaks.
Note: Refer to pump pressure chart.
5.
Release pressure from pump/crank by turning
relief valve.
(A, Fig. 17)
6
.
Remove sample from jaws.
(I, Fig. 18)
Tip: Use a hammer to loosen sample.
A. Loosen 9/16” retainer bolts
(Fig. 19)
.
B. Pull jaw retainer up.
(Fig. 20)
C. Remove sample from jaws.
Note: Refer to AWS, ASME and API specifications for tensile test coupon samples.
Tip: Mount hydraulic hand pump down to stable environment.
Note: Hydraulic hand pump can be mounted vertically or horizontally.
Tip: When loading sample pull to highest point in jaws for easier removal.
Note: Make sure relief valve is tight before operation.
I
Operation
Fig. 15
Fig. 14
Fig. 10
Fig. 16
Fig. 17
Fig. 18
Fig.
Fig. 20
20
Fig.
Fig. 19
19
G
Fig. 11
Fig. 13
Fig. 12
H
B


