background image

4

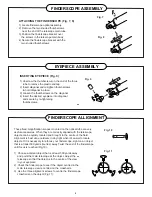
Fig. 8

Fig. 7

FINDERSCOPE ASSEMBLY

INSERTING EYEPIECE (Fig. 9)

1) Unscrew the thumbscrews on the end of the focus 
    tube to remove the plastic endcap.
2) Insert diagonal and re-tighten thumbscrews 
    to hold diagonal in place.
3) Loosen the thumbscrews on the diagonal.
4) Insert the desired eyepiece into diagonal 
    and secure by re-tightening 
    thumbscrews.

Fig. 9

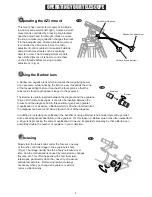
Fig. 10

Fig. 11

EYEPIECE  ASSEMBLY

FINDERSCOPE ALLIGNMENT

ATTACHING THE FINDERSCOPE (Fig. 7, 8)

1) Locate finderscope optical assembly.
2)  Remove the two knurled thumbscrews 
     near the end of the telescope main tube.
3) Position the finderscope bracket over 
    the screws in the telescope main body.
4) Secure the finderscope bracket with the 
    two knurled thumbscrews.

These fixed magnification scopes mounted on the optical tube are very 
useful accessories. When they are correctly aligned with the telescope, 
objects can be quickly located and brought to the centre of the field. 
Alignment is best done outdoors in day light when it's easier to locate 
objects. If it is necessary to refocus your finderscope, sight on an object 
that is at least 500 yards (metres) away. Twist the end of the finderscope 
until focus is reached (Fig.10). 

1)  Choose a distant object that is at least 500 yards away 
     and point the main telescope at the object. Adjust the 
     telescope so that the object is in the centre of the view 
     in your eyepiece. 
2)  Check the finderscope to see if the object centred in the 
     main telescope view is centred on the crosshairs. 
3)  Use the three alignment screws to centre the finderscope 
     crosshairs on the object (Fig.11). 

Summary of Contents for 705AZ3

Page 1: ...Cap Sun Shade Objective Lens Tube Rings Accessory Tray Tripod Leg Height Adjustment Clamp Piggyback Bracket Finderscope Finderscope Bracket Finderscope Allignment Screw Focus Locking Screw Focus Tube...

Page 2: ...g Your Eyes 3 5 3 3 4 4 4 5 5 5 6 6 7 7 7 8 8 8 8 8 8 9 TABLE OF CONTENTS Read the entire instructions carefully before beginning Your telesope should be assembled during daylight hours Choose a large...

Page 3: ...wingnuts and damage tripod legs Fig 3 Fig 2 TRIPOD SET UP ATTACHING THE TELESCOPE MAIN TUBE TO TUBE RINGS Fig 5 1 Remove the telescope tube from the paper covering 2 Place telescope tube in between t...

Page 4: ...two knurled thumbscrews These fixed magnification scopes mounted on the optical tube are very useful accessories When they are correctly aligned with the telescope objects can be quickly located and...

Page 5: ...e number of eyepiece in your collection Focusing Fig c Slowly turn the focus knobs under the focuser one way or the other until the image in the eyepiece is sharp Fig c The image usually has to be fin...

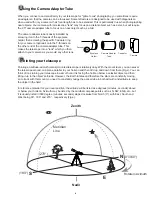
Page 6: ...0 with East South and West being 90 180 and 270 respectively Fig e Fig e Rotate in Azimuth 90 180 S E 270 W Zenith Meridian Line Tilt in Altitude Nadir 0 360 N Using the Camera Adapter Tube When you...

Page 7: ...bit from person to person is less until your eyes become fully dark adapted and decreases as you get older To determine an exit pupil you divide the diameter of the primary of your telescope in mm by...

Page 8: ...also affects images Astronomy is an outdoor activity The best conditions will have still air and obviously a clear view of the sky It is not necessary that the sky be cloud free Often broken cloud con...

Page 9: ...3rd edition 2000 A Manual Of Advanced Celestial Photography by Brad D Wallis and Robert W Provin Cambridge University Press New York 1984 Astrophotography An Introduction by H J P Arnold Sky Publishi...

Reviews: