T
RIPOD
SET UP
T
ELESCOPE
ASSEMBLY
3
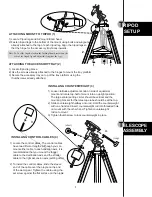
ATTACHING THE ACCESSORY TRAY (2)
1) Locate tripod leg brace.
2) Use the screws already attached to the hinges to mount the tray platform.
3) Secure the accessory tray on top of the tray platform using the
thumbscrews already attached.
ATTACHING MOUNT TO TRIPOD (1)
1) Locate Tripod legs and AZ mount/tripod head.
2) Fasten tripod legs to the bottom of the mount using bolts and wingnuts
already attached to the top of each tripod leg. Align the tripod legs so
that the hinge for the accessory tray faces inwards.
Note: To level the tripod, slacken the locking thumb screws on the
side of the tripod leg and adjust the length of the legs.
1.
2.
3.
4.
INSTALLING COUNTERWEIGHT (3)
1) Loosen latitude adjustment knob on side of equatorial
mount and rotate top-half of mount into an upright position.
The large scale (setting circle) should be vertical and the
mounting bracket for the telescope tube should be at the top.
2) Slide counterweight halfway onto rod. Hold the counterweight
with one hand and insert counterweight rod into threaded hole
on mount with the other hand. Tighten counterweight
rod onto mount.
3) Tighten thumbscrew to lock counterweight in place.
INSTALLING CONTROL CABLES (4)
1) Locate the control cables. The control cables
have two different lengths. Although you can
mount either cable to each direction axis, it is
recommended that you mount the longer
cable to the declination axis and the shorter
cable to the right ascension axis (setting circle).
2) To install the control cables, slide the sleeve
end of the cable over the nipple on the end
of the worm gear. Tighten the cable using the
set screw against the flat surface on the nipple.
(long)
(short)


