background image

Splitz-it  5-tON electric lOg Spliter

9

MAINTENANCE

REpLACING HYDRAULIC OIL

Replace the hydraulic oil in the log splitter after every 150 

hours of use. Take the following steps to replace the oil.

1.  Make sure all moving parts are stopped and the log 

splitter is unplugged.

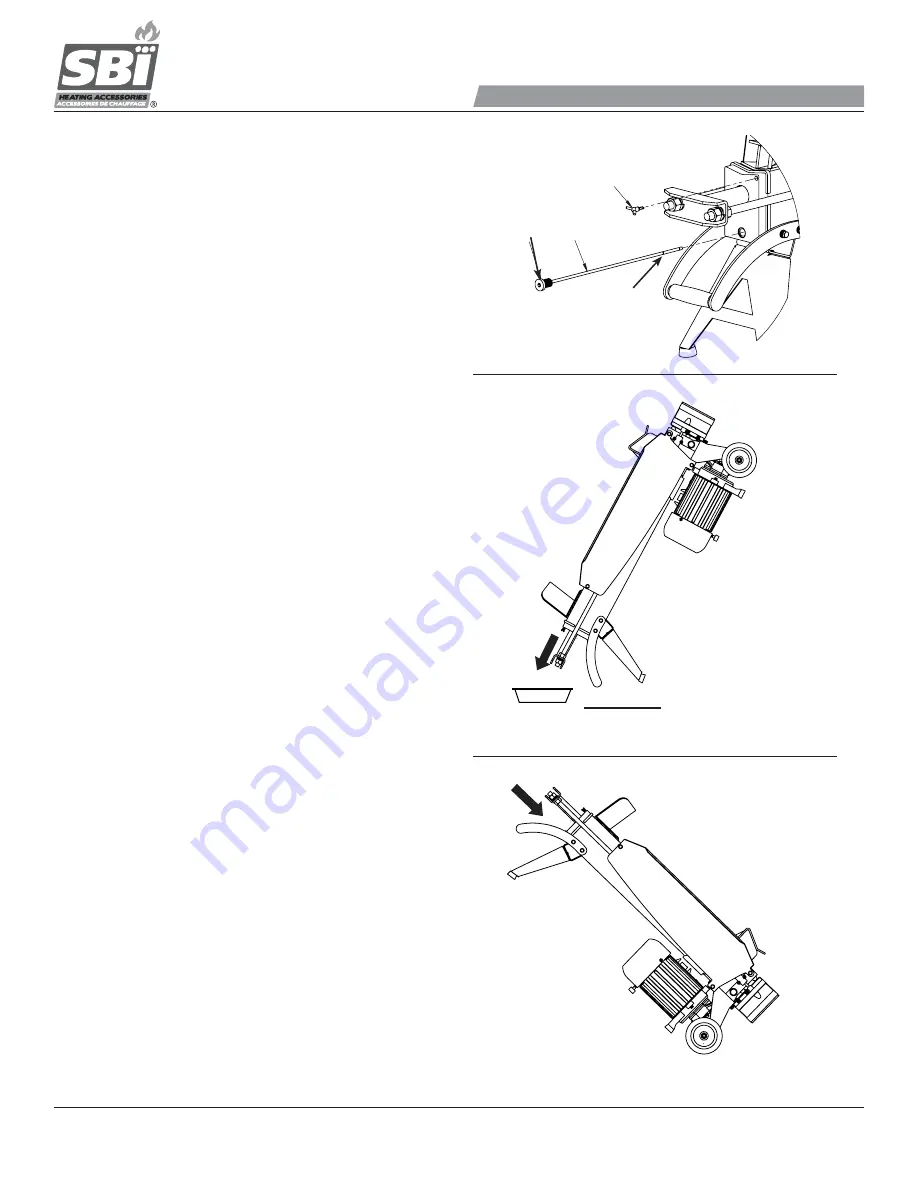
2.  Remove oil drain bolt and dipstick. Make sure bleed screw 

is closed tight. 

 (SEE FIGURE 9)

3.  Turn the log splitter on the support leg side over using 

a one gallon or larger capacity container to drain the 

hydraulic oil.  

(SEE FIGURE 10)

4.  Turn the log splitter on the motor side.  

(SEE FIGURE 11)

5.  Refill with 3.75 quarts of fresh hydraulic oil.

6.  While keeping the log splitter vertical, clean the surface 

of dipstick on the oil drain bolt and put it back into the oil 

tank.

7.  Make sure the level of the refilled oil is between the two 

grooves around the dipstick.

8.  Clean the oil drain bolt before re-threading it back in. 

Make sure the bolt is tightened to avoid leakage before 

placing the log splitter horizontally.  

IMpORTANT: LOOSEN bLEED SCREw 3-4 TURNS bEFORE 

OpERATION.

Periodically check oil level to ensure it is between the two 

grooves around the dipstick. If the level is below the lower 

limit, fill until level is correct.

The following hydraulic oils, or equivalent, are recommended 

for the log splitter’s hydraulic pump:

SHELL Tellus 22

MOBIL DTE 11

ARA Vitam GF 22

BP Energol HLP-HM 22 

SHARpENING wEDGE

When the log splitter wedge becomes dull and/or worn, 

sharpen the wedge using a fine-toothed file and smooth any 

burrs or crushed areas along the cutting edge.

oil drain container

Figure


10

Figure 11

oil drain 

plug

dipstick

bleed screw

Figure 9

full mark

Summary of Contents for AC02585

Page 1: ...WRITTEN CONSENT AND SHALL BE IMMEDIATELY RETURNED UPON REQUEST MATERIAL TOLERANCE UNLESS OTHERWISE NOTED 0 0 100 INCH 2 54 MM 0 00 030 INCH 0 76 MM NAME THIRD ANGLE PROJECTION SEE BILL OF MATERIALS W...

Page 2: ...Specifications Electrical Requirements 5 Set Up and Pre Operation 6 Assembly 7 Operation 8 Maintenance 9 Service Troubleshooting and Repair 10 Parts Explosion Breakdown and Parts List 11 12 Warranty...

Page 3: ...ving parts Always wear safety goggles for eye protection Everyday glasses have only impact resistant lenses and are not effective safety glasses Warning Warning INDICATES A HAZARD WHICH IF NOT AVOIDED...

Page 4: ...ual and the safety instructions it contains will provide you with the necessary knowledge to operate this equipment safely and effectively We have placed a safety de cal on the log splitter to remind...

Page 5: ...Force 5 ton Hydraulic Pressure 2 300 psi Hydraulic Oil Capacity 3 75 quarts Overall Size Length 37 inches Width 11 inches Height 20 inches Weight 105 lb The diameter of the log is not indicative a sm...

Page 6: ...r 6 Rubber feet 11 Log cradle 7 Rolling wheel Warning For your own safety do not connect the log splittertothepowersourceuntilthemachine is completely assembled and you read and understand the entire...

Page 7: ...op of the rolling wheel bracket with M6 1 x 12 bolts provided SEE FIGURE 3 4 Assemble the handle bars to the handle then attache the completed handle bar assembly to the log splitter beam using the M6...

Page 8: ...1 Release both controls 2 Once the log pusher completely stops at its starting position insert a wood wedge under the jammed log SEE FIGURE 7 3 Start the log splitter to push the wood wedge under the...

Page 9: ...back into the oil tank 7 Make sure the level of the refilled oil is between the two grooves around the dipstick 8 Clean the oil drain bolt before re threading it back in Make sure the bolt is tighten...

Page 10: ...properly positioned 1 Refer to Log Splitter Operation Section for log loading 2 The size or hardness of the log exceeds the capacity of the machine 2 Reduce the log size before splitting on the log sp...

Page 11: ...SPLITZ IT 5 TON ELECTRIC LOG SPLITER 11 SPLITZ IT 5 TON ELECTRIC LOG SPLITTER BREAKDOWN 17 18 9 10 11 12 27 25 26 29 13 8 7 14 15 16 6 5 4 3 1 2 28 20 19 22 23 21 24 30 31...

Page 12: ...le b w1200 1 14 w1200248 Control lever assy w1200 1 15 W1200122 WASHER M5 X 1 1 SPRLK HIGH COLLAR 2 16 W1200123 BOLT M5 8 X 16 SCH GR8 8 BLK OX F T 1 17 W120001 Motor assembly w1200 1 18 W1200207 Forw...

Page 13: ...supersede all other warranties either expressed or implied and all other obligations or liabilities on our part SBI Heating Accessories does not assume and does not authorize any other person to assum...

Page 14: ...______________________________________________________________________ _______________________________________________________________________________________________________ _________________________...

Page 15: ...______________________________________________________________________ _______________________________________________________________________________________________________ _________________________...

Page 16: ...sbI hEATING accessoRIes 250 rue de copenhague saint augustin de desmaures qu bec canada g3a 2h3 Tel 418 878 3040 FAx 418 878 3001 email info sbi international com...

Reviews: