7
During the combustion, oxygen taken from the room air is
used. In order to get sufficient air supply for the combustion,
leave the windows half-open in well-insulated rooms or have
a fresh-air intake installed. It is very important that the air
is introduced in the room where the stove is installed. This
can be done in various ways. For instance, you can mount a
damper in the external wall as close to the stove as possible.
The damper must be so constructed that it can be closed
when not in use.
Most of the Scan stoves are prepared for an indirect external
air supply. The cover plate at the rear of the stove is to be
removed and replaced by the connection branch with damper
(Ø 100 mm - special accessory) that is mounted by means
of the self-tapping screws. Thereafter you can connect it with
a flexible tube.
Several Scan stoves are also available with a special air con-
tainer (accessory) that takes the external air and introduces it
directly into the combustion chamber. On certain models, this
container can be mounted afterwards.
The air channel must have a diameter of at least Ø 100 mm
and must be insulated for condensation reasons.
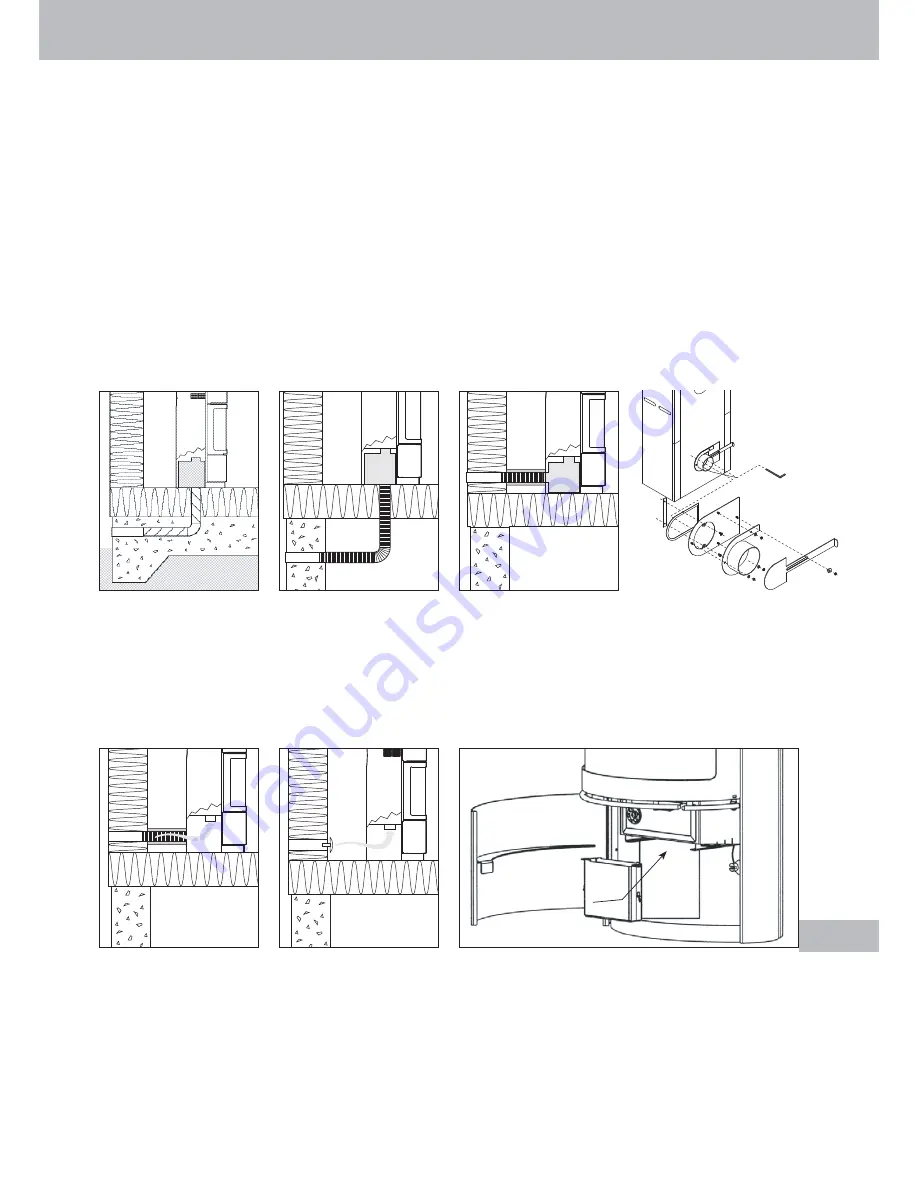
Direct air supply from the
bottom of the stove through
a concrete floor. Only pos-
sible on certain models and
not to be mounted after-
wards.
Direct air supply from the
rear of the stove through
an external wall. Can be
mounted afterwards on cer-
tain models.
The connecting piece/
damper for fresh-air intake
from the back of the stove is
mounted as shown above.
Indirect air supply from the
rear of the stove through an
external wall (by means of a
flexible tube).
Indirect air supply to the
room through a damper in
the external wall.
On certain models, this container can be mounted after-
wards if you need a direct external air supply into the com-
bustion chamber.
Direct air supply to the combustion chamber
Mounting of the connecting
piece/damper for fresh-air intake
Indirect air supply
Container for external air directly into the combustion chamber
Direct air supply from the
bottom of the stove through
a cellar. Only possible on
certain models and not to
be mounted afterwards.
Max. length ca. 3 m.
External fresh-air supply
M O U N T I N G I N S T R U C T I O N S