background image

~

 12 ~


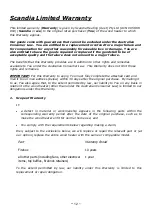
Scandia Limited Warranty


This limited warranty (

Warranty

) is given by Scandia Heating (Aust) Pty Ltd (ACN 005 868 

093) (

Scandia

 or 

we

) to the original retail purchaser (

You

) of the wood heater to which 

this Warranty applies. 
 

Our goods come with guarantees that cannot be excluded under the Australian    
Consumer Law.  You are entitled to a replacement or refund for a major failure and 

for compensation for any other reasonably foreseeable loss or damage.  You are 

also entitled to have the goods repaired or replaced if the goods fail to be of 
acceptable quality and the failure does not amount to a major failure. 


The benefits that this Warranty provides are in addition to other rights and remedies 

available to You under the Australian Consumer Law.  This Warranty does not limit those 

rights and remedies. 
 

IMPORTANT:

 For this Warranty to apply, You must fully complete the attached card and 

mail it to our mail address (below) within 30 days after the original purchase.  By mailing it 

to us, You also agree that, to the extent permitted by law, our liability to You on any basis in 
relation to the wood heater (other than under the Australian Consumer Law) is limited to our 

obligations under this Warranty. 

 
1.  Scope of Warranty 

If: 

 

a  defect  in  material  or  workmanship  appears  in  the  following  parts  within  the                
corresponding  warranty  period  after  the  date  of  the  original  purchase,  such  as  to 

make the wood heater unfit for normal home use; and 


 

You comply with the requirements below regarding making a claim, 


then, subject to the exclusions below, we will replace or repair the relevant part or (at 
our  option) replace the entire wood heater with the same or comparable model. 


To  the  extent  permitted  by  law,  our  liability  under  this  Warranty  is  limited  to  this 
replacement or repair obligation. 


Part 


Warranty Period 

Firebox 


10 years 

all other parts (including fans, other electrical 

items, top baffles, firebrick retainers) 

1 year 

Summary of Contents for SCWB1402

Page 1: ...nd understand all instructions before using your new wood heater Check Local Council Requirements Eg permits When installing operating and maintaining your wood heater follow the guidelines presented...

Page 2: ...e is designed to specifically burn dry hardwood Do not burn rubbish driftwood flammable liquids or any substance containing salts or corrosives 7 Creosote and soot may accumulate in your flue pipe and...

Page 3: ...ends should be kept to a minimum and we do not recommend using more than 2 bends on any installation Flues must not pass through ceilings floors attics roofs or combustible walls without adequate and...

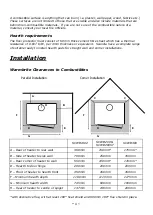
Page 4: ...of suitable ready to install hearth pads for straight wall and corner installations Installation Warmbrite Clearances to Combustibles with decorative flue with at least 180 heat shield and 900mm 180...

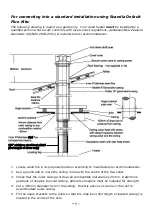
Page 5: ...sed position according to manufacturers recommendations 2 Use a plumb bob to mark the ceiling in line with the centre of the flue collar 3 Check that the outer casing will clear all combustible materi...

Page 6: ...heat shield up into bottom of the upper decorative flue The lower decorative flue features locating tags on the non crimped end which rest on the heater flue collar The solid heat shield section of th...

Page 7: ...irebox and rest the rear of the baffle on the rear lugs ensuring the baffle is touching the rear wall of the firebox Next install the firebricks First install the side and rear firebricks place the fi...

Page 8: ...l amount of smoke from the wood heater during the initial operations This is perfectly normal and is merely the curing of the wood heater paint Opening a window or door to provide additional ventilati...

Page 9: ...in this should burn off Overnight burning may not be possible on the Warmbrite 140 due to the loading restrictions from the firebox size Wood Heater Maintenance Check your wood heater regularly Initia...

Page 10: ...en hinge bolts Replace the door and check alignment repeat earlier steps if further fine adjustment necessary Door closing tension adjustment As door seals age the seal beds into the heater body this...

Page 11: ...ducing the air supply to the wood heater by closing down your air controls if this fails then you may have to adjust the door or you may have damage to the sealing Close a thin strip of paper in the d...

Page 12: ...complete the attached card and mail it to our mail address below within 30 days after the original purchase By mailing it to us You also agree that to the extent permitted by law our liability to You...

Page 13: ...or use 3 How to make a claim Any claim under this Warranty must be in writing to our mail address below It must be sent within the applicable warranty period and must state the model and serial numbe...

Reviews: