9
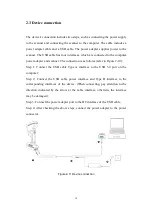
The names and functions of some structural components are shown in Table
2-1.
Table 2- 1 Some component names and descriptions
Component name
Functions
④
Front button
Shooting buttons in the global photography system
⑥ 、 ⑧
Indicator
strip
Bright red: The scanner software is disconnected; bright green: the
scanner is scanning at a normal distance; bright blue: the scanner
software is connected; marquee: the distance is too large or too small
when scanning.
⑦
Rear button
①
Click—turn on/off scanning
;
②
Double-click - you can switch the laser line in multiple blue,
single blue and infrared.
M
①
Click to switch the menu key function in order to adjust the
zoom ratio, adjust the laser exposure parameters, and operate
the view;
②
After scanning the mark points, press the buttom M, then
mark points will be optimized. After this step finished, then can
do some scanning.
+
①
Under the adjust zoom function: zoom in view
;
②
Under the function of adjusting the laser exposure
parameters: 0.5ms increase per exposure parameter
;
③
Under the action view function: adjust to the best view.
-
①
Under the adjust zoom function: zoom out view
;
②
Under the adjustment of laser exposure parameters: reduce
the exposure parameter by 0.5ms per exposure
;
③
Under the action view function: press once to adjust to lock
view, press twice to follow view.
⑨
USB
cable
power interface
Power connector for accessing the USB cable.
⑩
USB cable
Type B interface
Connect the USB cable Type B interface.
Attention
⑦
The function of all the buttons in the rear button works only under
the condition that the scanning software is running.


