background image

102

Scantron SelfScore Scanners

Procedure Overview

To recalibrate, perform the following:

Prepare for recalibration

Navigate the background menu

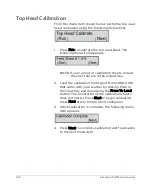
Perform a Top Head Calibrate function

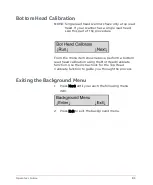
Perform a Bot Head Calibrate function (if your 

scanner is equipped with a bottom read head)

Exit the background menu

Instructions for the above tasks are found in the pages 

that follow.

Preparing for Recalibration

For best results, perform the following before 

calibrating:

Clean the scanner and the read head(s) as outlined 

in Chapter 7, “Chapter 7: Cleaning the Scanner”.

Ensure that the calibration forms are clean and 

undamaged.

Summary of Contents for SelfScore

Page 1: ...1 800 722 6876 www scantron com SelfScore Scanner S Operator Guide ...

Page 2: ...eils numériques de la classe A prescit dans le réglement sur le brouillage radioélectrique édicté par le Ministre des Communications du Canada 2005 2019 Scantron Corporation No part of this publication may be reproduced transmitted transcribed stored in a retrieval system or translated into any language in any form by any means for any purpose other than the purchaser s use without the express wri...

Page 3: ...le maintenance and troubleshooting Software References Your scanner can operate using any of the following software applications ScanTools Plus ScanTools Prisma A custom software application created using ScanTools Plus Link SDK A custom application created using ScanTools Prisma SDK This manual uses the generic term ScanTools when referring to whichever software option you are using to operate yo...

Page 4: ...erating in the SelfScore mode and Scantron Score Emulation mode for data collection Chapter 5 Chapter 5 Using the Background Menu provides a flowchart of the background menu system as well as explanations of each function Chapter 6 Chapter 6 Transport Printers describes printer features how to set up and test the printers as well as cleaning and troubleshooting Chapter 7 Chapter 7 Cleaning the Sca...

Page 5: ...Operator s Guide v Chapter A Appendix A Recalibration explains when and how to recalibrate the scanner ...

Page 6: ...he documentation set consists of the following SelfScore Operator s Guide Scanning Tests Surveys and Ballots Using SelfScore Elements of Data Collection SelfScore Quick Start SelfScore Quick Tips Scanning Tests Surveys and Ballots Contacting Customer Support If you require assistance see Chapter 9 Product Support and Services on page 97 for information on contacting Scantron Customer Support World...

Page 7: ...ectronic Equipment WEEE 1 8 UL Regulatory Compliance Statement 1 8 Chapter 2 Setting Up Your Scanner 2 9 Selecting a Good Location 2 9 Assembling the Scanner 2 11 Installing or Replacing an Ink Cartridge 2 14 Positioning the Printers 2 16 Connecting the Power Supply 2 20 Installing the Scanner Utilities Software Optional 2 22 Connecting the Scanner to the Computer Optional 2 23 Turning the Scanner...

Page 8: ...ode 4 40 Chapter 5 Using the Background Menu 5 51 Entering the Background Menu 5 52 Background Menu Flowchart 5 53 Scanner Information 5 54 Defaults Menu 5 55 Utilities Menu 5 57 Diagnostics Menu 5 66 Exiting the Background Menu 5 69 Chapter 6 Transport Printers 6 71 Getting Started 6 72 Installing or Replacing an Ink Cartridge 6 72 Positioning the Printers 6 75 Testing the Printers 6 78 To test t...

Page 9: ...and Services 9 97 Hardware Support and Form Orders 9 97 Hardware Support 9 98 Appendix A Recalibration A 101 Procedure Overview A 102 Preparing for Recalibration A 102 Navigating the Background Menu A 103 Top Head Calibration A 104 Bottom Head Calibration A 105 Exiting the Background Menu A 105 Index 107 ...

Page 10: ...x Scantron SelfScore Scanners ...

Page 11: ... this chapter you will find a description of your scanner s components features specifications and system requirements as well as safety and environmental information 1 optical mark recognition 1 In this chapter Scanner Components 1 2 SelfScore Standard Features 1 5 System Requirements 1 6 User Precautions 1 6 Environmental Information 1 7 UL Regulatory Compliance Statement 1 8 ...

Page 12: ...heet through the transport bed Pick roller Pulls a sheet onto the transport bed Printer area Dual transport printers print error or verification marks and scores on sheets as they pass through the scanner Read head area Read head goes here Sheet deflector area Sheet deflector goes here Thickness sensor Used to detect thickness of forms to ensure only one sheet is being scanned at a time Transport ...

Page 13: ...s of the scanner and provides messages on how to change the status and resolve a scanner condition Input tray lever Retains the input tray in the down position for easy loading of sheets The input tray lever must be released for scanner to function properly Input trays upper and lower Hold up to 100 sheets of paper for scanning The lower input tray rises automatically as sheets feed The upper tray...

Page 14: ...ly Component Function On Off switch Turns the scanner on and off Positioning stand Holds the scanner at the correct position for operation When extended the positioning stand places the scanner at an angle Power port Provides a connection point for power input from the power supply Quick Tips slot Provides a location on the scanner for the Quick Tips guides Tray release Releases when pressed the i...

Page 15: ...es sent to scanner display panel and optional host computer Optional communications with host computer through a USB virtual serial communications port Simultaneous transfer of data and scanning of forms Ability to read both Mark Reflex and Trans Optic forms Reads 166 cell spacing Input tray and output tray capacity of up to 100 sheets Sheet handling capacity of 2 5 x 5 inch to 9 x 14 inch 60 100 ...

Page 16: ...es Scanning Rate 2 800 sheets per hour Actual scanning rate depends on quantity of data read from the form and the amount of processing done on the data while scanning System Requirements For information about system requirements for the SelfScore scanner go to https www scantron com scanners forms optical mark recognition omr scanners opscan series selfscore User Precautions Users and their emplo...

Page 17: ...components Supervisors should review their practices and make compliance with these precautions a part of the job description for operation of the scanner Environmental Information Scantron scanners are designed to meet worldwide environmental requirements Guidelines are available for the disposal of consumable items that are replaced during maintenance or service Follow local regulations or conta...

Page 18: ... local sales agent for additional information on the collection and recovery programs available for this product UL Regulatory Compliance Statement CLASS 1 LED PRODUCT IEC 60825 1 1993 A1 1997 A2 2001 This class is eye safe under all operating conditions Array pulse duration 256usec maximum power output 0 34mW CAUTION Use of controls or adjustments or performance of procedures other than those spe...

Page 19: ...in a climate controlled environment for 24 hours before you attempt to scan them 3 Electrical noise Avoid locating the scanner near a generator or other type of large motor such as an elevator an air conditioner or a refrigerator that 2 In this chapter Selecting a Good Location 2 9 Assembling the Scanner 2 11 Installing or Replacing an Ink Cartridge 2 14 Positioning the Printers 2 16 Connecting th...

Page 20: ...e protection for the scanner The circuit from the source breaker box should not supply power to a major piece of equipment other than the scanner and computer if used 5 Space Find a location that allows you plenty of working surface around the scanner The scanner itself is 21 X 15 X 9 in 54 X 37 X 23 cm 6 Temperature Place the scanner in a location with temperatures between 60 and 85 F 16 and 29 C...

Page 21: ...tend the positioning stand so that the scanner is placed at the proper angle for operation 2 Install the paper guide by sliding it into the slot in the input tray 3 Install the input tray Slide the end of the tray that has two prong like tabs into the slots at the end of the scanner ...

Page 22: ...on SelfScore Scanners NOTE When removing the tray from the scanner depress the tray release tab 4 Insert the Quick Tips guide shipped with your scanner into the slot on the underside of the input tray This helps prevent loss of the instructions ...

Page 23: ...etting Up Your Scanner Operator s Guide 13 5 Install the output tray by hooking the two prong like tabs into the end of the scanner 6 Adjust the adjustment bar to the length of the sheets that you will be scanning ...

Page 24: ...Score Scanners Installing or Replacing an Ink Cartridge NOTE The scanner does not come with the ink cartridges installed To install or replace an ink cartridge follow these steps 1 Unlatch the printer cover and remove it 2 Locate the cartridge holders ...

Page 25: ...n press the top of the cartridge firmly into the cartridge holder until you feel two clicks This ensures that the cartridge is fully seated 4 Repeat step 3 for the second printer 5 Adjust the position of the printers as described in the next section NOTE For more printer information see Chapter 6 Chapter 6 Transport Printers ...

Page 26: ...is not already removed from a previous procedure unlatch it and remove it 2 Notice the location of the cartridge holder that is inside the printer assembly Also notice the ruler the printer alignment mark and the thumbscrew that sit beside the cartridge holder These are the elements used to position the printer s ...

Page 27: ...are positioned to 1 6 and 4 3 inches There are small triangles on the scanner printer ruler indicating these two locations Check the printer s to see if they are in the correct position If not use the following steps to position the printer s 4 Loosen the thumbscrew so that you can move the printer ...

Page 28: ...Chapter 2 Setting Up Your Scanner 18 Scantron SelfScore Scanners 5 Move the printer to the 1 6 inch mark and lightly tighten the thumbscrew 6 Adjust the position of the second printer to 4 3 inches ...

Page 29: ...Chapter 2 Setting Up Your Scanner Operator s Guide 19 7 Replace the printer cover making sure that it is firmly seated ...

Page 30: ...your scanner 2 Plug the end of the power cable three prong plug into a properly grounded electrical outlet providing alternating current AC CAUTION If lightning damage is a possibility use a power strip with surge protection CAUTION Do not connect the scanner to an outlet that also serves another major piece of equipment other than the computer if used ...

Page 31: ...ar end three receptacles of the power cable into the open end with three prongs of the power supply 4 Plug the rounded end of the power supply into the power port on the back of the scanner CAUTION Do not plug the rounded end of the power supply into any part of the computer ...

Page 32: ...se the following instructions only if you wish to connect your scanner to a computer IMPORTANT Before connecting your scanner to the computer install the drivers and utilities software as described below 1 Insert the scanner utilities CD into the CD ROM drive of your computer 2 Browse to your CD ROM drive 3 Double click the setup exe file to run the setup program 4 Follow the on screen instruction...

Page 33: ...on IMPORTANT Before connecting the scanner to the computer be sure to install the drivers and scanner utilities as described in the previous section 1 Locate the USB ports on the back of your computer Plug the A end flat end of the USB cable into the USB communications port NOTE A USB 1 1 or 2 0 communications port is required NOTE Do not connect more than one OpScan 4 ES iNSIGHT 4 ES or SelfScore...

Page 34: ... Scanner 24 Scantron SelfScore Scanners 2 Plug the USB B connector square end into the USB port on the back of the scanner IMPORTANT There may be a sticker covering the USB port If so remove it before plugging in the USB cable ...

Page 35: ... the scanner utilities software Doing so may result in incorrect drivers being loaded 1 Press the switch on the back of the scanner to turn the scanner on l 2 After you turn on the scanner wait for it to complete the self test The message Initializing will appear on the display panel After a few seconds another message will appear indicating what action needs to be taken next ...

Page 36: ...TE This step is not part of setup It is included in case you want to remove the scanner utilities software from your PC e g if you move the scanner to a different computer If you want to uninstall the scanner utilities software use the following procedure 1 Before uninstalling the software close all programs and turn off the scanner 2 Open the Control Panel and access the list of programs Wait for...

Page 37: ...sure to perform a test to ensure that your scanner is working properly Verifying Proper Setup Before starting your scanning session you may want to verify that the scanner is set up properly 3 In this chapter Verifying Proper Setup 3 27 Configuring the Scanner 3 30 Scanning Sheets 3 31 Storing Information 3 34 Understanding Display Panel Messages 3 34 Clearing Document Jams 3 35 ...

Page 38: ...ntron SelfScore Scanners 1 Ensure that the positioning stand is in the down position 2 Ensure that the input tray and output tray or Select Stacker are in place and that the adjustment bar is properly positioned for the sheets being scanned ...

Page 39: ...ner Operator s Guide 29 3 Ensure that the covers on the sheet deflector read head and printers are closed and fully seated 4 Ensure that the power supply is plugged into both a wall outlet or power strip and the back of the scanner ...

Page 40: ...ou will be collecting data with ScanTools software Configuring the Scanner Your scanner comes pre configured by Scantron ready to meet most scanning needs However should you have special requirements use the background menus to configure the scanner See Chapter 5 Chapter 5 Using the Background Menu for information on how to configure the scanner ...

Page 41: ...eep mode If there is still nothing in the display verify that the unit is plugged in and turned on If necessary see Chapter 2 Chapter 2 Setting Up Your Scanner If the message is different from the one shown above refer to the Scanning Tests Surveys and Ballots Using SelfScore guide included with your scanner for instructions on display panel messages 2 Press the Press To Load button on the side of...

Page 42: ...e This is important for proper feeding 3 Optional If you have a large number of sheets to load you can secure the input tray in the down position by pushing in the tray lock while the Press To Load button is depressed To release the lock after you have loaded sheets depress the Press To Load button and release it ...

Page 43: ...r to the left in the input tray as possible 6 Slide the paper guide so that it just touches the sheets IMPORTANT Release the Press To Load button if locked 7 Follow the instructions in the Scanning Tests Ballots and Surveys Using SelfScore guide to scan the type sheets that you just loaded Leading Edge Guide Edge Timing Marks Form ID Marks Trailing Edge ...

Page 44: ...atch is scanned and Quit is pressed the results are erased Understanding Display Panel Messages The display panel displays information regarding Scanner status Errors What to do next Button functionality See the Scanning Tests Surveys and Ballots Using SelfScore guide included with your scanner for explanations of all display panel messages The messages are listed alphabetically ...

Page 45: ...hapter on display panel messages in the Scanning Tests Surveys and Ballots Using SelfScore guide included with your scanner for more information on the specific error message that you received 1 Lift the following Sheet deflector Read head Printer cover 2 Remove any sheets on the transport bed 3 Close all covers making sure that each is fully seated 4 Return any unscanned sheets to the input tray ...

Page 46: ...Chapter 3 Operating Your Scanner 36 Scantron SelfScore Scanners NOTES ...

Page 47: ...s tally ballots and surveys The scanner can function as a standalone unit where the data is not retained or can be connected to a PC if you wish to collect and manage the ASCII data In SelfScore mode the scanner has form definitions for standard test forms available from Scantron so there is no need to create or download a form definition To start a new session load the key into the input tray and...

Page 48: ...er Special Features Some of the special features supported by SelfScore mode are Multiple keys Scoring and rescoring tests Combined subjective and objective and test scores Scores based on groups Letter grades on tests Test analysis reports item analysis and frequency distribution Printing results directly on class rosters Tallying surveys and ballots Survey and ballot results based on groups Surv...

Page 49: ... form ScanTools in combination with OMR with Imaging mode or OMR Only mode is best for that You want to collect image bar code or machine or hand print data use OMR with Imaging mode to collect these types of data You want to collect data and you are working on a computer platform that is not PC Download mode works with computer platforms other than PC ...

Page 50: ...when used with Remark software Scantron Score emulation mode works with most of the same forms used with Scantron Score and 888P scanners Visit www ScantronStore com for a list of compatible forms Scantron Score emulation mode can be used with optional Remark Classic OMR software to provide a variety of informative reports Item Analysis Print the number of tests processed Print the number or perce...

Page 51: ...ng There are small triangles on the scanner printer ruler indicating printer position locations When operating in Scantron Score emulation mode the printer position must be set to 2 5 inches and 6 2 inches to properly print the incorrect marks percentage score etc on Scantron Score forms To position the printer complete the following steps 1 Unlatch and remove the printer cover by lifting upon the...

Page 52: ...anners 2 Note the location of the cartridge holder inside the printer assembly Also note the ruler printer alignment mark and thumbscrew that sits beside the cartridge holder These are the elements used to position the printer ...

Page 53: ...ator s Guide 43 3 Scantron Score forms require that printers used with an iNSIGHT 4ES scanner are positioned at 2 5 inches and 6 2 inches Check the printer s to ensure that they are in the correct position ...

Page 54: ...44 Scantron SelfScore Scanners 4 If the printer position requires adjustment loosen the thumbscrew so you can move the printer 5 Adjust the position of the second printer to the 6 2 inch mark ...

Page 55: ...Operator s Guide 45 6 Move the printer to the 2 5 inch mark and lightly tighten the thumbscrew 7 Replace the printer cover ensuring that it is firmly seated ...

Page 56: ...d by students 2 Find the key marking row immediately above the first question 3 Mark a scoring option using the following guidelines 4 Mark the correct answer to each question Score the Tests 1 Press Start 2 Load the tests and keys into the hopper with the keys on top so they will scan first 3 optional Feed an item analysis form by following the instructions on the form and on the screen 4 When fi...

Page 57: ...coring option on side 1 as for single sided see above 2 Mark only key bubble 5 on side 2 all scoring options from side 1 will carry over 3 Mark the correct answer to each question Score the Tests 1 Press Start 2 Load the tests and keys into the hopper with the keys on top so they will scan first 3 optional Feed an item analysis form by following the instructions on the form and on the screen NOTE ...

Page 58: ...m 3 Mark one letter per key so that each key has a unique identifier 4 Ensure that each student test form is marked with the appropriate key identifier before scoring Score the Tests 1 1 Press Start 2 Load the tests and keys into the hopper with the keys on top so they will scan first 3 optional Feed item analysis forms by following the instructions on the form and on the screen 4 When finished fe...

Page 59: ...jective Score area of the test key Mark only one bubble per line for a maximum of 163 points 2 Mark the subjective score on the on the student test forms before scoring them Score the Test Scan key s and tests as you would normally see above Rescoring Tests The Rescore button offsets the printing slightly so you can score tests a second time and see differences clearly 1 Press Rescore ...

Page 60: ...g Surveys or Ballots 1 Mark the key marking row for surveys or ballot 2 Press Start 3 Feed the ballot or survey key 4 Feed the ballot or survey forms up to 9 999 5 Feed a Tally form Troubleshooting View on screen error messages for error type and recovery information For technical assistance ...

Page 61: ...s unchanged Press the left button to enter submenus run functions or change selections This chapter gives you an overview of the entire background menu system in the form of a flowchart It also covers details for each menu item The menu items are listed in the order that they appear in the background menu 5 In this chapter Entering the Background Menu 5 52 Background Menu Flowchart 5 53 Scanner In...

Page 62: ... Scantron SelfScore Scanners Entering the Background Menu Enter the background menu by holding down both buttons for about five seconds When the message Background Menu appears briefly release the buttons ...

Page 63: ...Operator s Guide 53 Background Menu Flowchart The background menu is organized as shown on the below ...

Page 64: ...es Where Scanner Model SelfScore And where Version number of the scanner firmware Description The scanner model is displayed immediately after entering the background menu Press Next to advance to the next menu item Sheet Count Variables Where Count Number of sheets Description Sheet count refers to the number of sheets that have been scanned since the scanner was put into service Press Next to ad...

Page 65: ...nd Menu Flowchart on page 53 for a flowchart of the entire background menu Defaults Menu Description This menu item allows you to enter the defaults menu Press Enter to enter the Defaults menu Press Next to advance to the Utilities menu See Utilities Menu on page 57 Show Comm Status Variables Where Status On Off Description This menu item allows you to either display or not display communication s...

Page 66: ...ription This menu item allows you to change the power saver setting The time shown indicates the amount of time that will elapse before the scanner goes into sleep mode Press Change to change the power saver time The power saver time will Cycle through 5 10 15 30 45 and 60 minute settings Reset to Off Start over at 5 minutes NOTE The default setting for the power saver is 5 minutes Press Next to a...

Page 67: ...full description of each menu item NOTE See Background Menu Flowchart on page 53 for a flowchart of the entire background menu items Utilities Description This menu item allows you to enter the Utilities menu Press Enter to enter the Utilities menu Press Next to advance to the Diagnostics menu See Diagnostics Menu on page 66 Top Head Calibrate Description This dialog allows you to run the top head...

Page 68: ...scanner and the read heads See Chapter 7 Chapter 7 Cleaning the Scanner for details Ensure that the calibration sheets are clean and undamaged Press Run to calibrate the top read head The following menu item appears NOTE If you run out of calibration sheets reload the ones that are in the output tray Load the calibration forms part 202 989 008 that came with your scanner by placing them in the inp...

Page 69: ...tem For instructions on calibrating the bottom read head refer to the instructions for the top read head above Comm Configuration Variables Where Scanner Model SelfScore Description This menu item allows you to display and configure the communications parameters NOTE The Comm Configuration menu item is not displayed if the scanner is displaying the Recalibrate See Manual message Press Next to skip...

Page 70: ...custom configuration The following menu items appear Default Config Set Variables Where Scanner Model SelfScore Description This menu item allows you to set the communications parameters to the factory default The factory default configuration is Start Record 1 FF Start Record 2 FF Start Record 3 FF Start Record 4 FF Start Record 5 FF Start Record 6 FF End Record 1 0D End Record 2 0A End Record 3 ...

Page 71: ...nload 1C Runtime 1D Status 73 Scanner Ctrl 65 Print Position 31 Print Data 32 Display Data 07 End of Info 04 End of Batch FF OCR 1E Press Next to skip this function and advance to the next menu item Press Set to set the communications parameters to the default configuration shown above A Comm Config Complete message will display Press Next to complete communications configuration and to exit this ...

Page 72: ...item Press Scan to scan a configuration sheet The following menu item appears Press Next to abort this function and to advance to the next menu item To proceed with scanner configuration feed the Scantron Configuration Sheet by simply placing it in the input tray after marking the sheet It will automatically scan A Comm Config Complete message will display Press Next to complete communications con...

Page 73: ...ay if you want the scanner to display each of the communications parameters on the display panel There are a total of 35 parameters Press Show Next to show the next parameter Press Next at any time to abort the function and advance to the next menu item Display Brightness Description This menu item allows you to adjust the display brightness Press Next to advance to the next menu item Press Change...

Page 74: ...lps ensure that your data collection results are accurate However if you are using forms that are not cut perfectly square leading edge skew detection can result in unwanted error messages If that occurs this function allows you to turn leading edge skew detection off to suppress the errors However Scantron cannot guarantee the accuracy of the data collected when leading edge skew detection is tur...

Page 75: ...to the question Press Next to advance to the next menu item Press Change to increment the printer offset by one Each time you press Change the offset indicator number increments by 1 up to 10 then it resets to 10 Continue pressing Change until you have reached the setting that you want to test Once you have chosen a setting score a test to determine if the alignment is correct Readjust as necessar...

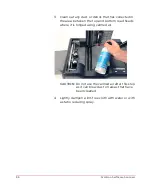
Page 76: ...chart on page 53 for a flowchart of the entire background menu Diagnostics Menu Description This menu item allows you to enter the Diagnostics menu Press Enter to enter the Diagnostics menu Press Next to advance to the Background Menu menu item Feed Print Description This menu item allows you to test the scanner s feed and print capabilities The test feeds sheets loaded in the input tray and the p...

Page 77: ... continue as long as there are sheets in the input tray Press Next if you wish to abort the test or if you have completed the test You will be advanced to the next menu item Top Read Validation Description This menu item allows you to validate the calibration and operation of the top read head NOTE This test requires Scantron Reflective Calibration sheets part number 202 171 989 Press Next to skip...

Page 78: ...nu item If the scanner fails the test the following three menu items appear Where x Paper Light Mark Dark Mark and y hex value 0 9 and A F If the scanner fails the test first ensure that the calibration sheets are not dirty or damaged If they are not clean the scanner read head then retest by pressing Retry If the scanner still fails the test after these measures contact Scantron Customer Support ...

Page 79: ... read head Refer to the instructions for Top Read Validation above with the following exception Place the Calibration Sheets in the input tray so that the words Scantron Reflective are face down and enter the scanner last Exiting the Background Menu Description After you have navigated through the background menu the menu item shown above appears Press Enter to re enter the background menu Press E...

Page 80: ...70 Scantron SelfScore Scanners ...

Page 81: ...er is not going to be used for a period greater than two weeks The scanner is going to be transported The scanner is going to be turned off or unplugged It is not necessary to remove the cartridge when allowing the scanner to go into Energy Star sleep mode 6 In this chapter Getting Started 6 72 Installing or Replacing an Ink Cartridge 6 72 Positioning the Printers 6 75 Testing the Printers 6 78 Cl...

Page 82: ... cartridges Position the printers optional Test the printers Instructions for each of these tasks are found in the sections that follow Installing or Replacing an Ink Cartridge NOTE The scanner does not come with the ink cartridges installed To install or replace an ink cartridge follow these steps 1 Unlatch the printer cover and remove it ...

Page 83: ... cartridge holder 3 Prepare the new cartridge Remove the new cartridge from the box and peel off the tape that covers the ink cartridge nozzles Be careful to not touch the cartridge contacts with your fingers 4 Install the new cartridge Slide the cartridge into the cartridge holder feet first then press the top of the cartridge firmly into ...

Page 84: ...core Scanners the cartridge holder until you feel two clicks This ensures that the cartridge is fully seated 5 Repeat step 4 for the second printer 6 Adjust the position of the printers as described in the next section ...

Page 85: ...tridge holder that is inside the printer assembly Also notice the ruler the printer alignment mark and the thumbscrew that sit beside the cartridge holder These are the elements used to position the printer s 3 SelfScore forms require that the printers are positioned to 1 6 and 4 3 inches There are small triangles on the scanner printer ruler indicating these two locations ...

Page 86: ...Scantron SelfScore Scanners Check the printer s to see if they are in the correct position If not use the following steps to position the printer s 4 Loosen the thumbscrew so that you can move the printer ...

Page 87: ...Operator s Guide 77 5 Move the printer to the 1 6 inch position and lightly tighten the thumbscrew 6 Adjust the position of the second printer to 4 3 inches ...

Page 88: ...ows Testing the Printers To test the printer perform the following steps 1 Load five expendable 8 5 by 11 inch data collection sheets in the input tray Do not use Calibration Sheets as you may need those in the future 2 Hold down at the same time the left and right buttons found under the display panel for about five seconds to enter the background menu The ...

Page 89: ...nu item appears 4 Press Enter to enter the Diagnostics menu The following menu item appears 5 Press Run to run the Feed Print test For the printers to successfully pass the test sheets must feed through the scanner and the printers must print characters on the sheets As the sheets move through the scanner the following message is displayed ...

Page 90: ...tem appears Press Exit to exit the background menu If the printer does not print on the sheets verify that you have installed the ink cartridge as directed Repeat the testing procedure If printing still does not appear call Scantron Customer Support for assistance as described in Chapter 9 Product Support and Services on page 97 ...

Page 91: ...it may be necessary to clean the cartridge holder NOTE Perform this procedure only if you are experiencing problems You can damage the electrical contacts in the cartridge holder if you clean them too frequently To clean the cartridge holder 1 Unlatch the printer cover and remove it ...

Page 92: ...ION Watch for loose ink on the cartridge that can soil your hands clothes or other items 3 Using a clean swab gently wipe the area of the cartridge holder that contains the electrical contacts CAUTION Do not spray any substance directly into or on the cartridge holder ...

Page 93: ... two weeks remove the cartridge from the scanner Store the cartridge in a sealed container and place the container in a cool dry location such as inside a refrigerator A printer that previously printed but now does not print Replace the cartridge Letters that are blurred or in a double image Replace the cartridge if the quality of printing does not improve Letters that are not printing completely ...

Page 94: ...84 Scantron SelfScore Scanners ...

Page 95: ...ver you may need to clean your scanner s read heads more frequently depending on the following Paper dust Sheets that generate more paper dust will necessitate more frequent cleaning Perforated sheets generate a considerable amount of paper dust Read head contamination Eraser fragments and correction fluid if used can build up on the read head 7 In this chapter Schedule 7 85 Supplies 7 86 Procedur...

Page 96: ...spray directly on the scanner Static reducing spray do not spray directly on the scanner Lint free cloths Canned air with non condensing propellant Procedure IMPORTANT Turn the scanner off before cleaning An illustration to help you identify key parts that need to be cleaned is shown below The recommended cleaning procedure follows ...

Page 97: ... 1 Raise the read head and sheet deflector Also remove the printer cover 2 Spray canned air with a non condensing propellant directly on the transport bed area This removes large amounts of dust and other types of debris ...

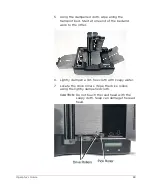
Page 98: ...ollected in the area between the top and bottom read heads where it is hinged using canned air CAUTION Do not use the canned air after this step as it can blow dust on areas that have been cleaned 4 Lightly dampen a lint free cloth with water or with a static reducing spray ...

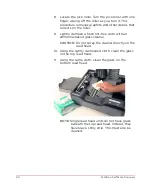
Page 99: ...bed Start at one end of the bed and work to the other 6 Lightly dampen a lint free cloth with soapy water 7 Locate the drive rollers Wipe the drive rollers using the lightly dampened cloth CAUTION Do not touch the read head with the soapy cloth Soap can damage the read head ...

Page 100: ... 9 Lightly dampen a fresh lint free cloth with an ammonia based glass cleaner CAUTION Do not spray the cleaner directly on the read head 10 Using the lightly dampened cloth clean the glass on the top read head 11 Using the same cloth clean the glass on the bottom read head NOTE Single read head units do not have glass beneath the top read head Instead they have black shiny strip This must also be ...

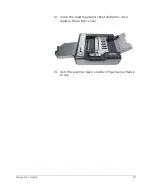
Page 101: ...Operator s Guide 91 12 Close the read head and sheet deflector Also replace the printer cover 13 Turn the scanner back on after it has had a chance to dry ...

Page 102: ...92 Scantron SelfScore Scanners ...

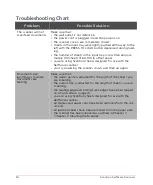
Page 103: ...ner If you are still unable to resolve the problem contact Scantron Customer Support as described in Chapter 9 Product Support and Services on page 97 NOTE For information regarding error messages see the Display Panel Messages chapter in the Scanning Tests Surveys and Ballots Using SelfScore guide 8 In this chapter Troubleshooting Chart 8 94 ...

Page 104: ... using Scantron sheets designed for use with the SelfScore scanner you try powering the scanner down and then up again Documents are jamming or multiple documents are feeding Make sure that the paper guide is adjusted for the width of the sheets you are scanning the output tray is adjusted for the length of sheets you are scanning the leading edge and timing track edges have been tapped on a hard ...

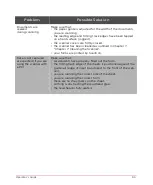
Page 105: ...leaning the Scanner your forms are printed by Scantron Data is not captured as expected if you are using the scanner with a PC Make sure that respondents have properly filled out the form the timing track edge of the sheets is positioned against the guide rail edge of input tray closest to the front of the scan ner you are scanning the correct side of the sheet you are scanning the correct form th...

Page 106: ...96 Scantron SelfScore Scanners ...

Page 107: ...re to get assistance with and supplies for your Scantron SelfScore scanner Hardware Support and Form Orders Custom and Standard Form Orders www ScantronStore com Email customer_service scantron com Call 800 347 7704 9 In this chapter Hardware Support and Form Orders 9 97 Software Support 9 99 ...

Page 108: ...documents Serial number and model number located on the side or back of the scanner Type of computer and the operating system you are using with the scanner PC Mac etc Sheet count determining sheet count will vary depending on your scanner Refer to the procedure documented in your Operator s Guide A description of the problem including The steps to reproduce it and whether you can determine the so...

Page 109: ...nformation Type of computer and the operating system you are using Steps required to reproduce the problem Website Email www scantron com support scantron com Live Chat You can also choose GoToAssist Live Chat an instant messaging solution for Technical Support Live Chat is available during Technical Support s normal business hours 1 Go to https www scantron com software support live chat key 2 Co...

Page 110: ...100 Scantron SelfScore Scanners NOTES ...

Page 111: ...the following reasons Received Recalibrate See Manual message on the scanner display panel Moved the scanner to a new location Instructed to do so by Scantron Customer Support NOTE Do not recalibrate unless required to do so Recalibrating too often can produce less than optimal results A In this chapter Preparing for Recalibration A 102 Navigating the Background Menu A 103 Top Head Calibration A 1...

Page 112: ...Calibrate function if your scanner is equipped with a bottom read head Exit the background menu Instructions for the above tasks are found in the pages that follow Preparing for Recalibration For best results perform the following before calibrating Clean the scanner and the read head s as outlined in Chapter 7 Chapter 7 Cleaning the Scanner Ensure that the calibration forms are clean and undamage...

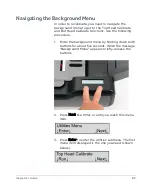
Page 113: ...d Calibrate functions Use the following procedure 1 Enter the background menu by holding down both buttons for about five seconds When the message Background Menu appears briefly release the buttons 2 Press Next five times or until you reach this menu item 3 Press Enter to enter the Utilities submenu The first menu item displayed is the one you need shown below ...

Page 114: ...ets reload the ones that are in the output tray 2 Load the calibration forms part 202 989 008 that came with your scanner by placing them in the input tray and depressing the Press To Load button The orientation of the calibration sheets does not matter Press Start to begin calibration Press Next at any time to abort calibration 3 When calibration is complete the following menu item appears 4 Pres...

Page 115: ... this part of the procedure From the menu item shown above perform a bottom read head calibration using the Bot Head Calibrate function Use the instructions for the Top Head Calibrate function to guide you through the process Exiting the Background Menu 1 Press Next until you reach the following menu item 2 Press Exit to exit the background menu ...

Page 116: ...106 Scantron SelfScore Scanners NOTES ...

Page 117: ...Mark Mode 5 63 Comm Configuration When Not in ES ScanMark Mode 5 59 Config Sheet Scan 5 62 Connecting the Power Supply 2 23 Connecting the Scanner 2 23 Connecting the Scanner to the Computer 2 23 D Default Config Set 5 60 Defaults Menu 5 55 Defaults Submenu 5 55 Diagnostics Menu 5 66 Diagnostics Submenu 5 66 Display Brightness 5 63 E Entering the Background Menu 5 52 Environmental Information 1 7 ...

Page 118: ...g for Recalibration A 102 Print Offset 5 65 Printer Features 6 72 Procedure 7 86 Procedure Overview A 102 R Reasons to Recalibrate A 101 S Scanner Components 1 2 Scanner Information 5 54 Scanner Model 5 54 Scanning Procedure 3 31 Schedule 7 85 Selecting a Good Location 2 9 SelfScore option storing information 3 34 Setting Up the Scanning Software for Printing 6 81 Sheet Count 5 54 Show Comm Status...

Page 119: ...2 Troubleshooting 6 83 Troubleshooting Chart 8 94 Turning the Printer s On Or Off 6 78 Turning the Scanner On 2 25 U Understanding Display Panel Messages 3 34 Uninstalling the Drivers and Scanner Utilities Software 2 26 User Precautions 1 6 Utilities 5 57 Utilities Submenu 5 57 V Verifying Proper Setup 3 27 W Waste Electrical and Electronic Equipment WEEE 1 8 ...

Page 120: ... 2019 Scantron Corporation All rights reserved 277 287 074 ...

Reviews: