E-500RA
- User Manual
• 5
EN
FR
IT
TOOL MAINTENANCE
During maintenance the tool must be disconnected from the source of compressed air.
1. DAILY MAINTENANCE
Daily, before starting work, apply several drops of lubricating oil (we recommend hydraulic
oil grade HLP ISO VG 32) into the air inlet of the tool, on condition there is no lubricating
device connected in the air distribution. If the tool is in continuous operation, it is necessary to
disconnect the air hose from the main air supply and lubricate the tool every 2 or 3 hours.
Check the tool for air leakage, if necessary replace damaged hoses and clasps.
If the pressure regulator is not equipped with a filter, blow through the air hose before its
connection to the tool in order to get rid of impurities and water. If the pressure regulator has a
filter, dry it out.
Check whether the fixed nose-piece corresponds to the BR diameter and that all screw threads
and joints are tightened properly.
Check whether the air outlets are really empty. If it is not so, it is necessary to remove the
damaged part, clean the hole or replace the damaged part with a new one, see paragraph 2
weekly maintenance.
2. WEEKLY MAINTENANCE
Cleaning of the tool and replacement of worn or non-functional parts.
Disassembly:
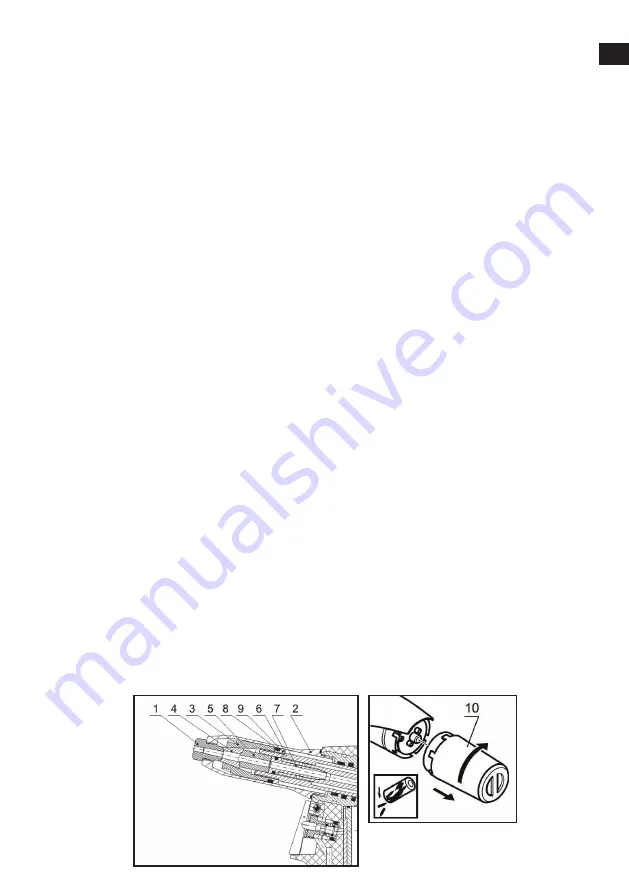
Disconnect the tool from the source of compressed air, unscrew the adjustable front nozzle /fig.2
- pos.2/ by means of a spanner no. 23, set the spanner no.15 onto the clamping sleeve /fig.2 -
pos.3/, set the spanner no. 17 on the backnut /fig.2 - pos.9/ and loosen. Unscrew the clamping
sleeve, replace the jaws /fig.2 - pos.4/ and jaw pusher /fig.2 - pos.5/. Then screw the clamping
sleeve back on and shift out the suction pipe /fig.2 - pos.7/ by means of short connection of the
tool to compressed air. The suction pipe can be removed after disconnection of compressed air
and unscrewing the clamping sleeve. Ali used threads are righthanded. Clean the dismounted
parts thoroughly and check them visually, especially the following:
1. Jaws
/fig.2 - pos.4/ - if worn or damaged, replace it, if dirty, clean it with a wire brush.
2. Nose-piece, jaw pusher
/fig.2 - pos.1,5/ - for wear of functional surfaces of the taper.
3. Completed tube
/fig.2 - pos.7/ - blow air through, if not clear (congested with shanks of BR), replace it.
4. «O» ring
/ fig.2 - pos.6/ - if damaged, replace it with a new one.
5. Adjustable front nozzle
/ fig.2 - pos.2/ - check for damage of the internai surface (Ø20).
6. Scraper ring
/fig.2 - pos.8/ - if damaged or worn, replace it with a new one.
7. Mandrel container
/fig.2 - pos.10/ - if the mandrel container or its bottom are worn or damaged, replace
them with new ones, otherwise there is danger of the torn-off shank popping out.
FIG.2


