background image

page 4 


version 1.8  


Measuring procedure 


1.  Open the drawer of the humimeter BMA 

and  take  out  the  measuring  box.  For 
that, lift the box and then pull it out.  

2. 

Completely  fill  up  the  measuring  box  with 
the  material  to  measure

.  For  that  you 

must use the delivered bucket. 

3.  Wipe off the material at the upper edge 

of the box evenly. 

4.  Put  the  filled  measuring  box  into  the 

drawer correctly and close it. 

5.  Select  the  right  product  (calibration 

curve) using the arrow keys.  

6. 

Press  the  Start  push  button.  The 
measurement  will  start  automatically. 
During  the  measurement,  the  LED  is 
blinking  in  blue  and  the  display  shows  the 
symbols for an ongoing measurement (see 
picture)

.


7. 

After 

the 

measuring 

procedure 

is 

completed,  the

  LED  is  shining  in  blue 

constantly and the measuring values are 
shown on the display. 

8. 

If  desired  the  measuring  values  can  be 
saved  now.  For  that,  please  follow  the 
instructions on the next page

.


9.  Open  the  drawer  and  carefully  remove 

the measuring box. 

10. Empty the measuring box completely. 

Summary of Contents for humimeter BMA

Page 1: ...User manual Moisture meter for determining water content of biomass humimeter BMA version 1 8 Schaller GmbH 2014...

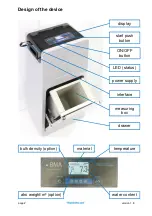
Page 2: ...2 version 1 8 Design of the device display start push button ON OFF button LED status power supply interface measuring box drawer temperature bulk density option water content atro weight m option mat...

Page 3: ...ply unit at the humimeter BMA and tighten it 4 Plug in the power supply unit into a Schuko socket 230VAC 5 After plugging in the humimeter BMA switches on automatically If not switch on the instrument...

Page 4: ...Select the right product calibration curve using the arrow keys 6 Press the Start push button The measurement will start automatically During the measurement the LED is blinking in blue and the displa...

Page 5: ...by performing several measurements 3 with the same sample and calculating the average of them If the individual measuring values are stored on the BMA the device calculates the average automatically...

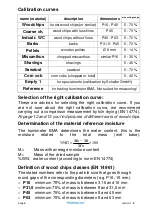
Page 6: ...ht calibration curve If you are not sure about the right calibration curve we recommend carrying out a comparison measurement by kiln drying EN 14774 At page 12 and 13 you find pictures of different s...

Page 7: ...l logs Clear logs Send logs Manual logs Clear logs Options Status Options Date Time Datalog Time Language Unlock C F o Userlevel BL On time Auto Off Time Calibrate Materialcalib Adjust Password Reset...

Page 8: ...transfer on the humimeter Press the key until you reach the menu see image on the right Then choose Send Logs and confirm by pressing the key Now choose Manual Logs and confirm with again All saved lo...

Page 9: ...he selected logs are printed out now To save paper please think of clearing the data storage regularly If the printing has been started successfully the printer begins to print out the logs immediatel...

Page 10: ...ber and confirm by pressing Online print 2 times Options o Online Print For choosing that menu item you have to unlock your BMA first If you have activated that function your BMA will print the curren...

Page 11: ...version 1 8 page 11 Definition of important units for wood chips accounting...

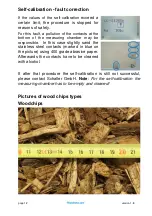
Page 12: ...measuring chamber may be responsible In this case slightly sand the stainless steel contacts marked in blue on the picture using 400 grade abrasive paper Afterwards the contacts have to be cleaned wit...

Page 13: ...version 1 8 page 13 Coarse ch Industr WC...

Page 14: ...within a short time Considering a sampling error due to the considerably smaller sample quantity as well as the content of volatile matters resin etc that are not water the kiln drying method will pra...

Page 15: ...tic Power supply 100 240 VAC 1 A 50 60 Hz Plug Schuko plug as per CEE 7 7 Display 128x64 matrix display lighted Dimensions BxTxH 432 x 282 x 862 mm Weight approx 26 kg with measuring box Degree of pro...

Page 16: ...letely there must not be less neither more material in it Wrong filling procedure Place the measuring box on the floor and pour the material into it Use delivered bucket for that action at every time...

Reviews: