background image

humimeter PM5 Operating Manual

Page 18

6. 

Saving your readings

6.1 

Hold function - Freezing the displayed values

The device can be configured in such a way that the information being shown on the 
display will freeze at the touch of a button until a new button is pressed. This function 
can be very useful when e.g. taking readings in spaces where it is not possible to see 
the display (e.g. overhead).

6.1.1  Activating the hold function in the options menu

To do so:

 The device has to be switched on and be in the product selection menu.

1.  Press 

 twice or hold for 2 seconds.

2.  Select 

Options

. To do so, press 

 or 

 and con-

firm by pressing 

.

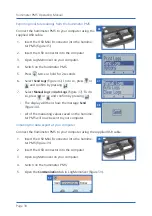
3.  Select 

Log Time

 (figur

10

). To do so, press 

 or 

 and confirm by pressing 

.

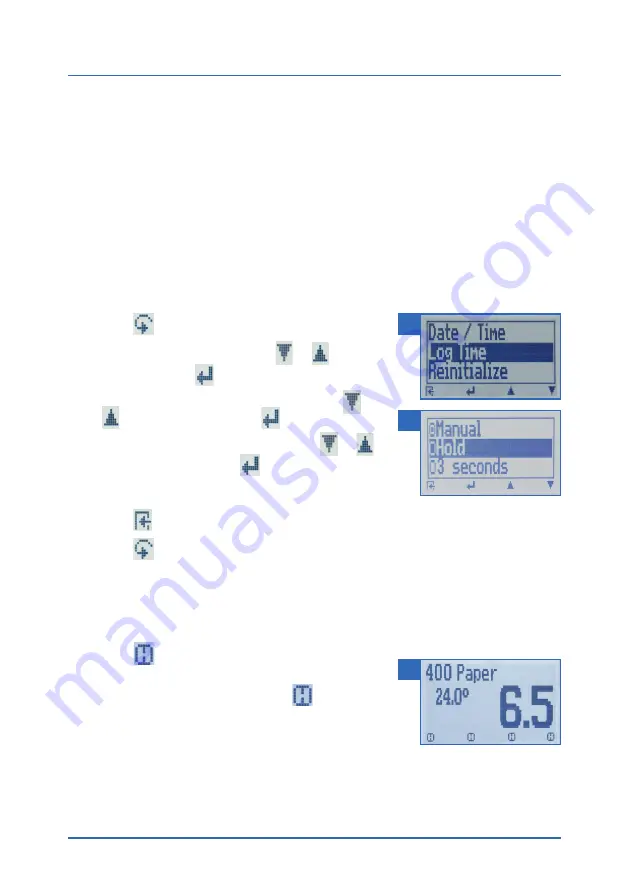
4.  Select 

Hold

 (figur

11

). To do so, press 

 or 


and confirm by pressing 

.


»

The setting has been saved.

5.  Press 

 to leave the 

Options

 menu.

6.  Press 

 to leave the main menu.

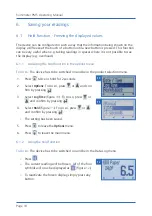
6.1.2  Using the hold function

To do so:

 The device has to be switched on and be in the Data Log menu.

•  Press 

.


»

The current reading will be frozen. All of the four 
symbols will now be displayed as 

 (figur

12

).

•  To reactivate the frozen display, simply press any 

button. 

 10 

 11 

 12 

Summary of Contents for humimeter PM5

Page 1: ...64 aw 51 9 r H 14 8 abs 100 4 g m2 Operating Manual Always read this operating manual before using the humimeter PM5 humimeter PM5 Paper moisture meter for measuring the absolute moisture content of p...

Page 2: ...imeter PM5 Operating Manual Page 2 Your humimeter PM5 at a glance The main unit No Name 1 Button 2 Handle 3 Display 4 USB port for charging the battery 5 Reset button 6 LED battery indicator 2 3 4 1 5...

Page 3: ...n unit No Name 1 Infrared temperature sensor 2 Sensor bars The display No Name 1 Product type 2 Moisture content in see 7 2 How moisture content is defined for definition 3 Display symbols 4 Temperatu...

Page 4: ...easurements Left On off button display light Yes Save measured value Auto save Hold function The buttons The four buttons are designed for navigating the symbols shown on the display Each of the butto...

Page 5: ...Save measured value 4 Show the last recorded values Main menu The main menu comprises the following menu items Edit Logs Manual Logs Auto Logs Clear Logs Print Logs Last Log All Logs Clear Logs Send...

Page 6: ...n this manual 10 1 4 Customer service 10 2 For your safety 11 2 1 Proper use 11 2 2 Improper use 11 2 3 User qualifications 11 2 4 General safety information 12 2 5 Warranty 12 3 On receipt of your de...

Page 7: ...based 22 6 3 1 Activating the auto save function in the options menu 22 6 3 2 Auto save function Saving measured values 22 6 4 Viewing individual readings 24 6 5 Viewing individual readings from a ser...

Page 8: ...Resetting the device to its factory settings 38 11 Cleaning and maintenance 38 11 1 Charging the integrated battery 38 11 2 Resetting the hardware device 39 11 3 Replacing the sensor bars 40 11 4 Che...

Page 9: ...ructions provided in this operating manual have been compiled on the basis of the current standards and regulations the state of the art and the extensive expertise and experience of Schaller GmbH Sch...

Page 10: ...This symbol indicates important information that enables users to use the de vice more efficiently and cost effectively CAUTION It is essential to observe this warning Non compliance can lead to inju...

Page 11: ...otating rolls The device must only be used for taking measurements on the products defined in the following sections of this manual see 7 Product types 2 2 Improper use The device must not be used in...

Page 12: ...ual Damage resulting from third party interventions Products that have been used improperly or modified without authorisation Products with missing or damaged warranty seals Damage resulting from forc...

Page 13: ...nds 4 2 Automatic calibration The display will then show the message Adjust figure 1 1 Lift the device up into the air with both hands holding onto both handles When doing so there must be a minimum o...

Page 14: ...ype overview figure 4 2 Use the arrow keys to move from one product type to the next 3 and keep any of them pressed to scroll through the types 4 Confirm your selection by pressing The product type yo...

Page 15: ...the paper or card board figure 6 Make sure that the sensor bars are in a straight line Measurements taken at the front of a roll are not reliable figure 7 Taking a measurement on a rotating roll Pres...

Page 16: ...bars after taking a measurement on a rotating roll CAUTION Electrostatic discharge On fast running machines there is the risk of an electrostatic discharge via the device Do not measure statically ch...

Page 17: ...ll now instantly display the moisture content and material temperature on the display 3 To obtain a reliable average moisture content reading move the device over the stack and take readings at differ...

Page 18: ...he device has to be switched on and be in the product selection menu 1 Press twice or hold for 2 seconds 2 Select Options To do so press or and con firm by pressing 3 Select Log Time figure 10 To do s...

Page 19: ...oisture content average 6 2 1 Saving individual readings The device can be configured in such a way that the device will save a reading every time a button is pressed This option manual save active is...

Page 20: ...The display will now appear as shown in figure 15 3 The data you have inputted can be overwritten at any time only if data has already been entered 4 Inputting letters Press and hold to quickly scroll...

Page 21: ...suring process The display will now appear as shown in figure 18 4 The data you have inputted can be overwritten at any time only if data has already been entered 5 Inputting letters Press and hold to...

Page 22: ...e figure 21 To do so press or and confirm by pressing 4 Select 3 seconds figure 22 To do so press or and confirm by pressing The setting has been saved 5 Press to leave the Options menu 6 Press to lea...

Page 23: ...r 5 Inputting numbers Press and hold to quickly scroll to the required number and either press it for 3 seconds or press to confirm the selected number 6 Moving forward back Press to switch to another...

Page 24: ...from a series of measurements To do so You must have saved a series of measurements e g 3 logs The display will now appear as shown in figure 27 1 Press 2 Navigate to the required measurement series...

Page 25: ...igure 33 4 Confirm by pressing The data log has been deleted 5 Press to leave the Edit Logs menu 6 Press to leave the main menu 6 7 Deleting individual measurement series To do so You must have saved...

Page 26: ...Select the required reading To do so press or The display will now appear as shown in figure 39 3 Press to switch to another input level The display will now appear as shown in figure 40 4 Press 5 The...

Page 27: ...ner brown 900 kg m 950 paper Test liner white copying paper 950 kg m 1000 paper Copying paper LWC uncoated 1 000 kg m 1050 paper Satin finish copying paper 1 050 kg m 1100 paper Satin finish copying p...

Page 28: ...sture content analysis in accordance with EN ISO 287 3 Compare the readings recorded for the different product types with those of the actual moisture content established using the reference measureme...

Page 29: ...Before using LogMemorizer please refer to the the separate LogMemorizer opation manual for the correct configuration of the USB COM Port For more information on LogMemorizer please refer to the separ...

Page 30: ...and confirm by pressing 7 Select Manual Logs or Auto Logs figure 47 To do so press or and confirm by pressing The display will then show the message Send figure 48 All of the measuring values saved o...

Page 31: ...ent manually saved logs Import all auto save logs for importing all auto save readings Import most recent auto save log for importing the most recent auto save logs No Name 1 Import all auto save logs...

Page 32: ...will show the following information figure 52 No Name 1 Serial number 2 Software version 3 Battery status 4 Memory status 3 Confirm by pressing 4 Press to leave the main menu 10 Configuring the device...

Page 33: ...en DD MM YY and hh mm ss press 6 Moving back Press to switch to another input level To move backward between DD MM YY and hh mm ss press 7 Confirm the date time by pressing The settings have been save...

Page 34: ...the four digit password is the device s serial number 4 Inputting numbers Press and hold to quickly scroll to the required number and either press it for 3 seconds or press to confirm the selected num...

Page 35: ...f the options must be activated see 10 4 Activating options 1 Press twice or hold for 2 seconds 2 Select Options To do so press or and confirm by pressing 3 Select C F To do so press or and confirm by...

Page 36: ...as been saved 5 Press to leave the Options menu 6 Press to leave the main menu 10 7 2 Configuring automatic switch off To do so All of the options must be activated see 10 4 Activating options 1 Press...

Page 37: ...onfirm by pressing The display will show the current password 4 Overwrite the current password To do so press and hold to quickly scroll to the required number and either press it for 3 seconds or pre...

Page 38: ...ter figure 58 Resetting the device will not affect the saved mea suring values 11 Cleaning and maintenance Regularly cleaning and maintaining the device will ensure that it will have a long service li...

Page 39: ...and 45 C when charging the battery as other temperatures can destroy the battery Make sure the mains and USB cable are properly connected As the device s user you are responsible by law for properly...

Page 40: ...rs figure 64 5 Fit the three new metal bars When at taching the new bars make sure they are straight Fasten the bars by tightening the screws Torx T20 screwdriver Make sure that the screws M4x8 are in...

Page 41: ...grey figure 68 the moisture meter has to be calibrated see 11 5 Cali brating the moisture meter 11 5 Calibrating the moisture meter 11 5 1 Automatic calibration See 4 2 Automatic calibration 11 5 2 S...

Page 42: ...ve the device out in the rain The device is not waterproof Do not expose the device to extreme temperatures Protect the device from strong mechanical shocks and loads 11 7 Cleaning the device ATTENTIO...

Page 43: ...1 Selecting the product type Material stack is not high enough The stack of paper or cardboard being mea sured has to be at least 50 mm high Reading taken in the wrong place e g at the front of a roll...

Page 44: ...placing the sensor bars Data transfer to Log Memorizer failed Interface has not been config ured The interface only has to be configured once To do so press the F1 key on your computer and read the H...

Page 45: ...s marked with this symbol are subject to Directive 2012 19 EU of the European Parliament and of the Council of 4 July 2012 on waste electrical and electronic equipment WEEE If the device is being oper...

Page 46: ...humimeter PM5 Operating Manual Page 46 14 Device information 14 1 EC declaration of conformity...

Page 47: ...th 50 mm Minimum material thickness 50 mm Paper density range 300 kg m to 1600 kg m Power supply LI Ion 1 800 mAh battery 60 to 100 operating hours Battery charging time Up to 6 h Current consumption...

Page 48: ...Raab Austria Tel 43 0 3178 28899 Fax 43 0 3178 28899 901 info humimeter com www humimeter com Climate Environment Materials Food Buildings Bioenergy Paper Board Schaller Messtechnik develops produces...

Reviews: