background image

Page 23


»

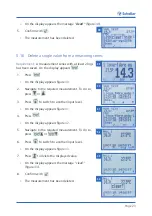
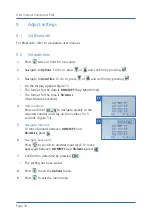
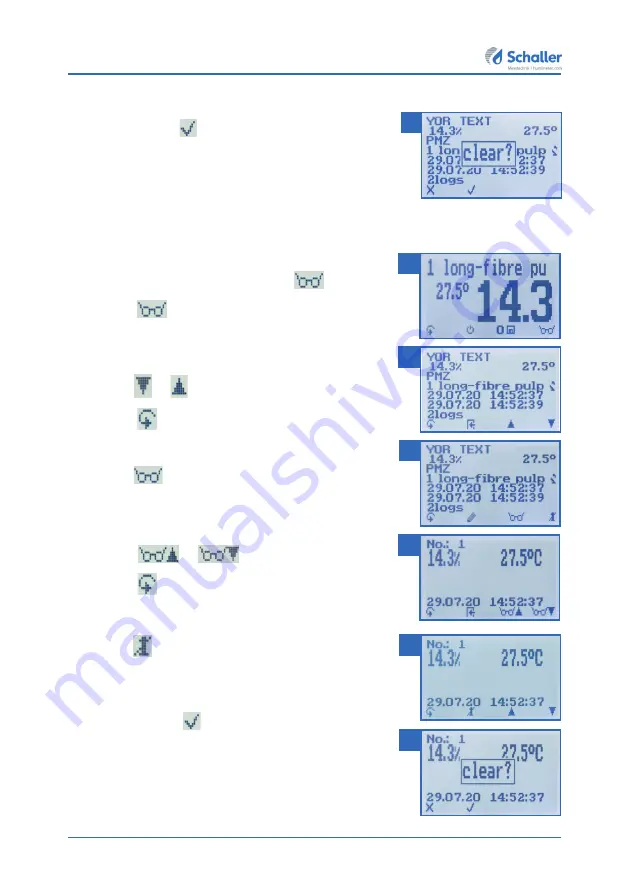
On the display appears the message "

clear?"

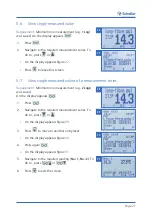
 (figure 

38

).

5.  Confirm with 

.


»

The measurement has been deleted.

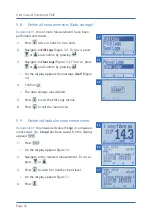
5.10  Delete a single value from a measuring series

Requirement:

  A measurement series with at least 2 logs 

has been saved. On the display appears 

1.  Press  

.


»

On the display appears figure 

40

.


2.  Navigate to the required measurement. To do so, 

press 

 or 

.

3.  Press  

 to switch to another input level.


»

On the display appears figure 

41

.

4.  Press 

.


»

On the display appears figure 

42

.

5.  Navigate to the required measurement. To do so, 

press  

 or 

.

6.  Press  

 to switch to another input level..


»

On the display appears figure 

43

.

7.  Press 

 to delete the displayed value.


»

On the display appears the message "clear?" 
(figure 

44

).

8.  Confirm with  

.


»

The measurement has been deleted.

 38 

 39 

 40 

 41 

 42 

 43 

 44 

Summary of Contents for humimeter PMZ

Page 1: ...64 aw 51 9 r H 14 8 abs 100 4 g m2 09 m s 4 90 Ugl 1 User manual Before starting any work read this manual humimeter PMZ Pulp moisture meter For absolute water content determination of pulp sheets on a pile Moisture meter Version 1 3 ...

Page 2: ...our humimeter PMZ The main unit No Name 1 Measuring electrodes blank area 2 Measuring electrodes insulated area 3 Infrared temperature sensor 4 USB interface available optionally 5 Display 6 Keypad 7 Rubber protection cover 8 Handlebar 2 4 5 1 6 8 3 7 ...

Page 3: ...Page 3 Rear of the main unit No Name 1 Battery compartment Display N0 Name 1 Characteristic curve 2 Water content in 6 2 Definition of moistu re content 3 Display symbols 4 Temperature display 1 2 4 3 1 ...

Page 4: ...bers Enter data Enter letters View measurements Continue right Delete measurements Left On off button display light Yes Save measured value Menus The device has three different menus product selection Data Log and main menu Product selection menu No Name 1 Change menu 2 Display illumination device on off 3 Changing the product type 2 1 3 ...

Page 5: ...ed values Main menu The main menu comprises the following menu items Data storage Manual Logs Clear Logs Print Logs Last Log All Logs Clear Logs Send Logs Manual Logs Clear Logs Options Bluetooth Date Time Log Time Language Unlock C F Userlevel BL On Time Auto Off Time Materialcalib Online Send Password Reset Status 2 1 3 4 ...

Page 6: ...ls used in this manual 10 1 4 Customer service 10 2 For your safety 11 2 1 Proper use 11 2 2 Improper use 11 2 3 User qualifications 11 2 4 General safety information 12 2 5 Warranty 12 3 First steps 12 3 1 Unpacking the device 12 3 2 Checking the delivery content 12 3 3 Inserting the batteries 13 4 Using the device Basics 14 4 1 Turn on the device 14 4 2 Selecting the product type 14 4 3 Perform ...

Page 7: ...es at the same time 19 5 6 View single measured value 21 5 7 View single measured values of a measurement series 21 5 8 Delete all measurements Data storage 22 5 9 Delete individual measurement series 22 5 10 Delete a single value from a measuring series 23 6 Product types 24 6 1 Selecting the product type 24 6 2 Definition of moisture content 25 7 Using the LogMemorizer program 26 7 1 Installing ...

Page 8: ...10 Resetting the device to factory settings 35 10 Cleaning and maintenance 35 10 1 Replacing batteries 35 10 2 Calibration check 36 10 2 1 Calibration check of the lancet probe 36 10 3 Care instructions 37 10 4 Cleaning the device 37 11 Faults 38 12 Storage and disposal 39 12 1 Storing the device 39 12 2 Disposal of the device 39 13 Device information 40 13 1 EC declaration of conformity 40 13 2 T...

Page 9: ...e been com piled on the basis of the current standards and regulations the state of the art and the extensive expertise and experience of Schaller Messtechnik GmbH Schaller Messtechnik GmbH does not accept any liability for damages associated with the following which also voids the warranty Non observance of this user manual Improper use Inadequately qualified users Unauthorised modifications Tech...

Page 10: ...that enables users to use the de vice more efficiently and cost effectively WARNING In case of non observance light or medium injuries can occur 1 4 Customer service For technical advice please contact our customer service department at Schaller Messtechnik GmbH Max Schaller Straße 99 A 8181 St Ruprecht an der Raab Telefon 43 0 3178 28899 Fax 43 0 3178 28899 901 E Mail info humimeter com Internet ...

Page 11: ...ts which are defined in the following instructions may be measured see 6 Product types 2 2 Improper use The device should not be used in ATEX areas Do not perform a measuring on a running machine It is not possible to measure pressed pulp blocks made of flocks Single sheet measurements are not possible The device is not waterproof protect it from water and fine dust 2 3 User qualifications The dev...

Page 12: ...ber 2 5 Warranty Not covered by warranty Damages caused by non observance of the user manual Damages caused by third party intervention Products that have been used improperly or modified without authorization Products with missing or damaged warranty seals Damages caused by majeure natural disasters etc Damages due to improper cleaning Damage due to leaking batteries 3 First steps 3 1 Unpacking t...

Page 13: ...side of the housing If you have an optional USB inter face pull out the protective cover of the USB socket first figure 1 and 2 2 Take the device in one hand and press with your thumb on the marked area of the battery compartment Now slide the battery cover downwards from the device 2 figure 3 3 Insert the batteries with negative and positive terminals matching those indicated on the battery compa...

Page 14: ...roduct types 1 Press the or button to move from one prod uct to the next Or 2 Press the or button for 3 seconds to open the product type overview figure 8 3 Use the arrow keys to move from one product type to the next 4 and keep any of them pressed to scroll through the types 5 Confirm your selection by pressing The selected product type is shown on the top of the display 4 3 Perform a measurement...

Page 15: ...evice has approximately the same temperature as the measured material The inser tion position is designed to ensure that the contact pressure on the electrodes lies around 250kg m 2 45kN m 1 Take the measuring unit by the handle with one hand and gently lift the pulp pile Insert the measuring electrodes into the crack of the pile see figure 9 and 10 2 The electrodes have to be inserted as far as p...

Page 16: ...curacy This rapid and non destructive measuring procedure allows you to quickly take moisture readings at a number of different points When saving the individual readings the device will automatically calculate the readings average see 5 5 Saving several readings measurement series at the same time i Information Incorrect readings Make sure to select the correct product type for the material you a...

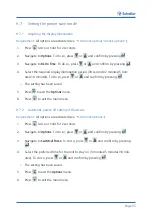
Page 17: ...e in the product selection menu 1 Press twice or hold for 2 seconds 2 Select Options To do so press or and con firm by pressing 3 Select Log Time figure 14 To do so press or and confirm by pressing 4 Navigate to Hold figure 15 To do so press or and confirm by pressing Setting has been saved 5 Press to leave the Options menu 6 Press to leave the main menu 5 3 2 Using the hold function Requirement T...

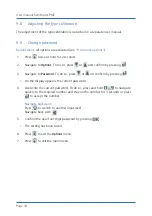
Page 18: ...igure 17 To do so press or and confirm by pressing 4 Navigate to Manual figure 18 To do so press or and confirm by pressing 5 Setting has been saved 6 Press to leave the Options menu 7 Press to leave the main menu 5 4 2 Using the manual save function Requirement The device has to be in the Data Log menu see Product selection menu on page 4 The device is set to DataLog Time Manual 1 Press On the di...

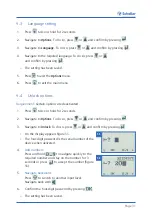
Page 19: ... device has to be in the Data Log menu 1 Take several readings from one stack or a roll see 5 Measurement 2 Press for each measurement On the display appears figure 23 This number shows the number of already saved readings 3 Press to enter a name for the saved series of measurements and to finish the measuring process On the display appears figure 24 If a previous entry has already been made the d...

Page 20: ...een saved The device automatically determines the average moisture content of the saved measuring values On the dispay appears the following information No Name 1 Name of the measurement series 2 Temperature average 3 Date start time of the measurement series 4 Date end time of the measurement series 5 Number of saved readings 6 Product type 7 Device name 8 Water content average 1 5 4 3 2 6 7 8 ...

Page 21: ... single measured values of a measurement series Requirement Minimum one measurement e g 2 Logs was saved On the display appears 1 Press 2 Navigate to the required measurement series To do so press or On the display appears figure 29 3 Press to move to another entry level On the display appears figure 30 4 Press again On the display appears figure 31 5 Navigate to the required reading No 1 No 2 To ...

Page 22: ...m by pressing On the display appears the message clear figure 34 4 Confirm The data storage was deleted 5 Press to exit the Edit Logs menue 6 Press to exit the main menu 5 9 Delete individual measurement series Requirement One measured value 1 Log or a measure ment series f e 3 Logs has been saved On the display appears 1 Press On the display appears figure 36 2 Navigate to the required measuremen...

Page 23: ...pears figure 40 2 Navigate to the required measurement To do so press or 3 Press to switch to another input level On the display appears figure 41 4 Press On the display appears figure 42 5 Navigate to the required measurement To do so press or 6 Press to switch to another input level On the display appears figure 43 7 Press to delete the displayed value On the display appears the message clear fi...

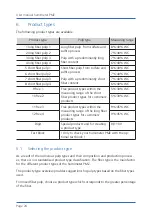
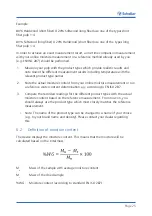
Page 24: ...of the short fiber product types for customers products 5 30 WC 10 free 2 5 30 WC 11 free 3 Free product types within the measuring range of the long fiber product types for customers products 9 45 WC 12 free 4 9 45 WC Digit Special products and for creating a product type 0 0 100 Test block Only to check your humimeter PMZ with the op tional test block 6 1 Selecting the product type As a result o...

Page 25: ...sture content from your online moisture measurement or run a reference water content determination e g according to EN ISO 287 3 Compare the recorded readings for the different product types with the actual moisture content based on the reference measurement From now on you should always use the product type which most closely matches the reference measurement Note The name of the product type can...

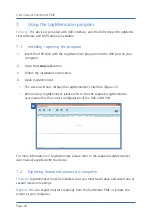
Page 26: ...n LogMemorizer The screen will now display the LogMemorizer s interface figure 45 Before using LogMemorizer please refer to the the separate LogMemorizer user manual for the correct configuration of the USB COM Port For more information on LogMemorizer please refer to the separate LogMemorizer user manual supplied with the device 7 2 Exporting measured values to a computer To do so LogMemorizer mu...

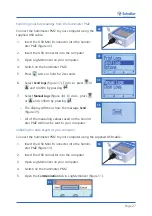
Page 27: ...firm by pressing 7 Select Manual Logs figure 48 To do so press or and confirm by pressing The display will then show the message Send figure 49 All of the measuring values saved on the humim eter PMZ will now be sent to your computer Initiating the data export at your computer Connect the humimeter PMZ to your computer using the supplied USB cable 1 Insert the USB Mini B connector into the humim e...

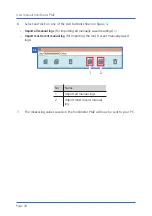
Page 28: ... Import all manual logs for importing all manually saved readings or Import most recent manual log for importing the most recent manually saved logs No Name 1 Import all manual logs 2 Import most recent manual log 7 The measuring values saved on the humimeter PMZ will now be sent to your PC 52 1 2 ...

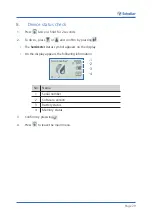
Page 29: ... so press or and confirm by pressing The humimeter status symbol appears on the display On the display appears the following information No Name 1 Serial number 2 Software version 3 Battery status 4 Memory status 3 Confirm by presssing 4 Press to leave the main menu 1 2 3 4 ...

Page 30: ... format for the date is DD MM YY Day Month Year The format for the time is hh mm ss Hour Minutes Seconds 4 Add numbers Press and hold to navigate quickly to the required number and stay on the number for 3 seconds figure 54 5 Navigate forward To move forward between DD MM YY and hh mm ss press 6 Navigate backward Press to switch to another input level To move backward between DD MM YY and hh mm ss...

Page 31: ...n options are deactivated 1 Press twice or hold for 2 seconds 2 Navigate to Options To do so press or and confirm by pressing 3 Navigate to Unlock To do so press or and confirm by pressing On the display appears figure 55 The four digit password is the serial number of the device when delivered 4 Add numbers Press and hold to navigate quickly to the required number and stay on the number for 3 sec...

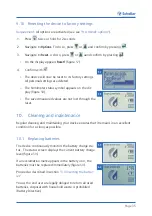
Page 32: ...aterialcalibration Password Reset are again deactivated 9 6 Selecting C F Requirement All options are activated see 9 4 Unlock options 1 Press twice or hold for 2 seconds 2 Navigate to Options To do so press or and confirm by pressing 3 Navigate to C F To do so press or and confirm by pressing 4 Navigate to the required temperature scale i e Celsius C or Fahrenheit F To do so press or and confirm ...

Page 33: ... so press or and confirm by pressing The setting has been saved 5 Press to exit the Options menu 6 Press to exit the main menu 9 7 2 Automatic power off setting of the device Requirement All options are activated see 9 4 Unlock options 1 Press twice or hold for 2 seconds 2 Navigate to Options To do so press or and confirm by pressing 3 Navigate to Switch off time To do so press or and confirm by p...

Page 34: ...confirm by pressing 3 Navigate to Password To do so press or nd confirm by pressing On the display appears the current password 4 Overwrite the current password To do so press and hold to navigate quickly to the required number and stay on the number for 3 seconds or press to accept the number Navigate backward Press to switch to another input level Navigate back with 5 Confirm the new four digit ...

Page 35: ...figure 58 The saved measured values are not lost through the reset 10 Cleaning and maintenance Regular cleaning and maintaining your device ensures that it remains in an excellent condition for as long as possible 10 1 Replacing batteries The device continuously monitors the battery charge sta tus The status screen displays the current battery charge level figure 59 If an exclamation mark appears ...

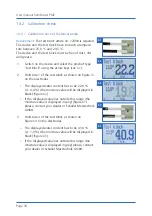
Page 36: ...ck as shown on figure 61 on the electrodes The displayed water content has to be 22 0 0 4 the moisture value will be displayed in black figure 62 If the displayed value lies outside this range the moisture value is displayed in grey figure 63 please contact your dealer or Schaller Messtechnik GmbH 3 Hold side 2 of the test block as shown on figure 64 on the electrodes The displayed water content h...

Page 37: ...loads 10 4 Cleaning the device ATTENTION Device damage caused by wet cleaning Water or cleaning products can damage the device if they get into the device Only clean with dry materials Housing Clean the plastic housing with a dry cloth Measuring electrodes Should the measuring electrodes be dirty they can be cleaned with alcohol Test block The test block can be cleaned with a moistened lint free c...

Page 38: ...that of the pulp a maxi mum difference of 3 C is permissible Wrong product type Before starting a measure ment check if the correct curve product is set see 6 1 Selecting the product type Material is not thick enough Ensure that the material has a minimum thickness of 30 cm on the top and bottom of the electrodes Incorrect contact pressure Increase or decrease the material weight on the electrodes...

Page 39: ...remove the batteries from the device if it is not used for more than two months Storage temperature 20 C to 60 C 12 2 Disposal of the device Devices marked with this symbol are regulated by the European Direc tive 2012 19 EU of the European Parliament and the Council of 4 July 2012 relating to waste of electrical and electronic equipment If the device is not used within the European Union national...

Page 40: ...nie 2014 30 EC EMC Directive 2014 30 EU RoHS Richtlinie 2011 65 EG RoHS Directive 2011 65 EU Die Übereinstimmung des bezeichneten Produktes mit den Bestimmungen der Richtlinien wird durch die vollständige Einhaltung folgender Normen nachgewiesen Full compliance with the standards listed below proves the conformity of the designated product with the provisions of the above mentioned EC Directives E...

Page 41: ...ruction in original version is available Bei Änderungen die nicht vom Hersteller spezifiziert sind verliert diese Konformitätserklärung die Gültigkeit In case of any changes not agreed upon with the manufacturer this declaration of conformity loses its validity St Ruprecht a d Raab 31 07 2022 Bernhard Maunz Rechtsverbindliche Unterschrift des Ausstellers Legal binding signature of the issuer ...

Page 42: ...bility Regulations 2016 Great Britain RoHS Directive 2011 65 EU Directive on the restriction of the use of certain hazardous substances in electrical and electronic equipment Full compliance with the standards listed below proves the conformity of the designated product with the provisions of the above mentioned Directives EN 61326 1 2013 Electrical equipment for measurement control and laboratory...

Page 43: ...on with manual of instruction in original version is available In case of any changes not agreed upon with the manufacturer this declaration of conformity loses its validity St Ruprecht a d Raab 31 07 2022 Bernhard Maunz Legal binding signature of the issuer ...

Page 44: ...m Minimum material thick ness 60 cm Fabrication process sulfate sulfite process Treatement bleached and unbleached Pulp density range 450 900 kg m Power supply 4 x 1 5 Volt AA Alkaline batteries Power consumption 60 mA with display illumination Menu languages German English French Italian Spanish Por tuguese Czech Polish Russian International Display 128 x 64 illuminated matrix display Device dime...

Page 45: ...Page 45 14 Notes ...

Page 46: ...User manual humimeter PMZ Page 46 ...

Page 47: ...Page 47 ...

Page 48: ...echt an der Raab Tel 43 0 3178 28899 Fax 43 0 3178 28899 901 info humimeter com www humimeter com Climate Environment Food Bioenergy Materials Buildings Paper Board Schaller Messtechnik develops produces and sells professional moisture meters and turnkey solutions ...

Reviews: