


If operating it in Switzerland, insert the concrete
mixer only in sockets that are protected by a
residual current-operated circuit breaker.
Mains connection and extension cable can have
3 wires as well as 2.
3-wire: P + N + SL. - (1/N/PE); 2-wire: P + N –
(1/N)
Extension cables must have a minimum cross-
section of 1.5 mm².
Connecting cable, plug and coupling jack must
be protected against water spray.
The mains connection is protected with a maxi-
mum 16A fuse.
Connections and repairs of the electrical
equipment should be performed by electri-
cians only.
Please quote the following information in
your queries:
•
Current type of the motor.
•
Data on the machine ratings plate.
When returning the motor, always send the
complete drive unit with switch.
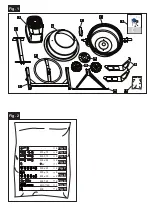
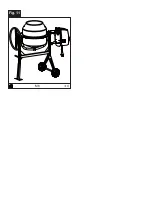
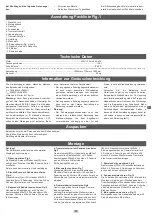
Equipment packing list Fig.1
1. Supporting stand, front
2. Motor casing
3. Frame
4. Swivel wheel
5. Drum upper section
6. Bearing bracket
7. Drum lower section
8. Instructions
9. Mixer
10. Bag provided (Fig. 2 Content)
11. Supporting stand, rear with wheel axle
12. 2 wheels
13. Locking washer
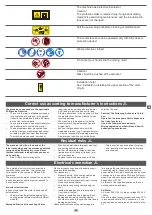
Technical data
Motor ..........................................................................................................................
230V / 50 Hz 0,55 kW
Capacity
.................................................................................................................................................125 l
Protection class .................................................................................................................................. IP 45D
(IP=International Protection; 4=Protection against contact with wire d=1mm+Protection against ingress of foreign bodies d>/= 1mm; 5=Protection against water jets from all directions; D=Protection against contact with wire d=1mm, 100mm
long)
Dimensions ................................................................................................... 1200mm x 710mm x 1400mm
Weight ...................................................................................................................................................
50 kg
Information on noise
The noise levels of the machine during operation
are as follows:
L
pA
: 73,2dB(A) K=3dB(A)
L
wA
: 93dB(A) K=3dB(A)
Vibration: 4.51m/s
2
K=1.5m/s
2
Warning:
Noise can seriously damage your
health. If the engine noise exceeds 85 dB (A),
please wear appropriate hearing protection. If
the electrical connection is faulty, the current may
drop when the machine starts. This may affect
other machines (e.g. flashing lights). If the elec
-
tric output corresponds to Zmax <0.27, such in
-
terference should not occur. (If it does, notify your
dealer).
• The vibration emission value given below has
been measured by a standardized test, and
can be used for comparing one power tool to
another;
• The vibration emission value given below
may also be used for a first assessment of
exposure.
Warning:
• The vibration emission value may vary during
actual use of the power tool from the specified
value, depending on the manner in which the
power tool is used;
• Try to keep exposure to vibration to a minimum.
Examples of ways to reduce vibration levels
are wearing gloves when using the tool and
limiting working hours. In doing so, all parts of
the operating cycle must be taken into account
(for example, times in which the power tool is
turned off, or when it is turned on without load).
Unpacking
Take the concrete mixer out of the carton with
the help of two persons.
Check to ensure that the delivery is complete.
Inform the dealer if there are faults.
Montage
Caution!
The concrete mixer should be used only after it
is installed fully.
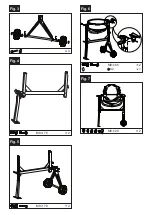
1. Installing wheels Fig.3
Install splint on both sides, washer, wheel
(12)
,
washer, splint on the supporting stand rear with
wheel axle
(11).
Bend the splints slightly after installation
2. Installing the front supporting stand with
frame Fig.4
Install front supporting stand
(1)
with 2 M8x70
screws, 2 8mm washers, 2 lockwashers, 2 M8
nuts on the frame
(3)
and tighten the screws.
3. Installing the frame with the wheel sup-
ports Fig. 5
Install frame and wheel supports fully with 2
M8x70 hexagon bolts, 2 8mm washers, 2 lock
-
washers and 2 M8 nuts. Tighten the screws.
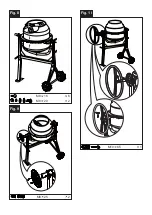
4. Installing the lower section of drum with
frame Fig.6
Set the lower section of the drum
(7)
with bea-
ring bracket
(6)
on the pre-installed framework,
tighten with 2 M8x65 hexagon bolts, 2 washers,
2 lockwashers and 2 M8 nuts.
Secure with a Ø42 spiral ring.
5. Installing mixer Fig.7
Lock mixer
(9)
with 2 M8x20 cross-head screws
to the lower section of the drum with 2 washers,
2 lockwashers and 2 M8 nuts. Insert one rubber
washer each between mixer and drum.
6. Installing upper section of drum Fig.8
Place rubber ring on the lower section. Place the
upper section of drum on it.
Caution! The pasted arrows mark the exact di
-
rection of the upper or lower section of the drum.
Align the upper section of the drum and install
it on the lower section with 6 M8x16 cross-head
screws and tighten. Lock mixer
(9)
with 2 M8x20
cross-head screws and 2 lockwashers to the
lower section of the drum with 2 washers, 2
lockwashers and 2 M8 nuts. Insert one rubber
washer each between mixer and drum.
7. Installing lockwasher Fig.9
Install lockwasher
(13)
with 2 M8x25 hexagon
bolts, 2 washers, 2 lockwashers on the swivel
axis and tighten.
8. Installing swivel wheel. Fig.10
The spring of the swivel wheel is locked to facili
-
tate installation with the help of a U-sheet. Slide
swivel wheel
(4)
onto the swivel axis and secure
with M10x65 hexagon bolt, washer, washer and
self-locking M10 nuts. Remove U-sheet.
9. Installing motor casing. Fig.11
Place the motor casing on the retaining plate,
secure with 4 M8 safety nuts.
16
D
GB
Summary of Contents for 5908403937
Page 4: ...4 Fig 3 Fig 4 2 M8 70 Fig 5 2 M8 70 Fig 6 Fig 7 2 M8 65 1 42 2 M8 20 ...
Page 5: ...Fig 8 Fig 9 Fig 10 F 2 M8 20 6 M8 16 2 M8 25 1 M10 65 ...
Page 6: ...Fig 11 4 M8 ...
Page 8: ...WIRING DIAGRAM Fig 13 ...
Page 31: ......
Page 33: ......
Page 34: ......