20
GB
www.scheppach.com
service@scheppach.com
+(49)-08223-4002-99
+(49)-08223-4002-58
Warning!
The specified vibration value was established in accord-
ance with a standardized testing method. It may change
according to how the electric equipment is used and may
exceed the specified value in exceptional circumstances.
The specified vibration value can be used to compare the
equipment with other electric power tools.
The specified vibration value can be used for initial
assessment of a harmful effect.
Reduce noise generation and vibration to a minimum!
• Use only equipment that is in perfect condition.
• Maintain and clean the equipment regularly.
• Adopt your way of working to the equipment.
• Do not overload the equipment.
• Have the equipment checked if necessary.
• Switch off the equipment when not in use.
• Wear gloves.
In these operating instructions we have marked the
places that have to do with your safety with this sign:
m
7. Attachment and operation
ATTENTION!
Before working on the device - cleaning,
inspection, maintenance or other work - always turn off
the device and separate it from the power supply.
ASSEMBLY
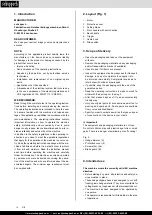
Mounting the protective cover Fig. 3
•
Attach the hand guard (2) with 2 screws to the de-
vice prior to startup.
m
Warning!
Use only original manufacturer‘s replace-
ment parts, accessories and attachments. Failure to
do so can cause poor performance, possible injury and
may void your warranty. Never use the machine with-
out the guard assembled!
Commissioning:
The tool can be plugged into any socket-outlet (with 230
V AC) that is equipped with a 10A fuse or higher. The
socket-outlet has to be safeguarded by an earthleakage
circuit breaker (e.l.c.b.). The operating current must not
exceed 30 mA.
AC motor
•
The mains voltage must be 230 V~
•
Extension cables up to 25 m long must have a
cross-section of 1.5 mm
2
.
•
Mounting of the extension cable (Fig. 4)
• Plug the female connector of the extension cable on
the male connector of the device.
• Thread the extension cable through the cable hook (7)
as a loop and hang it up.
• Make sure that the extension cable has enough free
motion.
Do not use an electric tool with a defective switch.
An electric tool that cannot be switched on or off is
dangerous and must be repaired.
Starting and stopping the hedge trimmer, Fig. 5
•
Starting the device: Push the trigger (6) on the back
handle (5) and operate at the same time with the
other hand the switch button on the front handle (4).
•
Stopping the device: Let go one of the trigger (6 or
4).
Back handle twist around 90° Fig. 7
m
Please remove the electricity plug from the network.
For twist the back handle please look for a safety stand-
ing or lay the device on a plane surface.
Push the button (Pos. 8) until the end of the button to the
direction of the back handle. Afterwards you can twist the
back handle around 90°. (Please notice, if you actuate
the trigger (Pos. 6) it’s not possible to actuate the button
(Pos. 8)
If you twist the back handle until the end it will lock
If you want the original position back please go ahead
like written above
8. Working instructions
m
WARNING!
The hedge trimmer must not be used or switched
on until it has been fully assembled.
For your own safety, please thoroughly read this
manual and the general safety instructions before
turning the device on. If you give the device to third
parties, always include these instructions.
NOTICES AND TIPS FOR HEDGE TRIMMER, Fig. 6
• The extension cable must be kept behind the hedge
trimmer when cutting so that it cannot be caught by
the knives.
• Find safe footing, operate the device with both hands
and turn it on.
• Cut the hedge from both sides and start at the bottom.
In this way, you can prevent cutting-waste falling into
the area that still needs to be cut.
• Guide the device gently through the area of the hedge.
• Do not attempt to cut too deeply.
• Then cut the upper part of the hedge.
• For older hedges which need more pruning, cut strong-
er branches and twigs with loppers first before cutting
the hedge with the device.
• Remove unconditionally any foreign objects out of the
hedge (e.g. wires) as these can damage the knives of
the hedge trimmer.
• Caution! The cutting tool stops delayed after the ma-
chine is switched off. Do not try to slow down the cut-
ting tool by the hand.

