background image

25 | GB

 www.scheppach.com   

 service@scheppach.com   

 +(49)-08223-4002-99   

 +(49)-08223-4002-58

 www.scheppach.com   

 service@scheppach.com   

 +(49)-08223-4002-99   

 +(49)-08223-4002-58

5. 

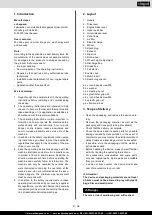
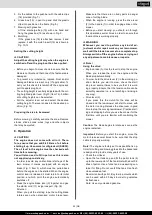
Fix the cables to the push bar with the cable clips 

(18) provided (Fig. 7).

6. 

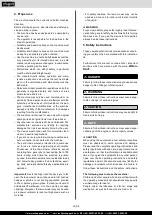
Grass box (16) - open it up and click the plastic 

clips into position on the frame (Fig. 8).

7. 

Mowing with grass box:

Lift  the  discharge  flap  (15)  with  one  hand  and 

hang the grass box (16) as shown in Fig. 9.

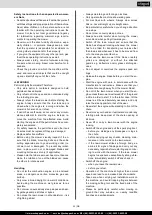
8.  Mulching:

If  the  grass  box  (16)  is  attached,  remove  it  and 

replace it with the mulch insert (19) as shown in 

Fig. 10-12.

Setting the cutting height

m

 CAUTION!

Adjust the cutting height only when the engine is 

switched off and the plug boot has been pulled.

• 

Before you begin to mow, check to ensure that the 

blade is not blunt and that none of the fasteners are 

damaged.

• 

To  prevent  any  imbalance,  replace  blunt  and/or 

damaged  blades  as  a  set  only  (if  applicable).  To 

carry out this check, first switch off the engine and 

pull the spark plug boot.

• 

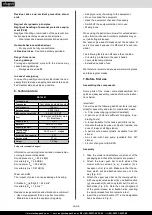
The cutting height is centrally adjusted with the cut

-

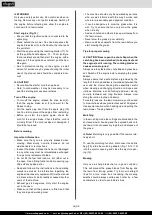
ting height adjustor lever (Fig.13/ Item 14). 5 differ

-

ent cutting heights can be selected.

• 

Pull  the  adjustor  lever  out  and  select  the  desired 

cutting height. The lever snaps into the desired po

-

sition. (Fig. 13)

Preparing the area to be mowed

Before mowing, carefully examine the area. Remove 

stones, sticks, bones, wires, toys and other objects 

that may be ejected.

8. Operation

m

 CAUTION!

The engine does not come with oil in it. There-

fore, ensure that you add 0,45 liters of oil before 

starting it up. Use normal, multigrade oil (SAE30). 

The oil level in the engine must be checked each 

time before mowing.

You will also need to fill in petrol, as this is also 

not supplied upon delivery.

• 

In order to avoid any unintentional start-ups of the 

lawn  mower,  it  comes  equipped  with  an  engine 

brake  (Fig.  1/  Item  3)  which  must  be  pulled  back 

before the engine can be started. When the engine 

control lever is released it must return to its initial 

position,  at  which  point  the  engine  automatically 

switches off.

• 

Press the engine brake lever (3) together and give 

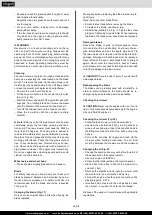
the starter cord (17) a vigorous pull. (Fig. 14)

Attention: 

When you pull the starting rope the cutting blade 

rotates  even  when  dissolved  motor  brake  lever. 


Make sure that there are no body parts in danger 

zone of cutting blade.

• 

When the engine is running, press the drive lever 

(2) to the handle (1) in order to engage drive on the 

mower.

• 

Before you start mowing, you should run through 

this operation several times in order to ensure that 

the machine is working properly.

m

 WARNING

Whenever you need to perform any kind of ad-

justment and/or repair work on your lawn mower, 

wait until the blade has come to a complete stop.

Always switch off the engine before carrying out 

any adjustments, maintenance or repairs.

m

 Note!

Using the drive:

• 

Engine brake (3): Use the lever to stop the engine. 

When  you  release  the  lever  the  engine  and  the 

blade stop automatically.

• 

To mow, hold the drive lever (2) in the working po

-

sition.  Before  you  start  to  mow,  check  the  start/

stop lever several times to be sure that it is work

-

ing properly. Ensure that the tension cable can be 

smoothly operated (i.e. is not catching or kinking in 

any way).

• 

Drive lever (2):

If  you  press  this  the  clutch  for  the  drive  will  be 

closed and the lawnmower will start to move with 

the motor running. Release the drive lever in good 

time to stop the moving lawnmower. Practice start

-

ing and stopping before you use the mower for the 

first time until you are familiar with controlling the 

mower.

Caution: 

The blade begins to rotate as soon as the 

engine is started.

Important: 

Before  you  start  the  engine,  move  the 

motor  brake  several  times  to  be  sure  that  the  stop 

cable is properly working.

Note: 

The engine is factory set to a speed that is op

-

timal for cutting and blowing grass into the basket and 

is designed to provide many years of use.

• 

Check the oil level.

• 

Open the fuel tank cap and fill the petrol tank (6) 

up to the lower point of the tank inlet with about 0.8 

litres of petrol. Use a funnel and a measuring con

-

tainer for filling. Do not overfill the tank. Use fresh, 

clean unleaded fuel.

Never mix oil with petrol. Buy fuel in amounts which 

can be used within 30 days in order to guarantee 

its freshness.

Note: Use only unleaded gasoline.

Summary of Contents for 5911227903

Page 1: ...ractée Traduction des instructions d origine 31 43 PL Spalinowa kosiarka do trawy z napędem Tłumaczenie oryginału instrukcji obsługi 44 56 Art Nr 5911227903 AusgabeNr 5911227850 Rev Nr 12 10 2018 ACHTUNG Vor Inbetriebnahme die Bedienungsanleitung genau durchlesen CAUTION Read the manual carefully before operating this machine ATTENTION Lire la notice intégralement avant l utilisation de la machine...

Page 2: ...2 www scheppach com service scheppach com 49 08223 4002 99 49 08223 4002 58 g f b 19 18 d c a e b b 1 2 3 4 5 6 7 9 13 10 12 11 14 15 16 17 1 18 5 20 8 ...

Page 3: ...3 www scheppach com service scheppach com 49 08223 4002 99 49 08223 4002 58 6 18 8 16 4 4 f b 17 2 3 d e b a b c g 5 5 5 4 16 9 7 ...

Page 4: ...4 www scheppach com service scheppach com 49 08223 4002 99 49 08223 4002 58 12 15 11 19 10 19 13 14 15 14 17 1 3 16 17 16 ...

Page 5: ...5 www scheppach com service scheppach com 49 08223 4002 99 49 08223 4002 58 20 21 10 10 18 12 19 22 22 20 23 m in m ax ...

Page 6: ...ung 8 2 Gerätebeschreibung 8 3 Lieferumfang 8 4 Bestimmungsgemäße Verwendung 9 5 Sicherheitshinweise 9 6 Technische Daten 11 7 Vor Inbetriebnahme 12 8 Bedienung 12 9 Wartung und Reinigung 15 10 Lagerung 17 11 Entsorgung und Wiederverwertung 18 12 Störungsabhilfe 18 13 Konformitätserklärung 59 14 Garantieurkunde 60 ...

Page 7: ... Stellen Sie sicher dass andere Personen ausreichend Sicherheitsabstand einhalten Halten Sie nicht beteiligte Personen vom Gerät fern Entfernen Sie den Zündkerzenstecker bevor Sie Wartungsarbeiten vornehmen Halten Sie Hände und Füße von den rotierenden Messern fern Halten Sie Hände und Füße von den rotierenden Messern fern Wichtig Die Abgase sind giftig betreiben Sie den Motor daher nicht in unbel...

Page 8: ...ger Straße 69 D 89335 Ichenhausen Verehrter Kunde Wir wünschen Ihnen viel Freude und Erfolg beim Ar beiten mit Ihrem neuen Gerät Hinweis Der Hersteller dieses Gerätes haftet nach dem gel tenden Produkthaftungsgesetz nicht für Schäden die an diesem Gerät oder durch dieses Gerät entstehen bei unsachgemäßer Behandlung Nichtbeachtung der Bedienungsanweisung Reparaturen durch Dritte nicht autorisierte ...

Page 9: ...cherheitseinrichtungen an der Maschine montiert sein Die Bedienungsperson ist im Arbeitsbereich ge genüber Dritten verantwortlich Die Maschine ist zur Bedienung durch eine Person konzipiert Alle Sicherheits und Gefahrenhinweise an der Ma schine beachten Alle Sicherheits und Gefahrenhinweise an der Ma schine vollzählig in lesbarem Zustand halten Maschine nur in technisch einwandfreiem Zustand sowie...

Page 10: ...instellungen des Mo tors oder überdrehen Sie ihn nicht Lösen Sie die Motorbremse bevor Sie den Motor starten Starten Sie den Motor mit Vorsicht entsprechend den Herstelleranweisungen Achten Sie auf ausrei chenden Abstand der Füße zu dem Schneidmes ser m Achtung Beim Benutzen von Geräten müssen einige Sicher heitsvorkehrungen eingehalten werden um Verlet zungen und Schäden zu verhindern Lesen Sie d...

Page 11: ...en werden In diesem Fall kippen Sie ihn nur so weit wie es unbedingt erforderlich ist und heben Sie nur die vom Benutzer abgewandte Seite hoch Starten Sie den Motor nicht wenn Sie vor dem Auswurfkanal stehen Führen Sie niemals Hände oder Füße an oder unter sich drehende Teile Halten Sie sich immer entfernt von der Auswurföffnung Heben Sie oder tragen Sie niemals einen Rasen mäher mit laufendem Mot...

Page 12: ...r gestartet wird Beim Loslassen des Motorbremshebels muss dieser in die Ausgangsposition zurückkehren und der Motor wird automatisch abgestellt Folgende Faktoren können diese Erscheinung beein flussen Durchblutungsstörungen der Hände des Bedieners niedrige Außentemperaturen lange Anwendungszeiten Deshalb wird empfohlen warme Arbeitshandschuhe zu tragen und regelmäßige Arbeitspausen einzule gen 4 V...

Page 13: ...erden Füllen Sie den Benzintank im Freien auf Benutzen sie einen Einfülltrichter und einen Meßbehälter Wi schen Sie übergelaufenes Benzin weg Ziehen Sie den Motorbremshebel 3 und zie hen Sie kräftig am Startseilzug 17 Abb 14 ACHTUNG Das Schneidmesser rotiert auch bei gelöstem Motorbremshebel sobald man am Start seilzug zieht Achten Sie darauf das sich keine Kör per Fremdteile im Gefahrenbereich de...

Page 14: ...fen oder das Mähen unsicher ist Vor ei ner Rückwärtsbewegung vergewissern Sie sich ob nicht kleine Kinder hinter Ihnen sind In dichtem hohen Gras stellen Sie die höchste Schnittstufe ein und mähen Sie langsamer Vor dem Entfernen von Gras oder sonstigen Verstop fungen stellen Sie den Motor ab und lösen Sie das Zündkabel Lesen und beachten Sie die Betriebsanleitung und auch die Hinweise bezüglich de...

Page 15: ...s führen Kontrollieren Sie ob der Grasauswurfka nal frei von Grasresten ist und entfernen diese bei Bedarf Reinigen Sie den Mäher niemals mit einem Wasserstrahl oder Hochdruckreiniger Der Motor soll trocken bleiben Entfernen Sie niemals Teile die der Sicherheit die nen Füllen Sie niemals Benzin ein wenn der Motor noch heiß ist oder läuft Entleeren des Grasfangkorbs Sobald während des Mähens Grasre...

Page 16: ...stände in den Luft einlass hineinfallen Abb 20 Achtung Luftfilter nie mit Benzin oder brennbaren Lö sungsmitteln reinigen Luftfilter nur mit Druckluft oder durch Ausklopfen reinigen Aggressive Reinigungsmittel wie Kaltreiniger oder Waschbenzin dürfen nicht verwendet werden Radachsen und Radnaben Sollten einmal pro Saison gereinigt und leicht ein gefettet werden Messer Lassen Sie ihr Messer aus Sic...

Page 17: ... werden müssen Ersatzteilbestellung Bei der Ersatzteilbestellung sollten folgende Anga ben gemacht werden Typ des Gerätes Artikelnummer des Gerätes Ersatzteile Zubehör Rasenmähermesser Artikel Nr 7911200604 Service Informationen Es ist zu beachten dass bei diesem Produkt folgen de Teile einem gebrauchsgemäßen oder natürlichen Verschleiß unterliegen bzw folgende Teile als Ver brauchsmaterialien ben...

Page 18: ...verträglichen und entsorgungstechnischen Gesichtspunkten ausgewählt und deshalb recycel bar Das Rückführen der Verpackung in den Materi alkreislauf spart Rohstoffe und verringert das Abfal laufkommen Verpackungsteile z B Folien Styropor können für Kinder gefährlich sein Es besteht Erstickungsge fahr Bewahren Sie Verpackungsteile außerhalb der Reichweite von Kindern auf und entsorgen Sie sie so sch...

Page 19: ...08223 4002 58 Table of contents Page 1 Introduction 21 2 Layout 21 3 Scope of delivery 21 4 Proper use 22 5 Safety instructions 22 6 Technical data 24 7 Before first use 24 8 Operation 25 9 Maintenance and cleaning 27 10 Storage 29 11 Disposal and recycling 30 12 Troubleshooting 30 13 Declaration of conformity 59 14 Warranty certificate 60 ...

Page 20: ...e distance Keep bystanders away Remove the ignition cable before all maintenance work and read the instructions for use Warning Risk of injury Do not let your hands or feet come in contact with the blades when the mo tor is running Warning Risk of injury Do not let your hands or feet come in contact with the blades when the mo tor is running Important Exhaust gas is poisonous do not operate in an ...

Page 21: ... machine can only be operated by persons who were instructed concerning the operation of the machine and who are informed about the asso ciated dangers The minimum age requirement must be complied with 6 In addition to the safety requirements in these operating instructions and your country s applica ble regulations you should observe the generally recognized technical rules concerning the opera t...

Page 22: ...ial lawns and home hobby gardens Public facilities sport ing halls and agricultural forestry applications are excluded Important Due to the high risk of bodily injury to the user the lawn mower may not be used to trim bushes hedges or shrubs to cut scaling vegetation planted roofs or balcony grown grass to clean suck up dirt and debris off walkways or to chop up tree or hedge clippings Moreover th...

Page 23: ... not mow on excessively steep slopes and near by garbage dumps ditches or dykes Do not use the lawn mower in a thunderstorm risk of lightning strike Always maintain good footing on inclines Only operate the machine at a walking pace For machines with wheels Always mow across hills i e never straight up or straight down Be particularly careful when you change direction on a slope Do not mow on over...

Page 24: ... overload the equipment Have the equipment checked if necessary Switch off the equipment when not in use Wear gloves When using the petrol lawn mower for extended peri ods vibration induced circulatory problems may oc cur white finger disease We cannot give exact details about the duration of use in this case because it is different for each indi vidual The following factors can influence the cond...

Page 25: ... the starter cord 17 a vigorous pull Fig 14 Attention When you pull the starting rope the cutting blade rotates even when dissolved motor brake lever Make sure that there are no body parts in danger zone of cutting blade When the engine is running press the drive lever 2 to the handle 1 in order to engage drive on the mower Before you start mowing you should run through this operation several time...

Page 26: ...ere it can be readily accessed by other users of the machine Exhaust gas is dangerous Only start the engine out in the open Make sure that all the guards are fitted and that they are in good working order The machine should only be operated by persons who are well informed with the way it works and who are in reasonably good physical condition It can be dangerous to mow the grass when it is wet Tr...

Page 27: ...tle children who are more difficult to see When mowing over thick high grass select the highest cutting level and mow at a slower speed Before you remove any grass or blockages of any kind switch off the engine and pull the plug boot Never remove any safety related parts Never fill the engine with petrol when it is hot or is running Emptying the grass basket As soon as grass clippings start to tra...

Page 28: ... thorized service workshop For optimum results it is recommended that the blade should be inspected once a year Changing the blade Fig 17 Only ever use original spare parts when having the blade replaced Wear gloves when replacing the blade in order to pre vent injury Never have any other blade fitted Empty the fuel tank before removing the blade To replace the blade undo the screw Reinstall as il...

Page 29: ...g Cleaning the belts Fig 17 19 Remove the knife and the gear housing by loosen ing the screws out Clean the elements of the transmission and the belt once or twice a year with brush or compressed air Screw the transmission housing and the knife on again Care and adjustment of the cables Oil the cables at regular intervals and check that they move easily Maintenance of the air filter Fig 20 A soile...

Page 30: ... tive components must be disposed of as special waste Ask your dealer or your local council 12 Troubleshooting Troubleshooting The table shows potential failures their possible cause and removal options However if you are un able to remove the problem contact a professional to assist you m CAUTION Always switch off the engine and pull the ignition ca ble before starting any inspection or adjustmen...

Page 31: ...ères Page 1 Introduction 33 2 Description de l appareil 33 3 Ensemble de livraison 33 4 Utilisation conforme 34 5 Notes importantes 34 6 Caractéristiques techniques 36 7 Avant la mise en service 37 8 Utilisation 37 9 Maintenance et nettoyage 40 10 Stockage 42 11 Mise au rebut et recyclage 43 12 Dépannage 43 13 Déclaration de conformité 59 14 Certificat de garantie 60 ...

Page 32: ...le d allumage avant les travaux de maintenance et lisez les instructions d utilisation Attention Risque de blessure Ne pas mettre les mains et les pieds au contact de la lame lorsque le moteur tourne Attention Risque de blessure Ne pas mettre les mains et les pieds au contact de la lame lorsque le moteur tourne Important Le gaz d échappement est toxique ne pas faire fonctionner dans des zones non ...

Page 33: ...s les personnes for mées à l utilisation de la machine et conscientes des risques associés sont autorisées à travailler avec la machine L âge minimum requis doit être respecté 6 En plus des indications d utilisation contenues dans cette notice et des réglementations parti culières de votre pays il convient d appliquer les règles techniques connues et reconnues s appli quant en général 2 Descriptio...

Page 34: ...machine ne doit pas être utilisée à titre pro fessionnel ou industriel Si vous n êtes pas certain que toutes les conditions sont réunies pour travailler en toute sécurité n utili sez pas la machine La tondeuse à gazon à essence convient à un emploi privé dans les jardins domestiques et d agrément Une tondeuse est considérée comme tondeuse à gazon de loisir lorsqu elle est utilisée pour l entretien...

Page 35: ...uchon du réservoir et d ajouter du carburant Sidelʼessencedéborde ilnefautsurtoutpasessayer de mettre le moteur en marche Au lieu de cela il faut éloignerlamachinedelʼendroitrecouvertdʼessence Tout essai de démarrage doit être évité jusquʼà ce que les vapeurs dʼessence se soient complètement évaporées Pour des raisons de sécurité remplacez toujours le réservoir à essence et tout autre élément du s...

Page 36: ...ls et mesures de protection Non respect des principes ergonomiques de base Utilisation négligente de l équipement de protec tion individuelle EPI La mauvaise ou la non utilisation d équipement de protection individuelle peuvent être à l origine de graves traumatismes Portez les équipements de protection prescrits Comportement mauvaise manipulation Soyez toujours concentré sur ce que vous faites m ...

Page 37: ...é rieur à l aide d un levier de serrage rapide 5 une disquesdefixation g unerondelle b etd unécrou enplastique f dechaquecôté Fig 4 5 etserrez le Veillez à ce que disques de fixation fixés dans le bon sens par rapport aux leviers de serrage ra pide afin que la fonction de serrage rapide soit bien assurée 4 Accrochez la poignée du câble de lanceur 17 au crochet prévu à cet effet comme montré à la F...

Page 38: ...nne correctement Attention le moteur est conçu pour une vitesse de coupe de l herbe adaptée pour permettre l expulsion de l herbe coupée dans le bac collecteur et pour as surer une longue durée de vie du moteur Contrôlez le niveau d huile Ouvrez le bouchon du réservoir d essence et rem plissez le réservoir d essence 6 jusqu au bas du col du tuyau de remplissage avec environ 1 4 l d essence Utilise...

Page 39: ...ondeuse et redistribuée sur le gazon Le ramassage et l élimination de l herbe sont supprimés m REMARQUE Le mulching n est possible que sur des gazons relativement courts Pour utiliser la fonction de mulching décrochez le bac collecteur 16 positionnez lʼadaptateur de mul ching fig 10 12 N 19 dans lʼorifice dʼéjection et fer mez le clapet dʼéjection 15 La tonte Tondez uniquement avec une lame affûté...

Page 40: ...ettoyer l appareil de la manière suivante avec de l eau Retirez le kit mulching le sac de ramassage Ne changez pas les réglages et n effectuez aucune réparation sans avoir arrêté le moteur auparavant Retirez le câble d allumage Sur une route ou à proximité d une rue faites attention à la circulation Maintenez l éjection de l herbe éloignée de la rue Evitez les endroits sur lesquels les roues patin...

Page 41: ...nètrent dans la tubulure d ad mission d air Fig 20 Attention Ne nettoyez jamais le filtre à air à l es sence ou avec du détergent inflammable Nettoyez le filtre à air uniquement à l air comprimé ou en tapotant dessus Placez l embout du tuyau sur la tondeuse et ouvrez le robinet d eau fig 23 Démarrez la tondeuse puis arrêtez la au bout de 30 sec environ Le support des lames rotatif dif fuse l eau s...

Page 42: ...le et d essence pour des raisons de sécurité Commande de pièces de rechange Il est nécessaire d indiquer les informations sui vantes Type de machine Référence de la machine Pièces de rechange accessoires Lame de tondeuse à gazon Numéro d article 7911200604 Informations concernant le service après vente Il faut tenir compte du fait que pour ce produit les pièces suivantes sont soumises à une usure ...

Page 43: ...ossibilités de résolution Si le problème persiste faites appel à un spécialiste m PRÉCAUTION Arrêtez tout d abord le moteur et retirez le câble d al lumage avant toute inspection ou réglage m PRÉCAUTION Si après un réglage ou une réparation le moteur a tourné quelques minutes pensez au fait que le pot d échappement et d autres pièces sont chaudes Donc ne les touchez pas afin d éviter des brûlures ...

Page 44: ...enia 46 3 Zakres dostawy 46 4 Zastosowanie zgodne z przeznaczeniem 47 5 Uwagi dotyczące bezpieczeństwa 47 6 Dane techniczne 49 7 Przed uruchomieniem 50 8 Eksploatacja 50 9 Czyszczenie i konserwacja 53 10 Przechowywanie 55 11 Utylizacja i recykling 55 12 Rozwiązywanie problemów 56 13 Deklaracja zgodności 59 14 Karta gwarancyjna 60 ...

Page 45: ...y zachowują odpowiedni odstęp bezpieczeństwa Nie pozwalać zbliżać się do urządzenia osobom nieuczestniczącym w pracy Wyjąć końcówkę przewodu świecy przed przystąpieniem do prac konserwacyjnych Nie zbliżać rąk i stóp do obracających się noży Nie zbliżać rąk i stóp do obracających się noży Ważne Spaliny są trujące dlatego nie eksploatować silnika w niewentylowanych pomieszczeniach Uwaga gorąca powie...

Page 46: ...Straße 69 D 89335 Ichenhausen Drogi Kliencie Mamy nadzieję że nowe narzędzie zapewni Ci wiele radości i sukcesów UWAGA Zgodnie z obowiązującym prawem dotyczącym od powiedzialności za produkt producent urządzenia nie ponosi odpowiedzialności za uszkodzenia pro duktu lub szkody wyrządzone przez produkt które występują na skutek Niewłaściwego obchodzenia się Niespełniania wymogów instrukcji obsługi N...

Page 47: ...ochronne i za bezpieczające Operator jest odpowiedzialny w obszarze robo czym za bezpieczeństwo osób trzecich Maszyna jest przeznaczona do obsługi przez jedną osobę Przestrzegać wszystkich wskazówek bezpieczeń stwa i ostrzegawczych umieszczonych na maszy nie Wszystkie wskazówki dotyczące bezpieczeństwa i zagrożeń umieszczone na maszynie należy utrzy mywać w stanie czytelnym Maszynę można użytkować...

Page 48: ...chyba że kosiarka wymaga podniesienia W takim przypad ku przechylić kosiarkę tylko na tyle na ile jest to bezwzględnie konieczne i podnosić tylko część niemającą kontaktu z użytkownikiem m OSTROŻNIE Podczas korzystania z urządzenia środki bezpie czeństwa muszą być przestrzegane aby uniknąć zranienia i uszkodzenia Dlatego należy uważnie przeczytać tę instrukcję obsługi te uwagi dotyczące bezpieczeń...

Page 49: ...Nigdy nie prowadzić rąk ani stów przy lub pod ob racającymi się elementami Zawsze trzymać się z dala od otworu wyrzutowego Nigdy nie podnosić ani nie przenosić kosiarki do trawy z włączonym silnikiem Wyłączyć silnik i wyciągnąć końcówkę przewodu świecy zapłonowej przed zwalnianiem blokad lub usuwaniem zato rów w kanale wyrzutowym przed kontrolą kosiarki do trawy czyszczeniem lub wykonywaniem innyc...

Page 50: ...ocisnąć dźwignię napędu 2 do uchwytu 1 aby aktywować napęd na kosiarce Przed rozpoczęciem koszenia należy tą procedurę wykonać kilka razy aby upewnić się że wszystko działa prawidłowo 7 Przed uruchomieniem Montaż komponentów W momencie dostawy niektóre elementy są zdemon towane Montaż jest łatwy gdy będą przestrzegane następujące wskazówki Wskazówka Podczas montażu i w celu wykonywania prac konser...

Page 51: ...wagę innym osobom lub dzieciom aby przebywały z dala od kosiarki Nigdy nie kosić przy złej widoczności Przed koszeniem usunąć rozrzucone luźne przed mioty z podłoża m OSTRZEŻENIE Za każdym razem gdy zachodzi konieczność przeprowadzenia prac nastawczych i lub napraw kosiarki należy odczekać aż nóż przestanie się obracać Przed rozpoczęciem jakichkolwiek prac nastaw czych konserwacyjnych i naprawczyc...

Page 52: ... odpowiednich środków pomocniczych np szczotki lub zmiotki W celu zagwarantowania odpowiedniego zbierania kosz 16 a zwłaszcza kratkę powietrzną od we wnątrz należy oczyścić po użytkowaniu Wskazówki dotyczące prawidłowego koszenia m Uwaga Nigdy nie otwierać klapy wyrzutowej gdy kosz wychwytujący jest opróżniany i silnik jeszcze pracuje Obracający się nóż może powo dować obrażenia Zawsze starannie m...

Page 53: ...ałożyć ponownie wszystkie elementy zgodnie z rys 17 Założyć prawidłowo śrubę Mocująca siła obrotowa wynosi 45 Nm Wymienić również śrubę ostrza przy wymianie ostrza Kosz 16 zawieszać tylko gdy silnik jest wyłączony a narzędzie tnące zatrzymane Unieść klapę wyrzutową 15 jedną ręką a drugą przytrzymać kosz 16 za uchwyt i zawiesić od góry rys 9 Po koszeniu Przed odstawieniem kosiarki do trawy do zamkn...

Page 54: ...rażających życiu Naprawa Po wykonaniu naprawy i konserwacji upewnić się że elementy istotne pod kątem bezpieczeństwa tech nicznego są założone i wykazują nienaganny stan techniczny Elementy mogące powodować obrażenia przechowywać w miejscu niedostępnym dla innych osób i dzieci Uszkodzony nóż Jeżeli mimo zachowania ostrożności nóż napotka na przeszkodę natychmiast wyłączyć silnik i wyciągnąć końców...

Page 55: ...ć zbiornik benzyny pompą do odsysania benzyny Uruchomić silnik i pozostawić pracujący silnik aż reszta benzyny zostanie zużyta Wymianę oleju przeprowadzać po każdym sezo nie W tym celu spuścić stary olej silnikowy z cie płego silnika i napełnić nowym olejem Wyjąć świecę zapłonową z głowicy cylindra Wlać do cylindra ok 20 ml oleju przy użyciu ole jarki ręcznej Pociągnąć powoli uchwyt rozruchowy tak...

Page 56: ...wnomierny bieg silna wibracje urządze nia poluzowane śruby poluzowane mocowanie noża niewyważony nóż sprawdzić śruby sprawdzić mocowanie noża wymienić nóż Silnik nie pracuje niewciśnięta dźwignia hamulca silnikowego dźwignia gazu w nieprawidłowej pozycji uszkodzona świeca zapłonowa pusty zbiornik paliwa zanieczyszczone paliwo chłodne otoczenie uszkodzony silnik nacisnąć dźwignię hamulca silnikoweg...

Page 57: ... www scheppach com service scheppach com 49 08223 4002 99 49 08223 4002 58 A B ...

Page 58: ...58 www scheppach com service scheppach com 49 08223 4002 99 49 08223 4002 58 B Engine Model TX ...

Page 59: ...suje nasledujúcu zhodu podla smernice EU a noriem pre výrobok HR ovime izjavljuje da postoji sukladnost prema EU smjernica i nor mama za sljedece artikle RS potvrđuje sledeću usklađenost prema smernicama EZ i normama za artikal RO declară următoarea conformitate corespunzător directivelor şi normelor UE pentru articolul BG декларира съответното съответствие съгласно Дирек тива на ЕС и норми за арт...

Page 60: ...r notificados dentro de 8 días después de haber recibido la mercancía de lo contrario el comprador pierde todos los derechos sobre tales defectos Garan tizamos nuestras máquinas en caso de manipulación correcta durante el plazo de garantía legal a partir de la entrega Sustituiremos gratuitamente toda pieza de la máquina que dentro de este plazo se torne inútil a causa de fallas de material o de fa...

Reviews: