background image

 www.scheppach.com / 

 service@scheppach.com / 

 +(49)-08223-4002-99 / 

 +(49)-08223-4002-58

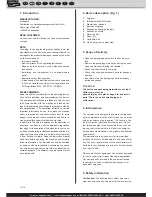
switch under the pressure switch cover. When the 

maximum pressure set is reached, the pressure switch 

is activated and the motor switched off. The pressure 
is reduced as the air is consumed by the connected 
tool, until the minimum pressure set is reached. Then 
the pressure switch re-engages the motor. The opera-
tor at the compressor should take care that the motor 

engages and disengages dictated by the influence of 

the increasing and decreasing pressure in the tank. 
The motor engages without any previous warning.

The maximum and minimum pressure have been set 

in the works. These settings may not be altered.

All accessories were connected to the adjustable drain 

valve (5).

As shown on the adjustable output pressure gauge 

(3), the pressure of the adjustable exit can be altered 
by turning the adjustable button (4).

Attention: 

In order to read the correct output at the 

output  gauge,  air  must  flow  through  the  output.  The 

adjustable valve must be set and the pressure gauge 

read with the valve open, while the air flows from the 

output set through the accessory. 
In order to increase the air pressure, turn the valve 
clockwise. In order to reduce the air pressure, turn the 
valve anti-clockwise.

Attention:

 The absence of air flow during setting pro

-

duces an incorrect display. For a correct display, air 

must flow.

Upon termination of your work, or when you leave the 
compressor unattended, switch it off as follows:

• 

Press the ON/OFF switch (2).

•  Wait until the compressed air has escaped via the 

drain valve (5) under the switch cover.

Attention: 

On pressing the button you should hear a 

short air exit (about half a second).

8.5 After operation Fig. 5

•  Switch the machine off and pull the mains plug.
• 

Pull the ring on the safety valve (6) in order to make 

sure that the compressed air has escaped from the 
tank, or open the drain plug of the tank in order to let 
the pressure escape.

9. Electrical connection

The electrical motor installed is connected and 
ready for operation. The connection complies with 
the applicable VDE and DIN provisions.
The customer‘s mains connection as well as the 
extension cable used must also comply with these 
regulations.

Damaged electrical connection cable

The insulation on electrical connection cables is often 
damaged.
This may have the following causes:

• 

Passage points, where connection cables are 
passed through windows or doors.

• 

Kinks where the connection cable has been improp-
erly fastened or routed.

to the transport company which was used to deliver 
the compressor.

• 

Install the compressor near the point of consumpti-
on.

• 

Avoid long air lines and supply lines (extension ca

-

bles).

• 

Make sure that the intake air is dry and dustfree.

• 

Do not install the compressor in a damp or wet 
room.

• 

The compressor may only be used in suitable rooms 

(with good ventilation and an ambient temperature from 
+5 °C to 40 °C). There must be no dust, acids, vapors, 
explosive gases or inflammable gases in the room.

• 

The compressor is designed to be used in dry 
rooms. It is prohibited to use the compressor in are-
as where work is conducted with sprayed water.

8. Attachment and operation

n


Important!

You must fully assemble the appliance before us-

ing it for the fi rst time!

8.1 Wheels, Fig. 2

For fixing the wheels (12), first put one axle pin through 

the wheel. Then place the spacer washer to the un-
derside of the wheel.

Fasten the wheel unit through the hole in the bracket 
underneath the tank.

Fasten the flat washer, the split washer, and the nut. 

Tighten the nut from the underside of the wheel and 
attach the wheel cover.

Repeat the procedure for the second wheel.

8.2 Rubber feet, Fig. 3

Fix the rubber feet to the bracket on the front of the tank 

using the screws, washers and nuts supplied. 

Warning: 

Make sure the place of setting up is clean, dry, and well 
vented.

Warning:

 As compressed air comes off the output, the 

output may not be directed towards the operator or peo-

ple in the vicinity. The air coming off the exit may not be 

inhaled. Daily check the pressure control valve.

8.3 Switching on and off the compressor

Check the model plate on the compressor: 230 – 240 
V (or 110 – 120 V).

Plug the compressor cable into a standard socket (240 
V or 120 V) and switch the compressor on. 

For switching the compressor on, lift the ON/OFF 

switch (3) on the pressure switch cover (2).

For switching the compressor off, depress the ON/
OFF switch.

8.4  Commissioning Fig. 4.1 + 4.2

The pressure in the tank is controlled by the pressure 

19 / 76

GB

FR

IT

CK

DE

SK

PL

HU

Summary of Contents for HC24 o

Page 1: ...941 AusgabeNr 3906106004 Rev Nr 24 02 2015 www scheppach com service scheppach com 49 08223 4002 99 49 08223 4002 58 Nachdrucke auch auszugsweise bed rfen der Genehmigung Technische nderungen vorbehal...

Page 2: ...kke bortskaffes som allmindeligt affald I henhold til det europ iske direktiv 2012 19 EU em bortskaffelse af elektriske og elektroniske produkter og g ldende national lovgivning skal brugt elv rktoj i...

Page 3: ...eppach com service scheppach com 49 08223 4002 99 49 08223 4002 58 www scheppach com service scheppach com 49 08223 4002 99 49 08223 4002 58 3 76 GB FR IT CK DE SK PL HU Fig 1 7 1 9 3 2 4 5 6 8 10 Fig...
Page 4: ...www scheppach com service scheppach com 49 08223 4002 99 49 08223 4002 58 GB FR IT CK DE SK PL HU Fig 4 1 4 3 Fig 4 2 5 Fig 5 Fig 6 6 10 4 54...
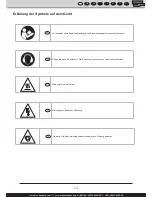
Page 5: ...nungsanleitung und Sicherheitshinweise lesen und beachten DE Warnung vor elektrischer Spannung DE Warnung Die Einheit ist ferngesteuert und darf ohne Warnung anlaufen DE Tragen Sie einen Geh rschutz D...

Page 6: ...2 Ger tebeschreibung 7 3 Lieferumfang 7 4 Bestimmungsgem e Verwendung 7 5 Sicherheitshinweise 7 6 Technische Daten 9 7 Vor Inbetriebnahme 10 8 Aufbau und Bedienung 10 9 Elektrischer Anschluss 11 10 R...

Page 7: ...ten Lesen Sie alle 1 Einleitung HERSTELLER scheppach Fabrikation von Holzbearbeitungsmaschinen GmbH G nzburger Stra e 69 D 89335 Ichenhausen VEREHRTER KUNDE Wir w nschen Ihnen viel Freude und Erfolg b...

Page 8: ...it benutzen Sie nur Zubeh r und Zusatzger te die in der Bedie nungsanleitung angegeben oder vom Herstel ler empfohlen oder angegeben werden Der Gebrauch anderer als der in der Bedienungsan leitung ode...

Page 9: ...rletzungsgefahr f r Sie bedeuten 17 Ger usch Bei Verwendung des Kompressors Geh rschutz tragen 18 Austausch der Anschlussleitung Wenn die Anschlussleitung besch digt wird muss sie vom Hersteller oder...

Page 10: ...und das Messger t bei offenem Ventil abgelesen werden w hrend die Luft aus dem einstellbaren Ablass durch das Zubeh r flie t Um den Luftdruck zu erh hen drehen Sie das Ventil im Uhrzeigersinn Um den...

Page 11: ...h lters eingestellt Es ist nicht zu l ssig das Sicherheitsventil zu verstellen oder dessen Plombe zu entfernen Damit das Sicherheitsventil im Bedarfsfall richtig funktioniert muss dies von Zeit zu den...

Page 12: ...stehend aufbewahren 10 4 1 Ablassen des berdrucks Lassen Sie den berdruck im Kompressor ab indem Sie den Kompressor ausschalten und die noch im Druckbeh lter vorhandene Druckluft verbrauchen z B mit...

Page 13: ...e der berhitzung beseitigen Kompressor l uft jedoch kein Druck R ckschlagventil undicht Dichtungen kaputt Ablass Schraube f r Kondenswasser 10 undicht R ckschlagventil austauschen Dichtungen berpr fen...

Page 14: ...e operating and safety instructions before you start working with this power tool GB Beware of electrical voltage GB Warning The equipment is remote controlled and may start up without warning GB Wear...

Page 15: ...Device description 16 3 Scope of delivery 16 4 Intended use 16 5 Safety information 16 6 Technical data 18 7 Before starting the equipment 18 8 Attachment and operation 19 9 Electrical connection 19 1...

Page 16: ...electric tools for protec 1 Introduction MANUFACTURER scheppach Fabrikation von Holzbearbeitungsmaschine GmbH G nzburger Stra e 69 D 89335 Ichenhausen DEAR CUSTOMER we hope your new tool brings you m...

Page 17: ...bits milling heads 11 Avoid inadvertent starting Make sure that the switch is switched off when plugging the plug into an outlet 12 Use extension cables for outdoors Only use approved and appropriatel...

Page 18: ...the rebounding hose Wear safety goggles when working with the blow out pistol Foreign bodies or blown off parts can easily cause injuries Do not blow at people with the blow out pistol and do not clea...

Page 19: ...cable used must also comply with these regulations Damaged electrical connection cable The insulation on electrical connection cables is often damaged This may have the following causes Passage point...

Page 20: ...The raw materials in this packaging can be reused or recycled The equip ment and its accessories are made of various types of material such as metal and plastic Defective compo nents must be disposed...

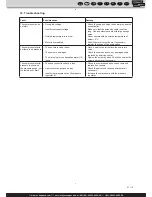
Page 21: ...se of the overheating The compressor starts but there is no pressure The non return valve leaks The seals are damaged The drain plug for condensation water 10 leaks Have a service center replace the n...

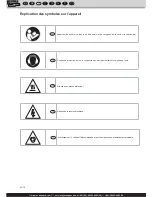
Page 22: ...de d emploi et les consignes de s curit et respectez les FR Attention la tension lectrique FR Avertissement L unit est t l command e et peut d marrer sans avertissement pr alable FR Portez une protect...

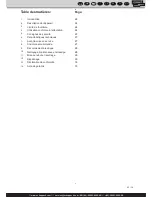
Page 23: ...appareil 24 3 Limite de fourniture 24 4 Utilisation conforme l affectation 24 5 Consignes de s curit 25 6 Caract ristiques techniques 27 7 Avant la mise en service 27 8 Structure et commande 27 9 Rac...

Page 24: ...sanale ou industrielle Nous d clinons toute responsabilit si l appareil est utilis dans des exploi 1 Introduction FABRICANT scheppach Fabrikation von Holzbearbeitungsmaschine GmbH G nzburger Stra e 69...

Page 25: ...re r parer l outil lectrique par un lectricien sp cialis Cet outil lectrique est conforme aux disposi tions de s curit en vigueur Les r parations ne doivent tre men e bien que par un lectricien sp cia...

Page 26: ...s exploiter le compresseur avec r servoir de pression rouill ou endommag Faites un constat de l endommagement et adressez vous au service apr s vente Conservez bien ces consignes de s curit d origine...

Page 27: ...ig 4 1 4 2 1 La pression dans le r servoir est r gl e l aide du manocontact sous le couvercle de manocontact Quand la pression maximale pr r gl e est atteinte le manocontact est d clench et le moteur...

Page 28: ...augmentation et de la diminution de la pression dans le r servoir Le moteur d marre sans aucune sorte d avertissement 2 La pression maximale et minimale ont t r gl es en usine Ces r glages ne doivent...

Page 29: ...r la rouille et les d t riora tions Il ne faut pas exploiter le compresseur avec un recipient sous pression rouill ou endommag Si vous constatez des dommages veuillez vous adresser au service apr s ve...

Page 30: ...ur onctionne cependant aucune pression n est pr sente Soupape anti retour non tanche Joints cass s Bouchon fi let de vidange pour l eau condens e 10 perm able Remplacer la soupape anti retour Contr le...

Page 31: ...per l uso e le avvertenze di sicurezza IT Fate attenzione alla tensione elettrica IT Avvertimento L unit telecomandata e pu mettersi in moto senza avvertimento IT Portate cuffi e antirumore L effetto...

Page 32: ...otazione 33 4 Utilizzo proprio 33 5 Avvertenze sulla sicurezza 34 6 Caratteristiche tecniche 35 7 Prima della messa in funzione 36 8 Montaggio ed azionamento 36 9 Ciamento elettrico 37 10 Pulizia manu...

Page 33: ...roduzione FABBRICANTE scheppach Fabrikation von Holzbearbeitungsmaschinen GmbH G nzburger Stra e 69 D 89335 Ichenhausen EGREGIO CLIENTE Le auguriamo un piacevole utilizzo del Suo nuovo appa recchio Av...

Page 34: ...ti Non utilizzare il cavo per estrarre la spina dalla presa Proteggere il cavo da calore olio e spigoli appuntiti 9 Prendersi cura degli elettroutensili con attenzione Tenete il compressore pulito per...

Page 35: ...ersi da quelli consigliati nelle istruzioni per l uso o nel catalogo pu comportare il rischio di lesioni alla vostra persona 17 Rumore Quando utilizzate il compressore indossate cuffie antirumore 18 S...

Page 36: ...olabile deve essere regolata e il mano metro di misurazione a valvola aperta deve essere let to e questo mentre l aria fluisce attraverso l accessorio applicato Per aumentare la pressione giri la valv...

Page 37: ...ma pressione consentita per il recipient a pressione Non consentito modifi care la regolazione della valvola di segue Prema il pulsante on off verso O Aspetti che l aria compressa dall valvola di usci...

Page 38: ...ne Tenete il compressore solo in un ambiente asciut to e non accessibile per persone non autorizzate Non ribaltatelo conservatelo solo diritto 12 Risoluzione dei guasti Guasto Possibile causa Rimedio...

Page 39: ...P ed uveden m do provozu si p e t te a dodr ujte n vod k obsluze a bezpe nostn pokyny CZ Varov n p ed elektrick m nap t m CZ Varov n Jednotka je zena d lkov a m e se spustit bez varov n CZ Noste ochra...

Page 40: ...roje 41 3 Rozsah dod vky 41 4 Pou it podle elu ur en 41 5 Bezpe nostn pokyny 42 6 Technick data 43 7 P ed uveden m do provozu 43 8 Mont a obsluha 44 9 Elektrick p pojka 44 10 i t n dr ba a ulo en 45 1...

Page 41: ...bearbeitungsmaschine GmbH G nzburger Stra e 69 D 89335 Ichenhausen V EN Z KAZN KU p ejeme V m hodn radosti a sp ch p i pr ci s Va m nov m p strojem POZN MKA V souladu s platn mi z kony kter se t kaj o...

Page 42: ...v p pa d po kozen je nechte obnovit autorizovan m odborn kem Pravideln kontrolujte prodlu ovac kabely a po kozen nahra te 10 Vyt hn te vidlici z elektrick z suvky Pokud elektrick n stroj nepou v te p...

Page 43: ...j p i provozu vysok ch teplot Kontakt s nimi vede k pop len Vzduch nas van kompresorem je t eba udr ovat bez p m s kter by mohly v st v erpadle kompresoru k po ru nebo v buchu P i uvol ov n hadicov sp...

Page 44: ...yto vadn elektrick p vodn kabely nesm b t pou v ny a kv li po kozen izolace jsou ivotu nebezpe n Pravideln kontrolujte po kozen elektrick ch p vod po kozen Eventu ln po kozen ihned nahl sit p epravn f...

Page 45: ...us odpov dat p slu n m p edpis m VDE a DIN Pou vejte pouze p vodn ka bely s ozna en m H05VV F Uveden typov ho ozna en na p vodn m kabelu je povinn Motor na st dav proud Nap t v s ti mus init 230 V Pro...

Page 46: ...nechat ochladit event odstranit p inu p eh t Kompresor b ov em nen k dispozici tlak Net sn zp tn ventil Zni en t sn n Net sn vypou t c roub na kondenzovanou vodu 10 Vym nit zp tn ventil T sn n p ekon...

Page 47: ...pre tajte n vod na obsluhu a bezpe nostn upozornenia a dodr iavajte ich SK V straha pred elektrick m nap t m SK V straha Jednotka je riaden dia kovo a m e sa rozbehn bez predch dzaj ceho varovania SK...

Page 48: ...2 Popis pr stroja 49 3 Rozsah dod vky 49 4 Spr vny sp sob pou itia 49 5 Bezpe nostn pokyny 50 6 Technick daje 51 7 Pred uveden m do prev dzky 52 8 Zlo enie a obsluha 52 9 Elektrick pr pojka 52 10 iste...

Page 49: ...1 vod V ROBCA scheppach Fabrikation von Holzbearbeitungsmaschine GmbH G nzburger Stra e 69 D 89335 Ichenhausen V EN Z KAZN K el me V m ve a z bavy a spechov pri pr ci s Va m nov m pr strojom POZN MKA...

Page 50: ...vznik eventu lneho nebezpe enstva zranenia 17 Hluk Pri pou van kompresora pou va ochranu slu chu 5 Bezpe nostn pokyny m Pozor Pri pou van elektrick ch pr strojov je nutn na ochranu pred z sahom elektr...

Page 51: ...y Po as procesu striekania a ani v pracovnej miestnosti sa nesmie faj i Nebezpe enstvo v buchu Taktie v pary farieb s ahko hor av Ohnisk otvoren svetlo alebo iskriace pr stroje sa tu nesm vyskytova re...

Page 52: ...P 2 na I 4 Na vypnutie kompresora stla te sp na ZAP VYP na O 8 4 Uveden m do prev dzky Obr 4 1 4 2 1 Tlak v n dr i je riaden tlakov m sp na om pod kry tom tlakov ho sp na a Po dosiahnut nastaven ho ma...

Page 53: ...ia pred isten m odpoji z kompresora Kompresor nesmie by isten vodou rozp adlami a pod 10 2 dr ba tlakovej n doby obr 1 Pozor Pre dlhodob trvanlivos tlakovej n doby 7 sa mus po ka dej prev dzke vypusti...

Page 54: ...kova pri vonkaj ej teplote ni ej ako 5 Motor necha vychladn pr padne odstr ni pr inu prehriatia Kompresor be av ak bez tlaku Sp tn ventil je netesn Tesnenia s po koden Vyp acia skrutka na kondenzovan...

Page 55: ...yta niniejsz instrukcj obs ugi i przestrzega wskaz wek bezpiecze stwa PL Ostrze enie przed napi ciem elektrycznym PL Ostrze enie Urz dzenie jest zdalnie sterowane i mo e si uruchomi bez ostrze enia PL...

Page 56: ...pis urz dzenia 57 3 Zakres dostawy 57 4 U ycie zgodne z przeznaczeniem 57 5 Wskaz wki bezpiecze stwa 58 6 Dane techniczne 59 7 Przed uruchomieniem 60 8 Monta i obs uga 60 9 Przy cze elektryczne 61 10...

Page 57: ...w tej instrukcji obs ugi oraz przepis w obowi zuj cych w Pa stwa kraju nale y r wnie przestrzega innych powszechnie uznanych technicznych norm dot eksploatacji urz dze do obr bki drewna Nie ponosimy o...

Page 58: ...nnie dba o urz dzenie Zawsze utrzymywa kompresor w czysto ci aby m c dobrze i bezpiecznie pracowa Przestrzega wskaz wek dotycz cych konser wacji Regularnie kontrolowa wtyczk i kabel a w razie stwierdz...

Page 59: ...t w tych substancji odno nie rodk w bezpiecze stwa i higieny pracy Przestrzega wskaz wek i oznacze substancji niebezpiecznych podanych na opakowaniach sto sowanych materia w W razie potrzeby stosowa d...

Page 60: ...ornikiem 3 Prosz zamocowa dodatkowe podk adki p askie i nakr tki Prosz dokr ci nakr tki na spodniej stro nie ko a 4 Prosz powt rzy te czynno ci w przypadku drugiego ko a 8 2 Gumowe n ki Rys 3 Prosz za...

Page 61: ...e by on pod czony do sieci elek trycznej Przewody elektryczne musz odpowiada w a ciwym przepisom VDE Zwi zek Elektryk w Niemieckich oraz normom DIN Stosowa wy cznie przewody elektryczne z oznaczeniem...

Page 62: ...cie a b dzie s ycha e spr one powietrze jest wydmuch iwane Nast pnie pu ci pier cie 10 4 Przechowywanie m Uwaga Wyci gn wtyczk z gniazdka spu ci spr one powietrze z urz dzenia i pod czonych narz dzi...

Page 63: ...to mo liwe usun przyczyn przegrzania Kompresor pracuje ale nie wytwarza ci nienia Nieszczelny zaw r zwrotny Uszkodzone uszczelki Nieszczelna ruba spustowa skondensowanej wody 10 Wymieni zaw r zwrotny...

Page 64: ...i tmutat t s a biztons gi el r sokat s mindig tartsa be azokat HU Figyelmeztet s az elektromos fesz lts g el l HU Figyelmeztet s Az egys g t vir ny tott s fi gyelmeztet s n lk l megindulhat HU Hordjon...

Page 65: ...z l k le r sa 66 3 Sz ll tott elemek 66 4 Rendeltet sszer i haszn lat 66 5 Biztons gi utas t sok 67 6 Technikai adatok 68 7 Be zemeltet s el tt 69 8 Fel p t s s kezel s 69 9 Elektromos csatlakoztat s...

Page 66: ...mel si utas t sokba foglalt biztons gi el r sok s a helyi orsz gos k l nleges el r sok kieg sz t sek nt be kell tartani az ltal nosan elismert m szaki el r sokat a fafeldolgoz szersz mg pek zemel se k...

Page 67: ...l s eset n cser ltes se ki azt egy elismert szakember ltal Ellen rizze le rendszeresen a hosszabb t k belt s s r l s eset n cser lje ki 10 H zza ki a csatlakoz dug t az aljzatb l Ha nem haszn lja az...

Page 68: ...att valamint a munkateremben Robban svesz ly Sz np r k is k nnyen gyull konyak Nem szabad t zhelyeknek ny lt f nynek vagy szikrak pz g peknek fel ll tva illetve zemeltetve lenni k Ne t roljon vagy fog...

Page 69: ...or elektromos k bel t egy szab v nyos aljzatba 240 V vagy 120 V majd kapcsolja be a kompresszort 3 A kompresszor bekapcsol s hoz a BE KI f kapcsol t 2 nyomja I helyzetbe 4 A kompresszor kikapcsol s ho...

Page 70: ...en amennyire csak lehet D rzs lje le a k s z l ket egy tiszta poszt val vagy pedig f jja ki alac sony nyom s alatt s r tett leveg vel Azt aj nljuk hogy minden haszn lat ut n azonnal kitiszt tsa a k sz...

Page 71: ...lts g T l alacsony a h l zati fesz lts g T l alacsony a kinti h m rs klet T lhev lt a motor Leellen rizni a k belt biztos t kot s a dugaszol aljzatot Ker lje el a t l hossz hosszabb t k belt Elegend...

Page 72: ...www scheppach com service scheppach com 49 08223 4002 99 49 08223 4002 58 72 76...

Page 73: ...www scheppach com service scheppach com 49 08223 4002 99 49 08223 4002 58 73 76...

Page 74: ...iecina du saska ar ES direkt vu atbilst bas un standarti du rakstu NL verklaart hierbij dat het volgende artikel voldoet aan de daarop betrekking hebbende EG richtlijnen en normen RUS PT declara o seg...

Page 75: ...pieza de la m quina que dentro de este plazo se torne in til a causa de fallas de material o de fabricaci n Las piezas que no son fabricadas por nosotros mismos ser n garantizadas hasta el punto que n...

Page 76: ...ami defekti ir j pazi o 8 dienu laik no preces sa em anas Pret j gad jum pirc ja ties bas piepras t atl dz bu par diem defektiem ir sp k neeso as M s dodam garantiju sav m iek rt m ja pirc js pret t m...

Reviews: