3. Installation and Operation
3.1. Wireless Sensor Software Installation
For this procedure you will need the CDR Wireless Sensor disk provided with your
system. This disk contains the driver for the Wireless Sensor, the Wireless Monitor, and
Wireless Tools utility.
1. Insert the CDR Wireless Sensor Software disk into the floppy drive of your computer.
2. Click Start, Run, and then enter a :\ setup.exe.
3. Click Next when the Welcome Screen for the setup program is displayed.
4. Click Yes after reading and agreeing to the license agreement.
5. If you are CDR program user (version 2.6 or DICOM), select the software version
you intend to use with the Wireless Sensor. This screen does not appear for non-CDR
users.
6. Click Next after selecting the location where the software will be installed.
7. Click Finish after the software is installed.
3.2. USB Interface Positioning
The Antenna / Receiver and USB Interface can be surface-, wall-, or ceiling-mounted as
one unit (docked) or separately (undocked) to achieve the best performance. To locate the
units in their shipped (docked) position, follow the steps below. To locate them
separately, refer to
Section
Error! Reference source not found..
1. Choose a convenient location for the USB Interface, keeping in mind that you may
need to periodically access the Sensor cradle for channel configuration.
2. Using the USB cable provided with your system, connect the cable from the USB
Interface to the PC workstation. If you need a different USB cable from the one
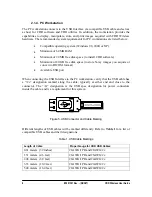
supplied with your system, refer to
Table 1
for compatible cable lengths and
markings.
10
B1051301 Rev. - (DRAFT)
CDR Wireless User Guide

