background image

53


12. Parameter 

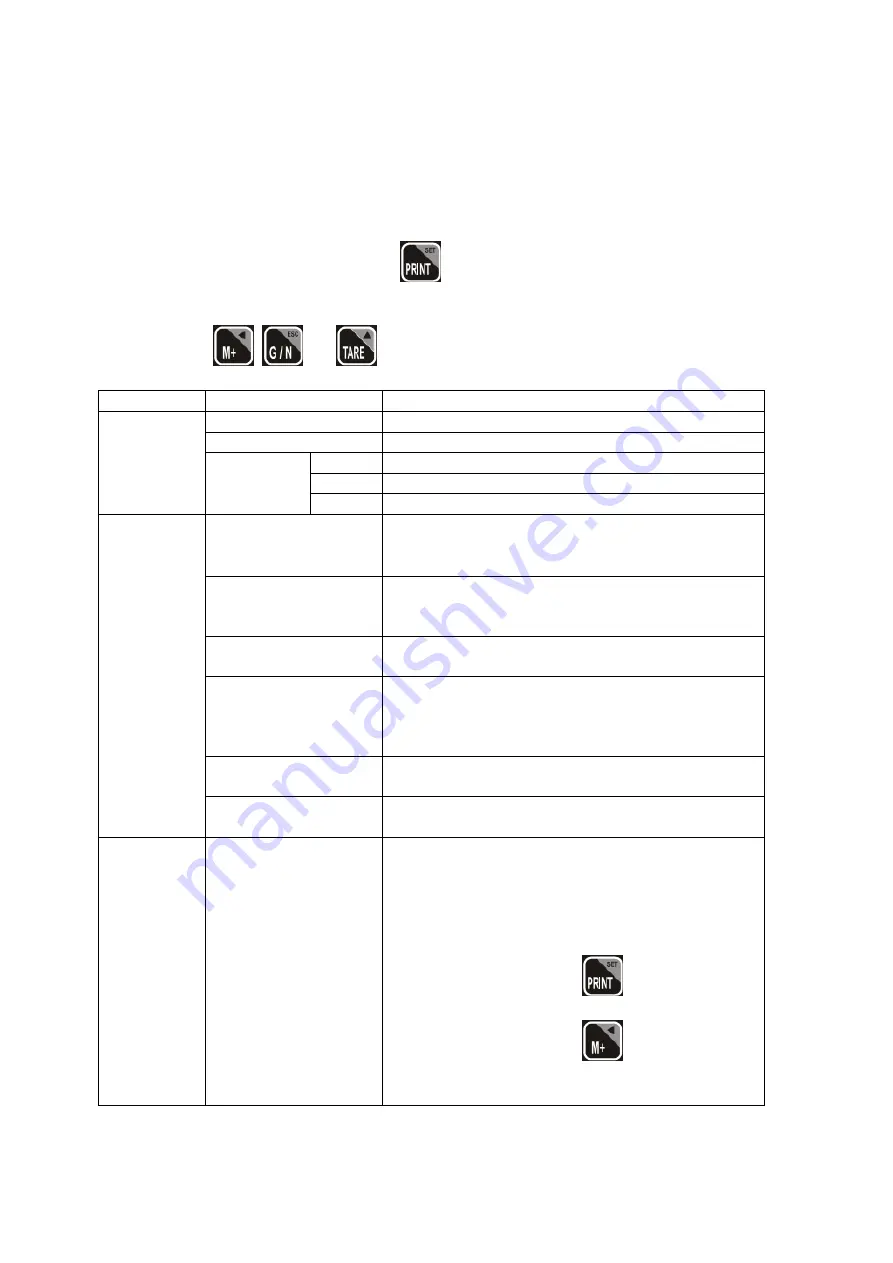
12.1  Parameter für die MS EasyScale Pro Sow 4309763 


Schalten Sie die Waage ein, um die Parameter einzustellen. 

Drücken Sie während des Selbsttests auf den 

-Knopf. 

Die Anzeige zeigt pn an. 
 

Drücken Sie auf 

 und 

, auf der Anzeige erscheint po chk 

 
Menü 

Untermenü 

Beschreibung 

P 0 chk 

Set H 

Obergrenze zum Probewiegen einstellen 

Set lo 

Untergrenze zum Probewiegen einstellen 

Piepen 

Nein 

Kein Piepton beim Probewiegen 

Ok 

Piepton beim Probewiegen innerhalb der Grenzen 

NIO 

Piepton beim Probewiegen außerhalb der Grenzen 

P1 ref 

A 2n 0   

Automatische Tarierung  
 
Optionen: 0,5 Stk.,1 Stk., 2 Stk., 4 Stk. 

0auto 

Nullstellung, nachdem die Waage auf null gesetzt 
wurde. 
Optionen: 0, 2, 5,10, 20, 50, 100 

0range 

Manuell auf null setzen. 
Optionen: 0, 2, 5,10, 20, 50, 100 

0tare 

Autotarierung für den NET-Modus. 
(Drücken Sie auf Tara, danach ist das NET-Gewicht auf 
null gesetzt) 
Option: ein  / aus 

Geschwindigkeit 

ADC-Geschwindigkeit einstellen 
Option: 7,5/15/30/60 

Null 

Neuen Nullpunkt einstellen 
 

P 2 com 

Modus 

Diese Option wird verwendet, um die Summierung und 
RS-232-Kommunikation einzustellen 
Optionen: 
Cont 

: Daten senden fortsetzen  

St 1 

: Versende Daten einmalig, wenn stabil. 

St c 

: Versende Daten ständig, wenn stabil. 

P r1 

: Drücken Sie den 

-Knopf und senden 

Sie die Daten einmalig  

Pr 2 

: Drücken Sie den 

-Knopf und senden 

Sie die Daten zum Drucken und zum 
Summieren. 

Summary of Contents for 4309606

Page 1: ... Gebruiksaanwijzing 3 MS Weighing indicator BWS Operations manual 23 MS Wiegecomputer BWS Gebrauchsanweisung 44 MS Ordinateur de pesée BWS Mode d emploi 65 MS Cabezal de pesar BWS Instrucciones para el uso 86 MS Indicatore peso BWS Manuale di istruzioni 107 ...

Page 2: ...2 ...

Page 3: ...ugen wissen 7 5 5 Automatisch optellen 7 6 Stuks tellen telwegen 8 7 Dierwegen en stabieldetectie 8 8 Toetsen lock slot 9 9 Batterij accu 9 10 Gebruikersinstellingen 10 10 1 aan uit schakelen van het backlight 10 10 2 INSTELLEN van AUTOMATISCH UITSCHAKELEN 10 10 3 Betreft een 4 0 BLE BT verbinding 10 11 Kalibreren BWS computer 10 12 Parameters 12 12 1 Parameters voor MS EasyScale Pro Select 430976...

Page 4: ...e 2de functie van deze toets is het verhogen aanpassen van de huidige instelling van de parameters of andere functies Druk en toetsen tegelijk bij normaal wegen om Dierwegen aan of uit te schakelen Bij stabiel gewicht met de Dierwegenfunctie hoort men 2 x een pieper Oproepen van het geheugen toont het totaal van de verzamelde gewichten uit het geheugen In de instelfunctie kan men hiermee de juiste...

Page 5: ...os kist op het platform dit gewicht verschijnt op het display Druk op de toets om te tarreren Het getoonde gewicht wordt opgeslagen als het tarragewicht dit wordt afgetrokken van het display het display toont 0 De NET indicator verschijnt Wordt er nu een product gewogen dan wordt alleen dat gewicht weergegeven Er kon nog een 2de keer getarreerd worden als er bv nog een ander soort product wordt to...

Page 6: ...egelijk het display toont set h dmv de toets kiest men voor SET H of SET L druk voor invoeren dmv en toets verandert men het cijfer dmv toets wijzigt u de waarde dmv toets wist u de waarde Na invoer van de waarde druk toets om te bevestigen druk op om terug te keren 4 3 Instellen check weegfunctie Druk en tegelijk display toont set h dmv toets kiest men voor pieper beep druk voor invoer druk om te...

Page 7: ...r of PC gestuurd worden Verwijder al het gewicht om naar nul terug te keren en om een 2de gewicht op de weegschaal te plaatsen Druk toets het display toont ACC 2 en dan het nieuwe totaal Continueer dit net zolang tot alle gewichten zijn toegevoegd 5 3 Geheugen bekijken Om de totalen te bekijken druk de toets 5 4 Het geheugen wissen Druk de en toetsen tegelijk in 5 5 Automatisch optellen Druk tijde...

Page 8: ...ctie aan of uitgeschakeld worden Om de stabiel detectie in te stellen schakel de weegschaal aan Druk knop tijdens de opstart procedure Display laat pn zien Druk en in display laat poch zien Druk tot dat display p4 oth laat zien Druk toets om te bevestigen en druk vervolgens om Anite selecteren Maak evt met de knop de selectie tot dat display On laat zien en bevestig weer met Bij de instelling On m...

Page 9: ... Zero U ziet dan de RI inc Hiermee bepaald u het aantal delen waarmee u wilt gaan werken Dus heeft u bij Deci gekozen voor 0 0 delen per 100 gram en kiest u nu bij RI inc waarde 5 betekent dat u met 5 x 100 gram dus op een halve kilo nauwkeurig gaat wegen Bij Deci op 0 en RI inc op 5 met 5 kilo nauwkeurig of bij Deci met 0 00 en RI inc op 5 met 50 gram nauwkeurig 8 Toetsen lock slot Deze functie k...

Page 10: ...toff druk toets om uw keuze in te voeren druk toets om uw keuze te maken voor de auto power off tijd of ON altijd AAN of 5 auto uitschakelen na 5 min niet gebruiken of 15 auto uitschakelen na 15 minuten niet gebruiken druk toets om te bevestigen druk toets om terug te keren 10 3 Betreft een 4 0 BLE BT verbinding Benodigde wachtwoord is 1234 om verbinding te maken De standaardnaam die gevonden moet...

Page 11: ...et de knop verander je de decimaal 17 Druk op de knop Scherm geeft nu load aan 18 Pak een kalibratie gewicht Deze moet minimaal 75 kilo zijn leg het op de dierkooiweger 19 Als display stable toont links boven druk vervolgens op de knop 20 Als display Pass in display toont dan is de kalibratie geslaagd 21 De computer start automatisch opnieuw op 22 Zet de computer uit on off knop en haal de gewicht...

Page 12: ... A 2n 0 Automatische tarrering Opties 0 5d 1 d 2 d 4 d 0auto Nul setting na het op nul zetten van de weegschaal Opties 0 2 5 10 20 50 100 0range Handmatige nul setting Opties 0 2 5 10 20 50 100 0tare Auto tarrering voor NET modus Druk op Tarra daarna zal NET weight nul zijn Optie on off Speed ADC snelheid instellen Optie 7 5 15 3 0 60 Zero Nieuw nul punt instellen P 2 com Mode Deze optie wordt geb...

Page 13: ...0 Tscale printer LP 50 instellen L ab Print opmaak voor bruto gewicht accumulatie opties Opties lab 0 lab 1 lab 2 lab 3 Prt Instellen print opmaak voor datum tijd opties Opties Prt 0 prt 1 prt 2 prt 3 prt 4 prt 5 prt 6 prt 7 L ang Taal instellen Opties Eng voor Engels P3 cal Deci Decimalen gebruiken instellen Opties 0 0 0 0 00 0 000 Dual Off voorkeur R1 inc Schaalverdeling selecteren Opties 1 2 5 ...

Page 14: ...wkeurig weegt dient deze handmatig te worden gekalibreerd Zie daarvoor hoofdstuk 11 Count Interne telling weergeven gra Lokale zwaartekracht instellen P4 oth Lock Toetsenblokkade instellen Opties on off ani on Rag 1 2 5 10 15 20 25 50 tim 10 20 30 40 50 60 70 80 90 nlk 1 2 5 10 15 20 25 50 off Functie voor dierwegen in uitgeschakelen Ps unit Kg lb lb oz tj hj Unit instellen Opties On Off Tj en Hj ...

Page 15: ...tions 0 2 5 10 20 50 100 0tare Auto tarrering voor NET modus Druk op Tarra daarna zal NET weight nul zijn Option on off Speed ADC snelheid instellen Option 7 5 15 3 0 60 Zero Nieuw nul punt instellen P 2 com Mode Deze optie wordt gebruikt om de accumulatie en RS 232 communicatie in te stellen Opties Cont voortzetten gegevens verzenden St 1 Verzend gegevens eenmalig wanneer stabiel St c Verzend geg...

Page 16: ...t 7 L ang Taal instellen Opties Eng voor Engels P3 cal Deci Decimalen gebruiken instellen Opties 0 0 0 0 00 0 000 Dual Off voorkeur R1 inc Schaalverdeling selecteren Opties 1 2 5 10 20 50 100 200 R1 cap 500 kg Schaalcapaciteit instellen On R1 inc Schaalverdeling selecteren Opties 1 2 5 10 20 50 100 200 R1 cap Schaalcapaciteit instellen Dan op drukken om R2inc en R2 cap in te stellen Cal Nonlin Non...

Page 17: ...rvoor hoofdstuk 11 Count Interne telling weergeven gra Lokale zwaartekracht instellen P4 oth Lock Toetsenblokkade instellen Opties on off ani on Rag 1 2 5 10 15 20 25 50 tim 10 20 30 40 50 60 70 80 90 nlk 1 2 5 10 15 20 25 50 off Functie voor dierwegen in uitschakelen Ps unit Kg lb lb oz tj hj Unit instellen Opties On Off Tj en Hj kan niet tegelijkertijd gebruikt worden P 6 xcl Externe kalibratie ...

Page 18: ...ul setting na het op nul zetten van de weegschaal Opties 0 2 5 10 20 50 100 0range Handmatige nul setting Opties 0 2 5 10 20 50 100 0tare Auto tarrering voor NET modus Druk op Tarra daarna zal NET weight nul zijn Optie on off Speed ADC snelheid instellen Optie 7 5 15 3 0 60 Zero Nieuw nul punt instellen P 2 com Mode Deze optie wordt gebruikt om de accumulatie en RS 232 communicatie in te stellen O...

Page 19: ...tellen print opmaak voor datum tijd opties Opties Prt 0 prt 1 prt 2 prt 3 prt 4 prt 5 prt 6 prt 7 L ang Taal instellen Opties Eng voor Engels P3 cal Deci Decimalen gebruiken instellen Opties 0 0 0 0 00 0 000 Dual Off voorkeur R1 inc Schaalverdeling selecteren Opties 1 2 5 10 20 50 100 200 R1 cap 1995 kg Schaalcapaciteit instellen On R1 inc Schaalverdeling selecteren Opties 1 2 5 10 20 50 100 200 R...

Page 20: ... weegschaal niet nauwkeurig weegt dient deze handmatig te worden gekalibreerd Zie daarvoor hoofdstuk 11 Count Interne telling weergeven gra Lokale zwaartekracht instellen P4 oth Lock Toetsenblokkade instellen Opties on off ani on Rag 1 2 5 10 15 20 25 50 tim 10 20 30 40 50 60 70 80 90 nlk 1 2 5 10 15 20 25 50 off Functie voor dierwegen in uitschakelen Ps unit Kg lb lb oz tj hj Unit instellen Optie...

Page 21: ...D waarde buiten bereik Plateau leegmaken en check of de pan goed is geïnstalleerd Controleer de load cell connectoren Err 9 Onstabiele aflezing Controleer luchtdrukverschillen trillingen RF geluid en of het apparaat ergens tegenaan komt Controleer de load cell connectoren Err 17 Tare out of range Verwijder de lading en start de weegschaal opnieuw op ol Over load Verwijder de lading Opnieuw kalibre...

Page 22: ...en Onstabiele display De goederen raken iets aan Luchtvariatie of trillingen Temperatuur gewijzigd Fout in laadcel of aansluitingen Fout in stroomtoevoer Controleer of de schaal is opgesteld op een acceptabele locatie Controleer de aansluitingen en laadcel Controleer de stroomtoevoer en batterij Gewichtswaarde onjuist Kalibratiefout Lineariteitsafwijking Platform van laadcel raakt iets aan Verkeer...

Page 23: ...ll 28 5 4 Memory Clear 28 5 5 Automatic accumulation 28 6 Parts Counting 28 6 1 Parts Counting Operation 28 7 Animal Weighing and stable detection 29 8 Keypad lock 30 9 Battery 30 10 User settings 30 10 1 Switch backlight on off 30 10 2 Setting Auto Power Off 31 10 3 Concerning a 4 0 BLE BT connection 31 11 Calibrating BWS computer 31 12 Parameters 32 12 1 Parameters for MS EasyScale Pro Select 43...

Page 24: ...n allowing individual weights stored to be retrieved as a total Bluetooth communication is possible within a 10 m range 2 Description of keys Key Description Power ON OFF Set display to zero To perform a tare function subtracts weights Memory recall key shows stored values from the memory Accumulator key stores current values to the memory Send data to printer or PC Shift to Gross Net Weight To ch...

Page 25: ...ting Press and to clear the memory 3 Basic operation 3 1 Resetting the display The indicator can be reset at any time by pressing the key at the point from which you wish to continue weighing or counting within the pre set limit This is usually necessary only when the platform is empty When zero is reached the display shows 0 The weigher has an automatic reset for example when a very small plus or...

Page 26: ...ting a reference weight To set a reference weight tare the empty box first and then place the product in the box The display shows the weight and the number of products present 4 Check Weighing 4 1 Explanation In check weighing an alarm or beep sounds when the weight on the scale reaches or exceeds the value set in the memory The memory stores an upper high and a lower low limit Check mode OK Duri...

Page 27: ...hen the weight is within the limits OK will be shown and beep will sound Check mode ng When the weight is outside the limits the beep will sound and OK will be shown 4 4 Note Note Check weighing is available only if weight is more than 20 units To switch off check weighing enter 0 for both limits by pressing the key While the current limits are displayed press to enter these zero values 5 Accumula...

Page 28: ... on the display press key to enter press key to select the mode press to confirm Display shows current RS 232 status press TARE key and select AUTO Once AUTO has been set the AUTO indicator appears Place a weight on the platform If it is stable a beep sounds twice Weight can now be added or removed When the weight stabilises the beep sounds again Finally remove all weight from the scale The last s...

Page 29: ...is in use Display shows Rag with set values If necessary adjust these using the key and confirm with RAG Set the number of parts in which the stable weight is determined compared with the average weight recorded Setting options 1 2 5 10 15 20 25 and 50 See explanation on setting of parts at the bottom of this page Assume 1 part of 0 5 kg has been chosen and 5 is selected here the range is 2 5 kg 5...

Page 30: ...r example if the scale is not operated for 10 minutes details in technical manual If a key is now pressed K LCK appears on the display To return to operating mode hold the keys down for 2 seconds The display shows ULCK unlock and returns to normal weighing 9 Battery The indicator can operate on a battery if desired The battery life is approximately 70 hours A symbol appears on the display when the...

Page 31: ... flat with all its feet on the ground 2 Make sure that the scale is empty and that nobody leans against it as this affects the calibration 3 Switch on the weighing computer press the on off button 4 Press the button once during start up within 10 sec 5 Display now shows PN 6 Then press the following keys in sequence and 7 Display now shows PO CHT 8 Then press the button 3 times 9 Display now shows...

Page 32: ... Menu Description P 0 chk Set H Set high limit for check weighing Set lo Set low limit for check weighing beep No No beep for check weighing Ok Beep when check weighing within limits ng Beep when check weighing outside limits P1 ref A 2n 0 Automatic zero tracking Options 0 5d 1 d 2 d 4 d 0auto Zero setting range after resetting the scale to zero Options 0 2 5 10 20 50 100 0range Manual zero settin...

Page 33: ...33 Pr 2 Send data to print and accumulation ...

Page 34: ...t the Tscale printer LP 50 L ab To set the print format for gross weight accumulation options Options lab 0 lab 1 lab 2 lab 3 Prt To set the print format for date time options Options Prt 0 prt 1 prt 2 prt 3 prt 4 prt 5 prt 6 prt 7 L ang To set language Options Eng for English P3 cal Deci To set to use decimal Options 0 0 0 0 00 0 000 Dual Off preference R1 inc To select the scale division Options...

Page 35: ... 10 15 20 25 50 tim 10 20 30 40 50 60 70 80 90 nlk 1 2 5 10 15 20 25 50 off To turn animal function on or off Ps unit Kg lb lb oz tj hj To set unit Options on Off When the unit option is on that unit can be active Tj and Hj cannot be used at the same time P 6 xcl External calibration P7 rst To reset the parameter back to the factory settings P8 uw b U w b On To turn Bluetooth function on or off of...

Page 36: ...ions 0 2 5 10 20 50 100 0range Manual zero setting range Options 0 2 5 10 20 50 100 0tare Auto zero tracking for NET mode After pressing tare NET weight will be zero Option on off Speed Set the ADC speed Option 7 5 15 3 0 60 Zero Set new zero point P 2 com Mode This option is used to set accumulation and RS 232 communication Options Cont Continue data sending St 1 Send data once when stable St c S...

Page 37: ...ns Options Prt 0 prt 1 prt 2 prt 3 prt 4 prt 5 prt 6 prt 7 L ang To set language Options Eng for English P3 cal Deci To set to use decimal Options 0 0 0 0 00 0 000 Dual Off preference R1 inc To select the scale division Options 1 2 5 10 20 50 100 200 R1 cap To set the scale capacity On R1 inc To select the scale division Options 1 2 5 10 20 50 100 200 R1 cap To set the scale capacity Then press to...

Page 38: ...5 50 off To turn animal function on or off Ps unit Kg lb lb oz tj hj To set unit Options on Off When the unit option is on that unit can be active Tj and Hj cannot be used at the same time P 6 xcl External calibration P7 rst To reset the parameter back to the factory settings P8 uw b U w b On To turn Bluetooth function on or off off ...

Page 39: ...o Options 0 2 5 10 20 50 100 0range Manual zero setting range Options 0 2 5 10 20 50 100 0tare Auto zero tracking for NET mode After pressing tare NET weight will be zero Option on off Speed Set the ADC speed Option 7 5 15 3 0 60 Zero Set new zero point P 2 com Mode This option is used to set accumulation and RS 232 communication Options Cont Continue data sending St 1 Send data once when stable S...

Page 40: ...t 0 prt 1 prt 2 prt 3 prt 4 prt 5 prt 6 prt 7 L ang To set language Options Eng for English P3 cal Deci To set to use decimal Options 0 0 0 0 00 0 000 Dual Off preference R1 inc To select the scale division Options 1 2 5 10 20 50 100 200 R1 cap To set the scale capacity On R1 inc To select the scale division Options 1 2 5 10 20 50 100 200 R1 cap To set the scale capacity Then press to set R2inc an...

Page 41: ...orrect date Enter the date using format yy mm dd Err 2 Incorrect time Enter the time using format hh mm ss Err 4 Zero setting error Zero setting range exceeded due to switching on 4 max Make sure platform is empty Err 5 Key board error Check the keys and connectors Err 6 A D value out of range Make sure platform is empty and check that pan is installed properly Check the load cell connectors Err 9...

Page 42: ...y is unstable Goods touching somewhere Air variation or vibrations Temperature changed Load cell or connections faulty Power supply faulty Check the scale is in an acceptable location Check the connectors and load cell Check the power supply and battery Weight value incorrect Calibration error Linearity error Platform of load cell touching somewhere Wrong weighing unit Use accurate weight for cali...

Page 43: ...oad cell or mechanism damaged Check the stoppers and locks under the platform Use accurate weight for calibration and linearity Check the load cell Battery not charging Mains voltage problem Charging circuit problem Battery problem Check the mains and adaptor Check the battery Check the charging circuit ...

Page 44: ...erte ansehen 48 5 4 Speicher löschen 48 5 5 Automatisches Summieren 48 6 Stückzahlen einstellen Zählungswiegen 49 7 Tierwiegen und Stabilitätsdetektion 49 8 Tastensperre Schloss 50 9 Batterie Akku 50 10 Benutzereinstellungen 51 10 1 Ein Ausschalten der Hintergrundbeleuchtung 51 10 2 EINSTELLEN AUTOMATISCHES AUSSCHALTEN 51 10 3 Bezüglich 4 0 BLE BT Verbindung 51 11 BWS Computer kalibrieren 51 12 Pa...

Page 45: ...ktion dieser Taste ist die Erhöhung Anpassung aktueller Parametereinstellungen oder anderer Funktionen Drücken Sie beim normalen Wiegen die und Tasten gleichzeitig um das Tierwiegen ein oder auszuschalten Bei stabilem Gewicht in der Tierwiegefunktion ertönt zweimal ein Piepton Speicheraufruf zeigt die Gesamtsumme der gespeicherten Gewichte aus dem Speicher In der Einstellungsfunktion kann man hier...

Page 46: ...Sie einen Karton eine Kiste auf die Plattform das Gewicht wird angezeigt Drücken Sie zum Tarieren auf die Taste Das angezeigte Gewicht wird als Taragewicht gespeichert Dieses wird von der Anzeige abgezogen und die Anzeige zeigt null an Die NET Anzeige wird angezeigt Wenn jetzt ein Produkt gewogen wird wird nur das Gewicht angezeigt Es kann noch ein zweites Mal tariert werden falls z B noch eine an...

Page 47: ...zur Bestätigung auf Mit den und Tasten stellen Sie die Zahlen ein mit der Taste ändern Sie den Wert und mit der Taste löschen Sie den Wert Nach Eingabe des Werts drücken Sie zur Bestätigung die Taste Drücken Sie auf um zurückzukehren 4 3 Einstellen der Probewiegefunktion Drücken Sie gleichzeitig auf und es wird set h angezeigt Mit der Taste wählen Sie Piepton aus drücken Sie zur Bestätigung auf Dr...

Page 48: ...m auf null zurückzukehren und um ein zweites Gewicht auf die Waage zu legen Drücken Sie die Taste In der Anzeige wird ACC 2 angezeigt und anschließend die neue Gesamtsumme Fahren Sie fort bis alle Gewichte hinzugefügt sind 5 3 Gespeicherte Werte ansehen Um die Gesamtsumme anzusehen drücken Sie auf die Taste 5 4 Speicher löschen Drücken Sie die und Tasten gleichzeitig 5 5 Automatisches Summieren Dr...

Page 49: ...er ausgeschaltet werden Schalten Sie die Waage ein um die Stabilitätsdetektion einzustellen Drücken Sie während des Starts den Knopf Die Anzeige zeigt pn an Drücken Sie und Die Anzeige zeigt poch an Drücken Sie bis in der Anzeige p4 oth angezeigt wird Drücken Sie zur Bestätigung die Taste und drücken Sie anschließend auf um Ani auszuwählen Wählen Sie gegebenenfalls mit dem Knopf aus bis in der Anz...

Page 50: ...hen dann den RI inc Hiermit bestimmen Sie die Stückzahl mit der Sie arbeiten möchten Wenn Sie also bei Deci 0 0 Stück pro 100 g ausgewählt haben und jetzt bei RI inc den Wert 5 auswählen bedeutet das dass sie mit 5 x 100 g also auf ein halbes Kilo genau wiegen Bei Deci auf 0 und RI inc auf 5 mit 5 kg Genauigkeit oder bei Deci mit 0 00 und RI inc auf 5 mit 50 g Genauigkeit 8 Tastensperre Schloss Di...

Page 51: ...kunden gedrückt In der Anzeige wird setbl angezeigt Drücken Sie die Taste in der Anzeige wird setoff angezeigt Drücken Sie die Taste um Ihre Auswahl zu treffen Drücken Sie die Taste um die Auto Power Off Zeit oder ON immer EIN oder 5 automatisches Ausschalten nach fünf Minuten nicht verwenden oder 15 automatisches Ausschalten nach 15 Minuten nicht verwenden Drücken Sie zur Bestätigung die Taste Dr...

Page 52: ...dem und können Sie die Nachkommastellen einstellen Mit der Taste wird die Dezimalstelle geändert 17 Drücken Sie die Taste Bildschirm zeigt jetzt Load an 18 Nehmen Sie ein Justiergewicht Diese sollte mindestens 75 Kilo betragen legen Sie sie auf die Käfigwaage 19 Wenn das Display stable anzeigt oben links drücken Sie die Taste 20 Wenn im Display Pass angezeigt wird ist die Kalibrierung erfolgreich ...

Page 53: ... Optionen 0 5 Stk 1 Stk 2 Stk 4 Stk 0auto Nullstellung nachdem die Waage auf null gesetzt wurde Optionen 0 2 5 10 20 50 100 0range Manuell auf null setzen Optionen 0 2 5 10 20 50 100 0tare Autotarierung für den NET Modus Drücken Sie auf Tara danach ist das NET Gewicht auf null gesetzt Option ein aus Geschwindigkeit ADC Geschwindigkeit einstellen Option 7 5 15 30 60 Null Neuen Nullpunkt einstellen ...

Page 54: ...ab Druckformat für Bruttogewicht Summierungsoptionen Optionen lab 0 lab 1 lab 2 lab 3 Prt Einstellen des Druckformat für Datum Zeitoptionen Optionen Prt 0 prt 1 prt 2 prt 3 prt 4 prt 5 prt 6 prt 7 L ang Sprache einstellen Optionen Eng für Englisch P3 cal Deci Dezimalwerte verwenden Optionen 0 0 0 0 00 0 000 Dual Aus empfohlen R1 inc Wiegeskala wählen Optionen 1 2 5 10 20 50 100 200 R1 cap 300 kg W...

Page 55: ...bengenannten theoretischen Kalibrierungswerte nicht genau wiegt muss die Waage von Hand kalibriert werden Siehe dazu Kapitel 11 Count Interne Zählung anzeigen gra Lokale Schwerkraft einstellen P4 oth Lock Tastensperre einstellen Optionen ein aus ani Ein Rag 1 2 5 10 15 20 25 50 tim 10 20 30 40 50 60 70 80 90 nlk 1 2 5 10 15 20 25 50 Aus Tierwiegefunktion ein ausschalten Ps unit kg lb lb oz tj hj E...

Page 56: ... die Waage auf null gesetzt wurde Optionen 0 2 5 10 20 50 100 0range Manuell auf null setzen Optionen 0 2 5 10 20 50 100 0tare Autotarierung für den NET Modus Drücken Sie auf Tara danach ist das NET Gewicht auf null gesetzt Option ein aus Geschwindigkeit ADC Geschwindigkeit einstellen Option 7 5 15 30 60 Null Neuen Nullpunkt einstellen P 2 com Modus Diese Option wird verwendet um die Summierung un...

Page 57: ...Einstellen des Druckformat für Datum Zeitoptionen Optionen Prt 0 prt 1 prt 2 prt 3 prt 4 prt 5 prt 6 prt 7 L ang Sprache einstellen Optionen Eng für Englisch P3 cal Deci Dezimalwerte verwenden Optionen 0 0 0 0 00 0 000 Dual Aus empfohlen R1 inc Wiegeskala wählen Optionen 1 2 5 10 20 50 100 200 R1 cap 500 kg Wiegekapazität einstellen Ein R1 inc Wiegeskala wählen Optionen 1 2 5 10 20 50 100 200 R1 c...

Page 58: ...n Kalibrierungswerte nicht genau wiegt muss die Waage von Hand kalibriert werden Siehe dazu Kapitel 11 Count Interne Zählung anzeigen gra Lokale Schwerkraft einstellen P4 oth Lock Tastensperre einstellen Optionen ein aus ani Ein Rag 1 2 5 10 15 20 25 50 tim 10 20 30 40 50 60 70 80 90 nlk 1 2 5 10 15 20 25 50 Aus Tierwiegefunktion ein ausschalten Ps unit kg lb lb oz tj hj Einheit einstellen Optione...

Page 59: ...rung Optionen 0 5 Stk 1 Stk 2 Stk 4 Stk 0auto Nullstellung nachdem die Waage auf null gesetzt wurde Optionen 0 2 5 10 20 50 100 0range Manuell auf null setzen Optionen 0 2 5 10 20 50 100 0tare Autotarierung für den NET Modus Drücken Sie auf Tara danach ist das NET Gewicht auf null gesetzt Option ein aus Geschwindigkeit ADC Geschwindigkeit einstellen Option 7 5 15 30 60 Null Neuen Nullpunkt einstel...

Page 60: ...at für Bruttogewicht Summierungsoptionen Optionen lab 0 lab 1 lab 2 lab 3 Prt Einstellen des Druckformat für Datum Zeitoptionen Optionen Prt 0 prt 1 prt 2 prt 3 prt 4 prt 5 prt 6 prt 7 L ang Sprache einstellen Optionen Eng für Englisch P3 cal Deci Dezimalwerte verwenden Optionen 0 0 0 0 00 0 000 Dual Aus empfohlen R1 inc Wiegeskala wählen Optionen 1 2 5 10 20 50 100 200 R1 cap 1995 kg Wiegekapazit...

Page 61: ...ie mit Falls die Waage nach der Einstellung der obengenannten theoretischen Kalibrierungswerte nicht genau wiegt muss die Waage von Hand kalibriert werden Siehe dazu Kapitel 11 Count Interne Zählung anzeigen gra Lokale Schwerkraft einstellen P4 oth Lock Tastensperre einstellen Optionen ein aus ani Ein Rag 1 2 5 10 15 20 25 50 tim 10 20 30 40 50 60 70 80 90 nlk 1 2 5 10 15 20 25 50 Aus Tierwiegefun...

Page 62: ...ereichs Plattform leer machen und prüfen ob die Pfanne richtig installiert ist Kontrollieren Sie die Ladezellenstecker Err 9 Instabile Ablesung Kontrollieren Sie Luftverwirbelungen Vibrationen HF Töne und ob das Gerät irgendwo gegenstößt Kontrollieren Sie die Ladezellenstecker Err 17 Tara außerhalb des Bereichs Entfernen Sie die Beladung und starten Sie die Waage erneut ol Außerhalb des Bereichs B...

Page 63: ...l Waren berühren einen anderen Gegenstand Luftveränderung oder Vibrationen Temperaturänderung Wägezelle oder Verbindung fehlerhaft Netzteil defekt Überprüfen ob die Waage an einem passenden Ort aufgestellt ist Anschlüsse und Wägezelle überprüfen Netzteil und Akku überprüfen Gewichtswert falsch Kalibrierungsfehler Linearitätsfehler Plattform der Wägezelle berührt einen anderen Gegenstand Falsche Wi...

Page 64: ...64 beschädigt ...

Page 65: ...9 5 4 Vidage de la mémoire 69 5 5 Pesage cumulatif automatique 69 6 Comptage d objets pesée de comptage 70 7 Pesée d animaux et détection de la stabilisation 70 8 Touches de verrouillage de sûreté 71 9 Pile batterie 71 10 Personnalisation 72 10 1 activation désactivation du rétroéclairage 72 10 2 Réglage de la mise hors tension automatique 72 10 3 Concernant la connexion BLE BT 4 0 72 11 Étalonnag...

Page 66: ...valeurs actuelles des paramètres ou autres fonctions Presser et simultanément en pesage normal pour activer ou désactiver le mode Pesée d animaux Une fois le poids stabilisé en mode Pesée d animaux on entend 2 brefs signaux sonores Affiche la mémoire montrant le poids total enregistré en mémoire En mode Réglage cette touche sert à activer les chiffres corrects Maintenir enfoncée la touche permet d...

Page 67: ...la bascule son poids s affiche sur l écran Appuyer sut la touche pour procéder au tarage Le poids affiché est mis en mémoire comme poids de tare et disparaît de l écran qui affiche 0 L indicateur Net s affiche Si on pèse alors un produit seul son poids sera affiché On peut encore procéder à un second tarage si par exemple un autre produit est ajouté au premier Là encore seul le poids de ce produit...

Page 68: ...e SET H limite supérieure et SET L limite inférieure appuyer sur pour commencer la saisie utiliser les touches et pour changer les chiffres la touche pour modifier la valeur et la touche pour la consulter Après avoir saisi la valeur voulue appuyer sur pour confirmer ou sur pour revenir en arrière 4 3 Réglage du mode Pesage de contrôle Appuyer sur et simultanément l écran affiche set h puis avec la...

Page 69: ...transmettre ce poids à une imprimante ou un ordinateur Enlever tout de la bascule pour revenir à l affichage zéro et déposer un nouvel objet à peser sur la bascule Appuyer sur la touche l écran affiche ACC 2 suivi du nouveau total Continuer ainsi pour tous les objets à peser 5 3 Affichage du contenu de la mémoire Pour lire le total appuyer sur 5 4 Vidage de la mémoire Appuyer simultanément sur les...

Page 70: ... affiche pochAppuyer sur jusqu à ce que l écran affiche p4 othAppuyer sur pour confirmer puis appuyer sur pour sélectionner AniAu besoin utiliser la touche pour sélectionner jusqu à faire apparaître On sur l écran et confirmer à nouveau avec Le réglage On vous permet d utiliser la détection de stabilisation L écran affiche Rag suivi de la valeur du réglage Au besoin modifier cette valeur avec la t...

Page 71: ...sur 5 précision à 5 kg près et avec Deci sur 0 00 et RI inc sur 5 précision à 50 g près 8 Touches de verrouillage de sûreté Cette fonction quand elle est installée intervient quand la bascule n a pas été utilisée pendant 10 minutes détails dans le manuel technique alors si on appuie sur une touche l écran affiche K LCK verrouillé Pour revenir en mode de fonctionnement maintenir les touches enfoncé...

Page 72: ...atique après 15 minutes sans utilisation appuyer sur pour confirmer appuyer sur pour revenir en arrière 10 3 Concernant la connexion BLE BT 4 0 Le mot de passe requis est 1234 pour se connecter Le nom par défaut à trouver est SCALE001 11 Étalonnage de l ordinateur BWS 1 Assurez vous que la peseuse pour cage d animaux est de niveau et plate avec tous ses pieds sur le sol 2 Assurez vous que la balan...

Page 73: ...imal 17 Appuyez ensuite sur le bouton L écran affiche maintenant load 18 Prenez un poids d étalonnage Il doit être d au moins 75 kilogrammes placez le sur la peseuse pour cage d animaux 19 Si l écran affiche stable en haut à gauche appuyez sur la touche 20 Si l écran affiche Pass l étalonnage est réussi 21 L ordinateur redémarre automatiquement 22 Éteignez l ordinateur à l aide du bouton marche ar...

Page 74: ...matique Options 0 5 incréments 1 inc 2 inc 4 incréments 0auto Mise à zéro après avoir mis à zéro la bascule Options 0 2 5 10 20 50 100 0range Mise à zéro manuelleOptions 0 2 5 10 20 50 100 0tare Auto tarage pour mode NET Appuyer sur mettant le poids NET à zéro Options on off Speed Réglage vitesse ADC Options 7 5 15 30 60 Zero Réglage du nouveau point zéro P 2 com Mode Cette option sert à régler l ...

Page 75: ...ns Prt 0 prt 1 prt 2 prt 3 prt 4 prt 5 prt 6 prt 7 L ang Configuration langue Options Eng anglais P3 cal Deci Réglage utilisation des décimalesOptions 0 0 0 0 00 0 000 Dual Off conseillé R1 inc Sélection de l incrément de pesée Options 1 2 5 10 20 50 100 200 R1 cap 300 kg Sélection de la capacité de la bascule On R1 inc Sélection de l incrément de pesée Options 1 2 5 10 20 50 100 200 R1 cap Réglag...

Page 76: ...u compteur interne gra Réglage de la gravité locale P4 oth Lock Réglage du verrouillage du clavier Options on off ani on Rag 1 2 5 10 15 20 25 50 tim 10 20 30 40 50 60 70 80 90 nlk 1 2 5 10 15 20 25 50 off Mise en hors tension du pesage d animaux Ps unit Kg lb lb oz tj hj Réglage des unités Options On Off Tj et Hj ne peuvent être employés simultanément P 6 xcl Étalonnage externe P7 rst Rétablissem...

Page 77: ...à zéro manuelle Options 0 2 5 10 20 50 100 0tare Auto tarage pour mode NET Appuyer sur mettant le poids NET à zéro Options on off Speed Réglage vitesse ADCOptions 7 5 15 30 60 Zero Réglage du nouveau point zéro P 2 com Mode Cette option sert à régler l accumulation et le transfert de données RS 232 Options Cont transfert de données en continu St 1 Envoi des données en une fois après stabilisation ...

Page 78: ...10 20 50 100 200 R1 capRéglage de la capacité de la bascule Puis appuyer sur pour le réglage de R2 inc et R2 cap Cal Nonlin Réglage non linéaire de l étalonnage Linear Réglage linéaire de l étalonnage n cal Zero Valeur d étalonnage théorique 0 1080 Au besoin modifier cette valeur avec la touche et confirmer avec lccap Valeur d étalonnage théorique 0748 0 Au besoin modifier cette valeur avec la tou...

Page 79: ...du pesage d animaux Ps unit Kg lb lb oz tj hj Réglage des unités Options On Off Tj et Hj ne peuvent être employés simultanément P 6 xcl Étalonnage externe P7 rst Rétablissement des réglages usine P8 uw b U w b On Activation désactivation de Bluetooth off ...

Page 80: ...0 Tarage automatique Options 0 5 incréments 1 inc 2 inc 4 incréments 0auto Mise à zéro après avoir mis à zéro la bascule Options 0 2 5 10 20 50 100 0range Mise à zéro manuelleOptions 0 2 5 10 20 50 100 0tare Auto tarage pour mode NET Appuyer sur mettant le poids NET à zéro Options on off Speed Réglage vitesse ADCOptions 7 5 15 30 60 Zero Réglage du nouveau point zéro P 2 com Mode Cette option sert...

Page 81: ...prt 2 prt 3 prt 4 prt 5 prt 6 prt 7 L ang Configuration langue Options Eng anglais P3 cal Deci Réglage utilisation des décimalesOptions 0 0 0 0 00 0 000 Dual Off consei llé R1 inc Sélection de l incrément de pesée Options 1 2 5 10 20 50 100 200 R1 cap 1 995 kg Sélection de la capacité de la bascule On R1 inc Sélection de l incrément de pesée Options 1 2 5 10 20 50 100 200 R1 cap Réglage de la capa...

Page 82: ... cela le chapitre 11 Count Affichage du compteur interne gra Réglage de la gravité locale P4 oth Lock Réglage du verrouillage du clavierOptions on off ani on Rag 1 2 5 10 15 20 25 50 tim 10 20 30 40 50 60 70 80 90 nlk 1 2 5 10 15 20 25 50 off Mise en hors tension du pesage d animaux Ps unit Kg lb lb oz tj hj Réglage des unitésOptions On Off Tj et Hj ne peuvent être employés simultanément P 6 xcl É...

Page 83: ...amp Vider le plateau et vérifier l installation de la bascule Contrôler les connecteurs de la cellule de charge Err 9 Lecture instable Rechercher les courants d air les vibrations le bruit de fond radio et si l appareil est en contact avec autre chose Contrôler les connecteurs de la cellule de charge Err 17 Tare hors champ Enlever la charge et redémarrer la bascule ol Poids hors limite Enlever la ...

Page 84: ...e la cellule de charge Vérifiez si la plateforme est correctement installée Essayez de rallumer la balance Recalibrez La valeur affichée est instable Contact avec les articles Vibrations ou variation de l air Changement de température Défaillance au niveau des connexions ou de la cellule de charge Défaillance au niveau de l alimentation Vérifiez si la balance est située dans un endroit adapté Véri...

Page 85: ...ilisation pour le transport n ont pas été retirés Erreur de linéarité Mécanisme ou cellule de charge endommagés Vérifiez les dispositifs de butée et de verrouillage sous la plateforme Utilisez un poids exact pour le calibrage et la linéarité Vérifiez la cellule de charge ...

Page 86: ... memoria 90 5 4 Borrar la memoria 90 5 5 Suma automática 90 6 Contar unidades pesaje de contar 91 7 Pesaje de animales y detección de estabilidad 91 8 Bloqueo de teclas seguro 92 9 Batería acumulador 92 10 Ajustes del usuario 93 10 1 Conexión y desconexión de la retroiluminación 93 10 2 AJUSTE de la DESCONEXIÓN AUTOMÁTICA 93 10 3 Con respecto a la conexión 4 0 BLE BT 93 11 Calibración del ordenado...

Page 87: ...de esta tecla es aumentar adaptar el ajuste actual de los parámetros u otras funciones Pulsar las teclas y simultáneamente con pesaje normal para conectar o desconectar el Pesaje de animales En caso de peso estable con la función de pesaje de animales se oyen dos pitidos Si se activa la memoria se visualiza el total de los pesos acumulados en la memoria En la función de ajuste se pueden activar la...

Page 88: ... si es necesario Se visualiza el indicador de CERO Colocar una caja sobre la plataforma El peso se visualiza en el display Pulsar la tecla para calcular la tara El peso indicado es memorizado como el peso de la tara el cual se resta del display el display visualiza 0 Aparece el indicador NET Si en ese momento se pesa un producto se visualizará únicamente ese peso Podría volver a calcularse la tara...

Page 89: ...za set h mediante la tecla se puede seleccionar SET H o SET L pulsar para introducir mediante las teclas y se cambia la cifra mediante la tecla se puede cambiar el valor mediante la tecla se puede borrar el valor Tras la introducción del valor pulsar la tecla para confirmar pulsar para volver 4 3 Ajuste de la función de pesaje de comprobación Al pulsar y simultáneamente el display visualiza set h ...

Page 90: ... un PC Quitar todo el peso para volver a cero y para colocar un segundo peso sobre la báscula Pulsar la tecla el display visualiza ACC 2 y a continuación el nuevo total Continuar de este modo hasta que se hayan añadido todos los pesos 5 3 Ver la memoria Para ver los totales pulsar la tecla 5 4 Borrar la memoria Pulsar las teclas y simultáneamente 5 5 Suma automática Durante la autocomprobación pul...

Page 91: ... de animales Para ajustar la detección estable conectar la báscula Pulsar la tecla durante el proceso de inicio El display visualiza pn Pulsar y el display visualiza poch Pulsar hasta que el display visualice p4 oth Pulsar la tecla para confirmar y a continuación pulsar para seleccionar Ani Dado el caso seleccionar mediante la tecla hasta que el display visualice On y confirmar de nuevo con Con el...

Page 92: ... RI inc el valor 5 esto significa que se va a trabajar con 5 x 100 gramos es decir con una precisión de medio kilo Con Deci a 0 y con RI inc a 5 es una precisión de 5 kilos Con Deci a 0 00 y RI inc a 5 es una precisión de 50 gramos 8 Bloqueo de teclas seguro Esta función puede ser ajustada p ej cuando no se vaya a utilizar la báscula durante 10 minutos los detalles se encuentran en el manual técni...

Page 93: ...ección pulsar la tecla para seleccionar con referencia al tiempo de desconexión automática o ON siempre CONECTADO o 5 desconexión automática tras 5 min de no utilización o 15 desconexión automática tras 15 minutos de no utilización Pulsar la tecla para confirmar pulsar la tecla para volver 10 3 Con respecto a la conexión 4 0 BLE BT La contraseña requerida es 1234 para conectarse El nombre por defe...

Page 94: ...los decimales Con el botón puedes cambiar el punto decimal 17 A continuación pulse el botón La pantalla muestra ahora la Load 18 Tome un peso de calibración Esta debe ser de al menos 75 kilogramos colóquela en la báscula para jaulas de animales 19 Si la pantalla muestra stable arriba a la izquierda pulse el botón 20 Si la pantalla muestra Pass la calibración se ha realizado correctamente 21 El ord...

Page 95: ...del límite P1 ref A 2n 0 Cálculo de tara automático Opciones 0 5 d 1 d 2 d 4 d 0auto Ajuste a cero tras haber puesto a cero la báscula Opciones 0 2 5 10 20 50 100 0range Ajuste a cero manual Opciones 0 2 5 10 20 50 100 0tare Cálculo de tara automático para modo NET Pulsar tecla de tara a continuación el peso NET será cero Opción on off Speed Ajuste de la velocidad ADC Opción 7 5 15 30 60 Zero Nuev...

Page 96: ... impresora Tscale L ab Formato de impresora para peso bruto opciones de acumulación Opciones lab 0 lab 1 lab 2 lab 3 Prt Ajuste de formato de impresora para opciones de fecha hora Opciones Prt 0 prt 1 prt 2 prt 3 prt 4 prt 5 prt 6 prt 7 L ang Ajuste del idioma Opciones Eng para inglés P3 cal Deci Ajuste del uso de decimales Opciones 0 0 0 0 00 0 000 Dual Off preferencia R1 inc Seleccionar graduaci...

Page 97: ...iormente la báscula no pesa con precisión será preciso efectuar un calibrado manual Para ello véase el capítulo 11 Count Visualizar el recuento interno gra Ajuste de la fuerza de gravedad local P4 oth Lock Ajuste del bloqueo del teclado Opciones on off ani on Rag 1 2 5 10 15 20 25 50 tim 10 20 30 40 50 60 70 80 90 nlk 1 2 5 10 15 20 25 50 off Conectar desconectar la función de pesaje de animales P...

Page 98: ...ste a cero tras haber puesto a cero la báscula Opciones 0 2 5 10 20 50 100 0range Ajuste a cero manual Opciones 0 2 5 10 20 50 100 0tare Cálculo de tara automático para modo NET Pulsar tecla de tara a continuación el peso NET será cero Opción on off Speed Ajuste de la velocidad ADC Opción 7 5 15 30 60 Zero Nuevo ajuste del punto cero P 2 com Mode Esta opción se utiliza para ajustar la acumulación ...

Page 99: ... hora Opciones Prt 0 prt 1 prt 2 prt 3 prt 4 prt 5 prt 6 prt 7 L ang Ajuste del idioma Opciones Eng para inglés P3 cal Deci Ajuste del uso de decimales Opciones 0 0 0 0 00 0 000 Dual Off prefer encia R1 inc Seleccionar graduación Opciones 1 2 5 10 20 50 100 200 R1 cap 500 kg Ajustar la capacidad de la escala On R1 inc Seleccionar graduación Opciones 1 2 5 10 20 50 100 200 R1 cap Ajustar la capacid...

Page 100: ...ibrado manual Para ello véase el capítulo 11 Count Visualizar el recuento interno gra Ajuste de la fuerza de gravedad local P4 oth Lock Ajuste del bloqueo del teclado Opciones on off ani on Rag 1 2 5 10 15 20 25 50 tim 10 20 30 40 50 60 70 80 90 nlk 1 2 5 10 15 20 25 50 off Conectar desconectar la función de pesaje de animales Ps unit Kg lb lb oz tj hj Ajuste de la unidad Opciones On Off Tj y Hj n...

Page 101: ...bación está fuera del límite P1 ref A 2n 0 Cálculo de tara automático Opciones 0 5 d 1 d 2 d 4 d 0auto Ajuste a cero tras haber puesto a cero la báscula Opciones 0 2 5 10 20 50 100 0range Ajuste a cero manual Opciones 0 2 5 10 20 50 100 0tare Cálculo de tara automático para modo NET Pulsar tecla de tara a continuación el peso NET será cero Opción on off Speed Ajuste de la velocidad ADC Opción 7 5 ...

Page 102: ...50 de la impresora Tscale L ab Formato de impresora para peso bruto opciones de acumulación Opciones lab 0 lab 1 lab 2 lab 3 Prt Ajuste de formato de impresora para opciones de fecha hora Opciones Prt 0 prt 1 prt 2 prt 3 prt 4 prt 5 prt 6 prt 7 L ang Ajuste del idioma Opciones Eng para inglés P3 cal Deci Ajuste del uso de decimales Opciones 0 0 0 0 00 0 000 Dual Off preferencia R1 inc Seleccionar ...

Page 103: ... tras el ajuste de los valores teóricos de calibrado indicados anteriormente la báscula no pesa con precisión será preciso efectuar un calibrado manual Para ello véase el capítulo 11 Count Visualizar el recuento interno gra Ajuste de la fuerza de gravedad local P4 oth Lock Ajuste del bloqueo del teclado Opciones on off ani on Rag 1 2 5 10 15 20 25 50 tim 10 20 30 40 50 60 70 80 90 nlk 1 2 5 10 15 ...

Page 104: ... A D fuera de rango Vaciar la plataforma y comprobar si el recipiente está correctamente instalado Controlar los conectores de la célula de carga Err 9 Lectura inestable Controlar las variaciones de aire vibraciones sonido RF y si el aparato roza con algo Controlar los conectores de la célula de carga Err 17 Tara fuera de rango Retirar la carga y reiniciar la báscula de nuevo ol Sobre el rango Ret...

Page 105: ... de carga o el mecanismo están dañados Compruebe que la plataforma está instalada correctamente Intente encender la báscula de nuevo Vuelva a calibrar La pantalla es inestable Los productos hacen contacto en algún punto Variación de aire o vibraciones Ha cambiado la temperatura La célula de carga o las conexiones están dañadas La alimentación eléctrica es defectuosa Compruebe que la báscula está e...

Page 106: ...s de protección de sobrecarga o los seguros de transporte Error de linealidad La célula de carga o el mecanismo están dañados Compruebe los tapones y los seguros de debajo de la plataforma Utilice un peso preciso para calibración y linealidad Compruebe la célula de carga ...

Page 107: ...Cancellare la memoria 111 5 5 Somma automatica 111 6 Conteggio dei pezzi 112 7 Pesatura di animali e rilevamento del peso stabile 112 8 Blocco dei tasti 113 9 Batteria accumulatore 113 10 Impostazioni personalizzate 114 101 Inserimento disinserimento della retroilluminazione 114 10 2 IMPOSTAZIONE DELLO SPEGNIMENTO AUTOMATICO 114 10 3 Per quanto riguarda la connessione 4 0 BLE BT 114 11 Calibrazion...

Page 108: ...o tasto è l aumento o la modifica dell impostazione attuale dei parametri o di altre funzioni Premere i tasti e contemporaneamente nella pesatura normale per attivare o disattivare la funzione pesatura di animali Quando il peso della funzione pesatura animale è stabile si sentono due segnali sonori Richiamando la memoria viene visualizzato il totale dei pesi presente in memoria Nella funzione di i...

Page 109: ...ero Mettere una scatola cassa sulla piattaforma il suo peso apparirà sul display Premere il tasto per calcolare la tara Il peso visualizzato viene memorizzato come tara viene sottratto dal display il display visualizza 0 Appare l indicazione NETTO Se ora viene pesato un prodotto verrà visualizzato solo quel peso È possibile calcolare la tara una seconda volta se per esempio viene aggiunto un altro...

Page 110: ...asto si seleziona SET H o SET L premere per inserire con il tasto e il tasto si modifica la cifra con il tasto si modifica il valore con il tasto si elimina il valore Dopo l inserimento del valore premere il tasto per confermare il tasto per tornare indietro 4 3 Impostazione della funzione di controllo del peso Premere e contemporaneamente il display visualizza set h con il tasto selezionare il se...

Page 111: ...are a zero e appoggiare il secondo oggetto sulla bilancia Premere il tasto il display visualizza ACC 2 e quindi il nuovo totale Continuare in questo modo fino a quando sono stati aggiunti tutti i valori di peso 5 3 Verificare la memoria Per verificare i totali premere il tasto 5 4 Cancellare la memoria Premere i tasti e contemporaneamente 5 5 Somma automatica Durante il controllo automatico premer...

Page 112: ...e di pesatura degli animali può essere attivata o disattivata Per impostare il rilevamento stabile avviare la bilancia Premere il tasto durante la procedura di avvio Il display visualizza pn Premere e il display visualizza poch Premere fino a che il display visualizza p4 oth Premere il tasto per confermare e poi premere Ani per selezionare Con il tasto selezionare fino a che il display non visuali...

Page 113: ...orare Se in Deci avete scelto 0 0 pezzi per 100 grammi e in RI selezionate 5 come valore questo significa che peserete con una precisione di mezzo chilo cioè 5 x 100 grammi Con Deci su 0 e RI inc su 5 la precisione è 5 chili con Deci su 0 00 e RI inc su 5 la precisione è 50 grammi 8 Blocco dei tasti Questa funzione può essere impostata per esempio quando la bilancia non viene utilizzata per 10 min...

Page 114: ...ire ciò che si desidera premere il tasto per selezionare l autoaccensione sempre off oppure ON sempre ON oppure 5 auto spegnimento dopo 5 minuti oppure 15 auto spegnimento dopo 15 minuti di non utilizzo premere il tasto per confermare premere il tasto per tornare indietro 10 3 Per quanto riguarda la connessione 4 0 BLE BT La password richiesta è 1234 per connettersi Il nome predefinito da trovare ...

Page 115: ... il pulsante si può cambiare il punto decimale 17 Poi premi il pulsante Lo schermo ora mostra il load 18 Prendere un peso di calibrazione Questo deve essere di almeno 75 chilogrammi metterlo sulla pesa per gabbie di animali 19 Se il display mostra stable in alto a sinistra premere il pulsante 20 Se il display mostra Pass nel display allora la calibrazione è riuscita 21 Il computer si riavvia autom...

Page 116: ...one automatica Opzioni 0 5d 1 d 2 d 4 d 0auto Settaggio a zero dopo l azzeramento della bilancia Opzioni 0 2 5 10 20 50 100 0range Azzeramento manuale Opzioni 0 2 5 10 20 50 100 0tare Calibrazione automatica per la modalità NET Premere Tara il peso netto sarà zero Opzione on off Speed Impostazione velocità ADC Opzione 7 5 15 3 0 60 Zero Impostazione nuovo azzeramento P 2 com Mode Questa opzione vi...

Page 117: ...stazione stampante LP 50 L ab Impaginazione stampa per peso lordo opzioni totale cumulativo Opzioni lab 0 lab 1 lab 2 lab 3 Prt Impostazione impaginazione stampa per opzioni data ora Opzioni Prt 0 prt 1 prt 2 prt 3 prt 4 prt 5 prt 6 prt 7 L ang Impostazione lingua Opzioni Eng per Inglese P3 cal Deci Impostazione numero decimali Opzioni 0 0 0 0 00 0 000 Dual Off preferito R1 inc Selezione graduazio...

Page 118: ...calibrazione la bilancia non pesa correttamente è necessario eseguire la calibrazione manualmente Si veda il capitolo 11 Count Visualizzazione conteggio interno gra Impostazione gravità locale P4 oth Lock Impostazione blocco tasti Opzioni on off ani on Rag 1 2 5 10 15 20 25 50 tim 10 20 30 40 50 60 70 80 90 nlk 1 2 5 10 15 20 25 50 off Funzioni per attivazione disattivazione pesatura animali Ps un...

Page 119: ...opo l azzeramento della bilancia Opzioni 0 2 5 10 20 50 100 0range Azzeramento manuale Opzioni 0 2 5 10 20 50 100 0tare Calibrazione automatica per la modalità NET Premere Tara il peso netto sarà zero Opzioni on off Speed Impostazione velocità ADC Opzioni 7 5 15 3 0 60 Zero Impostazione nuovo azzeramento P 2 com Mode Questa opzione viene utilizzata per impostare il totale cumulativo e la comunicaz...

Page 120: ...nazione stampa per opzioni data ora Opzioni Prt 0 prt 1 prt 2 prt 3 prt 4 prt 5 prt 6 prt 7 L ang Impostazione lingua Opzioni Eng per Inglese P3 cal Deci Impostazione numero decimali Opzioni 0 0 0 0 00 0 000 Dual Off preferito R1 inc Selezione graduazione bilancia Opzioni 1 2 5 10 20 50 100 200 R1 cap 500 kg Impostazione capacità bilancia On R1 inc Selezione graduazione bilancia Opzioni 1 2 5 10 2...

Page 121: ...eguire la calibrazione manualmente Si veda il capitolo 11 Count Visualizzazione conteggio interno gra Impostazione gravità locale P4 oth Lock Impostazione blocco tasti Opzioni on off ani on Rag 1 2 5 10 15 20 25 50 tim 10 20 30 40 50 60 70 80 90 nlk 1 2 5 10 15 20 25 50 off Funzioni per attivazione disattivazione pesatura animali Ps unit Kg lb lb oz tj hj Impostazione unità Opzioni On Off Tj e Hj ...

Page 122: ...ti P1 ref A 2n 0 Calibrazione automatica Opzioni 0 5d 1 d 2 d 4 d 0auto Settaggio a zero dopo l azzeramento della bilancia Opzioni 0 2 5 10 20 50 100 0range Azzeramento manuale Opzioni 0 2 5 10 20 50 100 0tare Calibrazione automatica per la modalità NET Premere Tara il peso netto sarà zero Opzione on off Speed Impostazione velocità ADC Opzione 7 5 15 3 0 60 Zero Impostazione nuovo azzeramento P 2 ...

Page 123: ...so lordo opzioni totale cumulativo Opzioni lab 0 lab 1 lab 2 lab 3 Prt Impostazione impaginazione stampa per opzioni data ora Opzioni Prt 0 prt 1 prt 2 prt 3 prt 4 prt 5 prt 6 prt 7 L ang Impostazione lingua Opzioni Eng per Inglese P3 cal Deci Impostazione numero decimali Opzioni 0 0 0 0 00 0 000 Dual Off preferito R1 inc Selezione graduazione bilancia Opzioni 1 2 5 10 20 50 100 200 R1 cap 1995 kg...

Page 124: ...eorici di calibrazione la bilancia non pesa correttamente è necessario eseguire la calibrazione manualmente Si veda il capitolo 11 Count Visualizzazione conteggio interno gra Impostazione gravità locale P4 oth Lock Impostazione blocco tasti Opzioni on off ani on Rag 1 2 5 10 15 20 25 50 tim 10 20 30 40 50 60 70 80 90 nlk 1 2 5 10 15 20 25 50 off Funzioni per attivazione disattivazione pesatura ani...

Page 125: ...attaforma e controllare se il contenitore è installato correttamente Controllare i connettori della cella di carico Err 9 Lettura instabile Controllare le variazioni di pressione le variazioni il rumore della radiofrequenza e se il dispositivo urta contro qualcosa Controllare i connettori della cella di carico Err 17 Tara fuori limite Togliere il prodotto e riavviare la bilancia ol Carico eccessiv...

Page 126: ...he la piattaforma sia stata installata correttamente Provare a riaccendere la bilancia Effettuare nuovamente la taratura Il display è instabile Il carico tocca qualcosa Variazioni d aria o vibrazioini La temperatura è cambiata Trasduttore o connettori guasti Alimentatore guasto Verificare che la bilancia si trovi in posizione accettabile Controllare i connettori e i trasduttori Controllare l alime...

Page 127: ...trasporto non sono stati rimossi Errore di linearità Trasduttore o meccanismo danneggiati Verificare i fermi e gli elementi di bloccaggio sotto la piattaforma Usare un peso accurato per la taratura e la linearità Controllare il trasduttore ...

Page 128: ...128 ...

Reviews: