OPERATOR’S MANUAL
59
C2G rondo
Version: 27201 - H
Schmalenberger GmbH + Co. KG
D-72072 Tübingen / Germany
4.6
Installation - general
4.7
Mounting the installation kit / Pre-fabricated pool
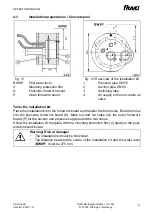
fig. 15
Place the base frame in the desired
position. Fasten the base frame with 4
screws (S).
Warning!
The base frame should be installed in
such a way that it is insulated from the
floor and the wall (I) to avoid the
possibility
of
external
voltage
transmissions.
I
Insulation
S
Screw
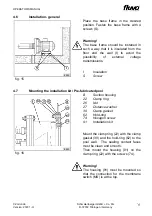
fig. 16
B
Suction housing
22
Clamp ring
26
Nut
27
Distance washer
39
Clamp gasket
62
Hold-ring
74
Hexagon screw
91
Installation kit
Mount the clamp ring (22) with the clamp
gasket (39) and the hold-ring (62) to the
pool wall. The sealing contact faces
must be clean and smooth.
Then mount the housing (91) on the
clamp ring (22) with the screws (74).
Warning!
The housing (91) must be mounted so
that the connection for the membrane
switch (MS) is at the top.
8222
8223
11


