5
SLB440
SLB450
Operating instructions
Safety light barriers
EN
3. Mounting
3.1 General conditions
The following guidelines are provided as preventive warning notices
to ensure a safe and appropriate handling These guidelines are an
essential part of the safety instructions and therefore must always be
observed and respected
• The AOPD must not be used on machines which cannot be
stopped electrically in case of emergency
• The safety distance between the AOPD and a hazardous
machine movement must always be observed
• Additional mechanical safety guards must be installed so that
the operator has to pass by the protection field to reach the
hazardous machine parts
• The AOPD must be installed so that the personnel is always
within the detection zone when operating the machine An
incorrect installation can lead to serious injuries
• Never connect the outputs to +24VDC If the outputs are
wired to +24VDC, they are in ON state, as a result of which
they are unable to stop a hazardous situation occurring on the
application/machine
• The safety inspections must be conducted regularly
• The AOPD must not be exposed to inflammable or explosive
gasses
• The connecting cables must be connected in accordance with
the installation instructions
• The fixing screws of the end caps and the mounting angle
must be firmly tightened
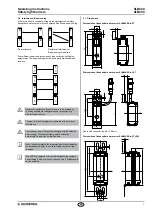
3.2 Protection field and approach
Additional protective devices must ensure that the operator has to pass
by the protection field to reach the hazardous machine parts
The AOPD must be installed so that personnel are always located
within the detection zone of the safety device when operating the
hazardous machine parts to be secure
3.3 Aligning the sensors
Procedure:
1 Transmitter and receiver must be fitted parallel to each other and at
the same height
2 First turn the transmitter and then the receiver so that the front
covers are opposite each other until the integrated signal lamp lights
up green (operating mode automatic) or yellow (operating mode
restart interlock)
3 Adjust the transmitter and receiver so that they are in the middle of
the angular range for a green or yellow indication Fix the position
with the two screws for the mounting bracket
3.4 Alignment mode
In this operating mode, the signal strength is indicated by yellow light
impulses The better the alignment, the higher the frequency of the light
pulses The alignment is optimal when the light pulses switch over to
continuous light
If there is no optical synchronisation between the transmitter and the
receiver, a light pulse is emitted every three seconds
Alignment mode is terminated by switching off the supply voltage
Activating alignment mode with 5-pole cable connection
If through power-up 24V is applied to the restart input via a pushbutton
for at least 2 seconds the device will start in alignment mode The push
button can be released as soon as the indicator changes from red to
yellow
Activating setup mode with 4-pole cable connection
If +24V is applied for at least 2 seconds when the system starts at the
"OSSD 1" output, the receiver unit starts in alignment mode
If setup mode is activated with 24V at OSSD 1, the outputs
OSSD 1 and OSSD 2 must not be connected to the machine
or the machine controls
Activating setup mode with adapter cable KA-0977
Connect the adapter cable to the device Press and hold the integrated
button and switch the supply voltage on The button can be released as
soon as the indicator changes from red to yellow
Integrated alignment tool (only SLB450)
The receiver has an integrated LED behind the front cover which
acts as an alignment aid by making the optical detection range of the
receiver visible The light impulses of the alignment aid are only visible
if the person viewing them is within the detection angle The transmitter
should be mounted in a position at which the integrated alignment aid is
clearly visible
As soon as the receiver unit detects a signal from the transmitter, the
number of output light impulses changes:
2 impulses
No reception
3 impulses
Weak reception
4 impulses
Adequate reception
5 impulses
Optimum reception
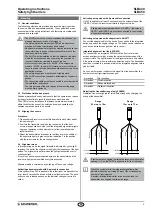
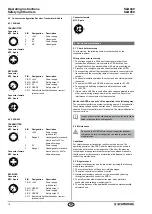
Adjusting the transmitter range (only SLB450)
Operation can be configured for two different ranges by changing the
wiring at the transmitter
Range
0.3 m up to 18 m
Range
12 m up to 75 m
+24VDC
2
3
4
1
0
VDC
Range 1
Range 2
0 VDC
+24 VDC
+24VDC
2
3
4
1
0
VDC
Range 1
Range 2
0 VDC
+24 VDC
If systems are configured to alternative range but with smaller
spacing (<12 m), the AOPD is exposed to a risk of reflection
When the system starts, the integrated signal lamp first
indicates the set beam coding by way of the corresponding
number of light impulses
If another impulse follows after a two second break, the
transmitter is configured to alternative range


