4
Operating instructions
Safety light barriers
SLB440
SLB450
EN
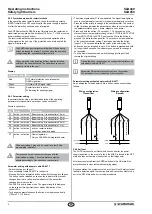
2.8.2 Protection mode with restart interlock
In the operating mode restart interlock, the safety switching outputs
(OSSD) remain in the OFF condition after the power supply is applied
or after the protection zone has been interrupted
The AOPD switches the OSSDs to the ON state once the restart input
signal impulse is applied with a duration of 100 ms < T < 1500 ms using
a command device (push button)
The receiver indicates the readiness for authorized operation with a
yellow signal on the end cap If the protection zone is interrupted, the
signal will indicate red
The AOPD changes to alignment aid mode if the enabling
button is pressed for at least 2 seconds when the operating
voltage is applied, see chapter Alignment aid
The command device (enabling button) must be installed
outside of the hazardous area The hazardous zone must
be easily visible to the user
Display
Diagnostic lamp Status
Red
OFF state (protection zone interrupted,
OSSD signal low)
Green
ON state (OSSD signal high)
Yellow
Restart interlock is active,
SLB waiting for enabling signal
2.8.3 Parameter setting
In parameterisation mode, individual adaptation of the operating
parameters for transmitter and receiver can be carried out
Possible options are:
No. Option
Description
P1
active / not active
Beam coding 1 (response time 10 ms)
P2
active / not active
Beam coding 2 (response time 14 ms)
P3
active / not active
Beam coding 3 (response time 18 ms)
P4
active / not active
Beam coding 4 (response time 25 ms)
P5
active / not active
Beam coding 5 (response time 7 ms)
P6
active / not active
active = restart interlock
not active= automatic mode
P7
active / not active
Heater regulation:
Only on SLB450 with integrated heater
The beam coding 5 may only be used if no other SLBs
are operated in parallel
The response time of the system changes with the
selected beam coding The safety distance must be
adapted accordingly See section on reaction time
Parameter setting with adapter cable KA-0977
• Switch the supply voltage off
• Connect adapter cable KA-0977 to the device
• Press and hold the integrated button and switch the supply voltage on
The button can be released as soon as the indicator of the receiver
changes from red to yellow and the indicator of the transmitter
changes from blue to yellow
• The AOPD is now in setup mode The signal strength is displayed
on the receiver through impulses or steady illumination of the
yellow LEDs
• To change to parameterisation, the button must be pressed briefly
(100 ms < T < 1500 ms)
• The status of parameter P1 is now indicated The signal lamp lights up
once in cyan (parameter is active) or magenta (parameter is not active)
• Press the button briefly to change to the next parameter The number
of light impulses indicates the parameter number, the colour indicates
the parameter status (cyan = active, magenta = not active)
• Press and hold the button (25 seconds < T < 6 seconds) and the
status of the current parameter changes from ACTIVE to NOT ACTIVE
or from NOT ACTIVE to ACTIVE and is saved While the button is
pressed, the indicator changes after 15 seconds to a static indication
of the current parameter setting Pressing and holding the button
longer T > 25 seconds indicates the colour of the new status The
button can now be released to save If the button is pressed and held
for longer than 6 seconds, the indicator goes out and the change is
not accepted
• To exit parameterisation mode, switch the supply voltage off and
restore the original wiring
Transmitters and receivers can be configured simultaneously
with adapter cable KA-0977
Parameter P6 restart interlock only acts on the receiver
The parameter is only indicated on the transmitter
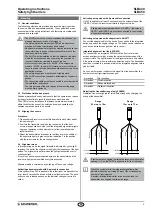
Parameter setting without adapter cable KA-0977
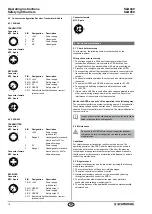
As an alternative to the adapter cable, a button can be connected as
follows:
Wiring configuration
Transmitter
Wiring configuration
Receiver
+24VDC
2
3
4
1
0
VDC
Range 1
Range 2
0 VDC
+24 VDC
2
4
3
1
5
+24VDC
0
VDC
OSSD 2
Authorised operation
+24 VDC
0 VDC
OSSD 1
2.8.4 Self-test
The AOPD carries out a self-test within 2 seconds after the power
supply is applied In the event of a fault, the AOPD is locked in the OFF
state and reports the status (see section on fault diagnosis)
After a successful self-test the AOPD switches to the ON state if the
protection zone is clear (automatic operating mode)
During operation, the system executes a cyclic self-test Safety-relevant
faults are detected within the reaction time and cause the outputs to be
put in the OFF state and an error code is indicated


