4
Operating instructions
Safety-monitoring module
SRB 202MSL
EN
5.3 Set-up instructions
According to DIN EN 61496-1 (paragraph A.7.2.2), a failure of the
signal light must cause a bridged condition to be avoided. The
signalling output L84 is used to avoid that the immediate activation of
the emergency stop function of the SRB 202MSL in case of failure of
only one of both muting lamps, so that the operator has the opportunity
to exchange the defective lamp in due time. This function increases
the availability of the system and prevents the shutdown of a relatively
expensive plant due to a simple lamp failure. To set this signalling
output, the following steps must be executed:
• Prior to switching the supply voltage (24 VDC) on, check the proper
connection of the SRB 202MSL and connect a muting lamp to the
outputs LA1 and LA2 (min. 150 mA, max. 500 mA).
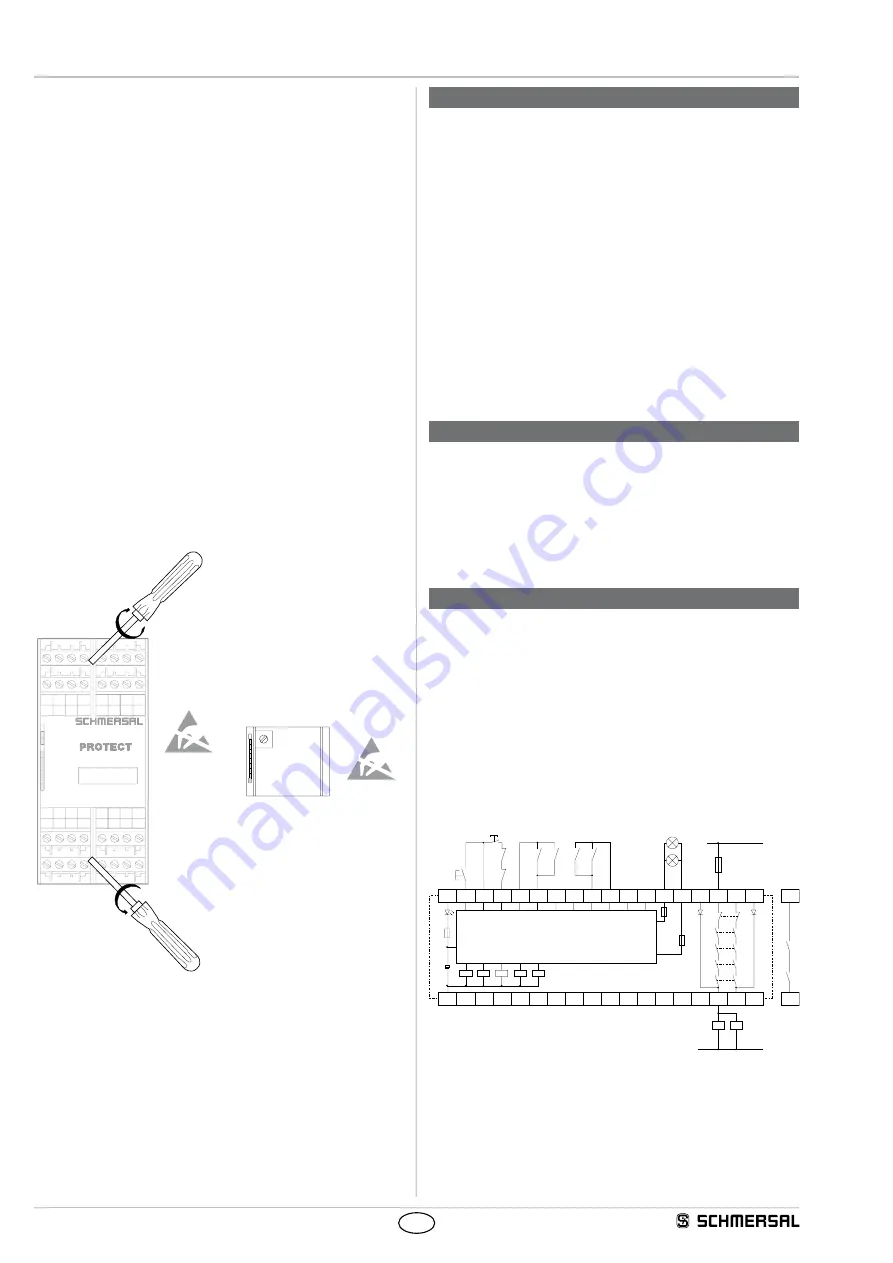
• The enclosure must be opened to set the signalling output L84. To
open the front cover, insert a slotted screwdriver in the top and bottom
cover notch and gently lift it (Fig. 2). When the front cover is open, the
electrostatic discharge requirements must be respected and observed.
After setting, the front cover must be fitted back in position.
• Bring the SRB 202MSL in muting condition (actuate the sensors S1
and S2 within the timeframe).
• Check if the muting lamp is on.
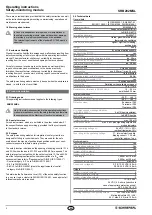
• Connect a voltmeter to output L84 and the 0V potential and turn
the lamp trimmer R1 (Fig. 3) until the signal condition of output L84
changes from 0V to 24V.
• Remove the muting lamp at the outputs LA1 and LA2. The signal
condition of output L84 changes to 0V. Reconnect the muting lamp.
• The set lamp current must be entered on the front cover.
U
B
U
i
K1
K2
K3
K4
K5
LA
A1 X1 X2 MR
S11 S12 S13
S22
S21
S23
X23 L84 X13
24
LA1 13 23 L54
LA2 14
A2
SRB 202MSL
L84: 0,24 A
U
B
U
i
K1
K2
K3
K4
K5
LA
A1 X1 X2 MR
S11 S12 S13
S22
S21
S23
X23 L84 X13
24
LA1 13 23 L54
LA2 14
A2
SRB 202MSL
L84: 0,24 A
R1
Fig. 2
Fig. 3
6. Set-up and maintenance
6.1 Functional testing
The safety function of the safety-monitoring module must be tested.
The following conditions must be previously checked and met:
1. Correct fixing
2. Check the integrity of the cable entry and connections
3. Check the safety-monitoring module's enclosure for damage.
4. Check the electrical function of the connected sensors and their
influence on the safety-monitoring module and the downstream
actuators
6.2 Maintenance
A regular visual inspection and functional test, including the following
steps, is recommended:
1. Check the correct fixing of the safety-monitoring module
2. Check the cable for damages
3. Check electrical function
Damaged or defective components must be replaced.
7. Disassembly and disposal
7.1 Disassembly
The safety-monitoring module must be disassembled in a de-energised
condition only.
7.2 Disposal
The safety-monitoring module must be disposed of in an appropriate
manner in accordance with the national prescriptions and legislations.
8. Appendix
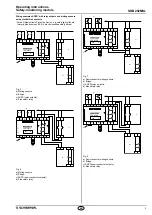
8.1 Wiring examples
Dual-channel control, shown for 2 muting sensors and an external
master reset button
J
(Fig. 4)
• Relay outputs: Suitable for 2-channel control, for increase in capacity
or number of contacts by means of contactors or relays with positive-
guided contacts.
• The control system recognises wire-breakage and earth faults in the
monitoring circuit.
• Cross-wire shorts between the monitoring circuits are detected.
• Electronic fuse F1: 1.25 A
•
S
= Feedback circuit
K4
K1
K2
K3
F1
A1
L
N
K
A
K
A
K1
K2
K3
K4
K5
K
A
K
B
S1
S
J
S2
S4
S3
A2
L54 LA1 LA2 X13
14
13
24
23
X23
a)
Master-
J
S11
+
–
+
–
S12 S13 S21 S22 S23 L84
MR
X1
X2
K
B
K5
K
B
F3
F2
Fig. 4:
b) Logic and lamp monitoring


